Deploying Cloudera Data Science Workbench 1.5.x on Hortonworks Data Platform
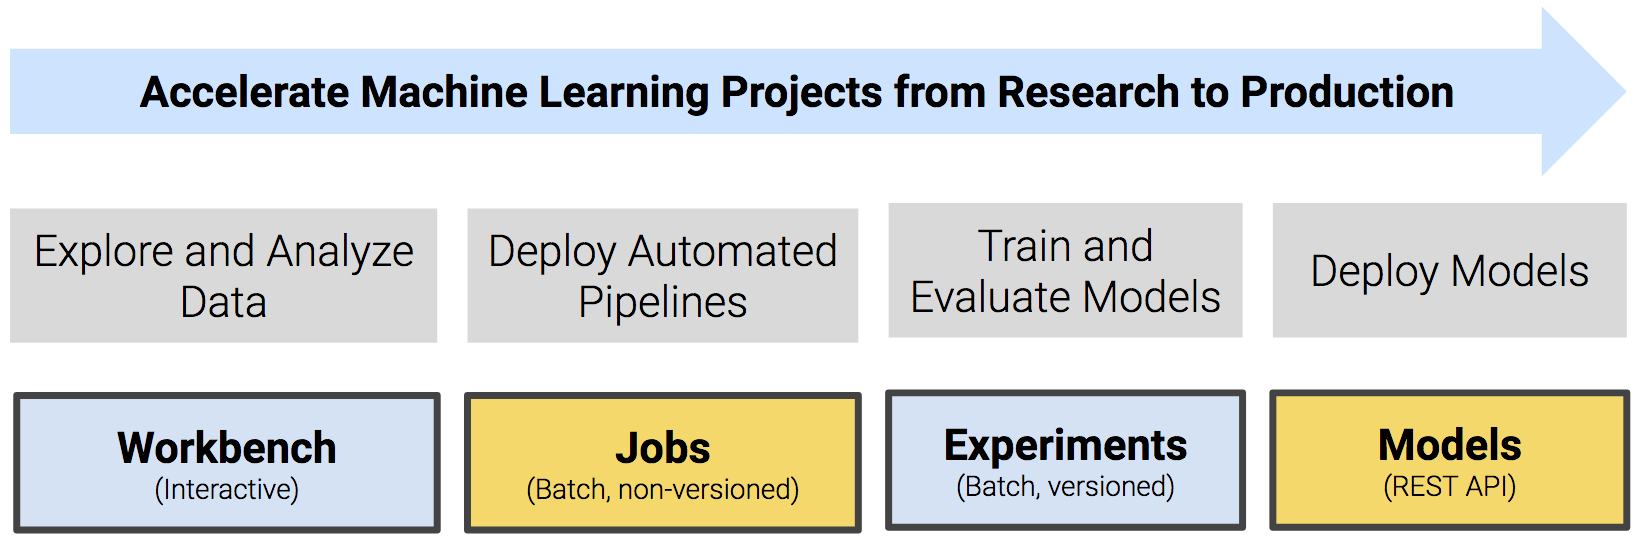
Cloudera Data Science Workbench is a secure, self-service enterprise data science platform that lets data scientists manage their own analytics pipelines, thus accelerating machine learning projects from exploration to production. It allows data scientists to bring their existing skills and tools, such as R, Python, and Scala, to securely run computations on data in Hadoop clusters. It enables data science teams to use their preferred data science packages to run experiments with on-demand access to compute resources. Models can be trained, deployed, and managed centrally for increased agility and compliance.
With version 1.5, Cloudera Data Science Workbench now includes direct integration with the Hortonworks Data Platform for a complete machine learning workflow that supports collaborative development and can run both in the public cloud and on-premises.
A detailed overview of the core capabilities of Cloudera Data Science Workbench is available here: Core Capabilities of Cloudera Data Science Workbench.
On this page:
The rest of this topic describes how Cloudera Data Science Workbench can be deployed on HDP. It walks you through a brief architecture overview, the installation requirements, and the limitations associated with such deployments. It also includes instructions on how to install the Cloudera Data Science Workbench package on HDP.
- CDSW-on-HDP Architecture Overview
- Supported Platforms and Requirements
- Known Issues and Limitations
- Installing Cloudera Data Science Workbench 1.5.x on HDP
- Getting Started with a New Project on Cloudera Data Science Workbench
- Upgrading a CDSW 1.5.x Deployment from HDP 2 to HDP 3
- Frequently Asked Questions (FAQs)
CDSW-on-HDP Architecture Overview
Cloudera Data Science Workbench runs on one or more dedicated gateway / edge hosts on HDP clusters. A gateway host is one that does not have any cluster services running on them. They only run the clients for cluster services (such as the HDFS Client, YARN Client, Spark2 Client and so on). These clients ensure that Cloudera Data Science Workbench has all the libraries and configuration files necessary to securely access the HDP cluster and their respective services.
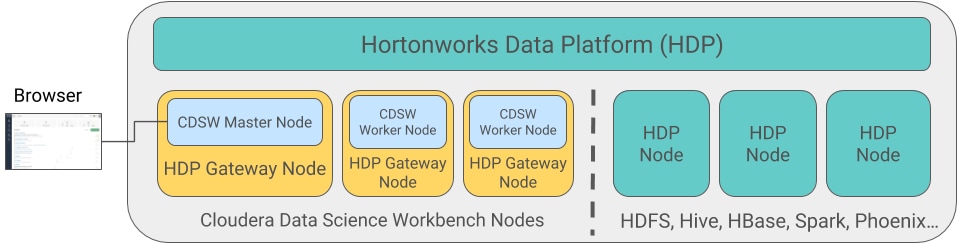
Cloudera Data Science Workbench does not support running any other services on these gateway hosts. Each gateway host must be dedicated solely to Cloudera Data Science Workbench. This is because user workloads require dedicated CPU and memory, which might conflict with other services running on these hosts.
From the gateway hosts assigned to Cloudera Data Science Workbench, one will serve as the master host, which also runs the CDSW web application, while others will serve as worker hosts. You should note that worker hosts are not required for a fully-functional Cloudera Data Science Workbench deployment. For proof-of-concept deployments you can deploy a 1-host cluster with just a Master host. The Master host can run user workloads just as a worker can.
Refer the following topics for more details on master and worker hosts, and the other components (such as engines for workload execution) that make up Cloudera Data Science Workbench.
Supported Platforms and Requirements
This topic lists the software and hardware configuration required to successfully install and run Cloudera Data Science Workbench on the Hortonworks Data Platform. Cloudera Data Science Workbench and HDP do not support hosts or clusters that do not conform to the requirements listed on this page.
Platform Requirements
Operating System Requirements
| Operating System | Versions | Notes |
|---|---|---|
| RHEL / CentOS / Oracle Linux RHCK | 7.2, 7.3, 7.4, 7.5 |
|
| Oracle Linux (UEK - default) | 7.3 | - |
Additional OS-level Settings
- Enable memory cgroups on your operating system.
- Disable swap for optimum stability and performance. For instructions, see Setting the vm.swappiness Linux Kernel Parameter.
- Cloudera Data Science Workbench uses uid 8536 for an internal service account. Make sure that this user ID is not assigned to any other service or user account.
- Cloudera recommends that all users have the max-user-processes ulimit set to at least 65536.
- Cloudera recommends that all users have the max-open-files ulimit set to 1048576.
Java Requirements
The entire cluster, including Cloudera Data Science Workbench gateway hosts, must use either Oracle JDK 8 or OpenJDK 8.
For Red Hat/CentOS deployments, Java Cryptography Extension (JCE) Unlimited Strength Jurisdiction must be enabled on the Cloudera Data Science Workbench gateway hosts. This is to ensure that JDK uses the same default encryption type (aes256-cts) as that used by Red Hat/CentOS operating systems, Kerberos, and the rest of the cluster. For instructions, see Installing the JCE on Ambari.
The JAVA_HOME configuration property must be configured as part of the CDSW installation process and must match the JAVA_HOME environmental variable configured for your HDP cluster. If you need to modify JAVA_HOME after the fact, restart the master and worker hosts to have the changes go into effect.
Network and Security Requirements
- All Cloudera Data Science Workbench gateway hosts must be part of the same datacenter and use the same network. Hosts from different data-centers or networks can result in unreliable performance.
- A wildcard subdomain such as *.cdsw.company.com must be configured. Wildcard subdomains are used to provide isolation for user-generated content.
- Disable all pre-existing iptables rules. While Kubernetes makes extensive use of iptables, it’s difficult to predict how
pre-existing iptables rules will interact with the rules inserted by Kubernetes. Therefore, Cloudera recommends you use the following commands to disable all pre-existing rules before you proceed
with the installation.
sudo iptables -P INPUT ACCEPT
sudo iptables -P FORWARD ACCEPT
sudo iptables -P OUTPUT ACCEPT
sudo iptables -t nat -F
sudo iptables -t mangle -F
sudo iptables -F
sudo iptables -X
- Cloudera Data Science Workbench sets the following sysctl options in /etc/sysctl.d/k8s.conf:
- net.bridge.bridge-nf-call-iptables=1
- net.bridge.bridge-nf-call-ip6tables=1
- net.ipv4.ip_forward=1
- SELinux must either be disabled or run in permissive mode.
- Multi-homed networks are supported with Cloudera Data Science Workbench.
- Firewall restrictions must be disabled across Cloudera Data Science Workbench or HDP hosts. Internally, the Cloudera Data Science Workbench master and worker hosts require full
connectivity with no firewalls. Externally, end users connect to Cloudera Data Science Workbench exclusively through a web server running on the master host, and, therefore, do not need direct access
to any other internal Cloudera Data Science Workbench or HDP services.
Review the complete list of ports required by Cloudera Data Science Workbench at Ports Used By Cloudera Data Science Workbench.
- Non-root SSH access is not allowed on Cloudera Data Science Workbench hosts.
- localhost must resolve to 127.0.0.1.
- Cloudera Data Science Workbench does not support DNS servers running on 127.0.0.1:53. This IP address resolves to the container localhost within Cloudera Data Science Workbench containers. As a workaround, use either a non-loopback address or a remote DNS server.
Cloudera Data Science Workbench does not support hosts or clusters that do not conform to these restrictions.
Hardware Requirements
Cloudera Data Science Workbench hosts are added to your cluster as gateway hosts. The table below lists the recommended minimum hardware configuration for Cloudera Data Science Workbench gateway hosts.
| Resource Type | Master | Workers | Notes |
|---|---|---|---|
| CPU | 16+ CPU (vCPU) cores | 16+ CPU (vCPU) cores | |
| RAM | 32+ GB | 32+ GB | |
| Disk Space | |||
| Root Volume | 100+ GB | 100+ GB |
If you are going to partition the root volume, make sure you allocate at least 20 GB to / so that the installer can proceed without running out of space. |
| Application Block Device | 1 TB | - |
The Application Block Device is only required on the Master where it is mounted to /var/lib/cdsw. You will be asked to create a /var/lib/cdsw directory on all the Worker hosts during the installation process. However, they do not need to be mounted to a block device. This directory is only used to store client configuration for HDP cluster services on Workers. |
| Docker Block Device | 1 TB | 1 TB | The Docker Block Device is required on all Master and Worker hosts. |
Python Supported Versions
The default Cloudera Data Science Workbench engine includes Python 2.7.11 and Python 3.6.1. To use PySpark within the HDP cluster, the Spark executors must have access to a matching version of Python. For many common operating systems, the default system Python will not match the minor release of Python included in Cloudera Data Science Workbench.
To ensure that the Python versions match, Python can either be installed on every HDP host or made available per job run using Spark’s ability to distribute dependencies. Given the size of a typical isolated Python environment and the desire to avoid repeated uploads from gateway hosts, Cloudera recommends installing Python 2.7 and 3.6 on the cluster if you are using PySpark with lambda functions.
You can install Python 2.7 and 3.6 on the cluster using any method and set the corresponding PYSPARK_PYTHON environment variable in your project. Cloudera Data Science Workbench includes a separate environment variable for Python 3 sessions called PYSPARK3_PYTHON. Python 2 sessions continue to use the default PYSPARK_PYTHON variable. This will allow you to run Python 2 and Python 3 sessions in parallel without either variable being overridden by the other.
Anaconda
-
Install the Anaconda package on all cluster hosts. For installation instructions, refer to the Anaconda installation documentation.
-
Set the ANACONDA_DIR property in the Cloudera Data Science Workbench configuration file: cdsw.conf. This can be done when you first configure cdsw.conf during the installation or later.
-
Restart Cloudera Data Science Workbench to have this change go into effect.
Known Issues and Limitations
- Cloudera Data Science Workbench cannot be managed by Apache Ambari.
- Apache Phoenix requires additional configuration to run commands successfully from within Cloudera Data Science Workbench engines (sessions, jobs, experiments, models).
Workaround: Explicitly set HBASE_CONF_PATH to a valid path before running Phoenix commands from engines.
export HBASE_CONF_PATH=/usr/hdp/hbase/<hdp_version>/0/
Installing Cloudera Data Science Workbench 1.5.x on HDP
Use the following steps to install the Cloudera Data Science Workbench RPM package on an HDP cluster.
Prerequisites
Before you begin installing Cloudera Data Science Workbench, perform the following steps to set up a wildcard DNS subdomain for CDSW, disable untrusted SSH access to the hosts, and configure the Application and Docker block devices.
Add Gateway Hosts for Cloudera Data Science Workbench to Your HDP Cluster
To add new hosts to act as Gateway hosts for your cluster:
-
Log in to the Ambari Server.
-
Go to the Hosts page and select .
-
On the Install Options page, enter the fully-qualified domain names for your new hosts.
The wizard also needs the private key file you created when you set up password-less SSH. Using the host names and key file information, the wizard can locate, access, and interact securely with all the hosts in the cluster. Alternatively, you can manually install and start the Ambari agents on all the new hosts.
Click Register and Confirm.
For more detailed instructions, refer to Install Options.
-
The Confirm Hosts page prompts you to confirm that Ambari has located the correct hosts for your cluster and to check those hosts to make sure they have the correct directories, packages, and processes required to continue the install. When you are satisfied with the list of hosts, click Next.
For detailed instructions, refer to Confirm Hosts.
-
On the Assign Slaves and Clients page, select the Clients that should be installed on the new hosts. To install clients on all hosts, select the Client checkbox for every host. You can use the all option for each available client to expedite this.
Make sure no other services are running on these hosts. To make this easier, select the none option for all other services.
- On the Configurations page, select the configuration groups for the new hosts.
-
The Review page displays the host assignments you have made. Check to make sure everything is correct. If you need to make changes, use the left navigation bar to return to the appropriate screen.
When you are satisfied with your choices, click Deploy.
-
The Install, Start and Test page displays progress as the clients are installed and deployed on each host. When the process is complete, click Next.
-
The Summary page provides you a list of the accomplished tasks. Click Complete and you will be directed back to the Hosts page.
Create HDFS User Directories
To run workloads that leverage HDP cluster services, make sure that HDFS directories (/user/<username>) are created for each user so that they can seamlessly connect to HDP from Cloudera Data Science Workbench.
-
SSH to a host in the cluster that includes the HDFS client.
-
Switch to the hdfs system account user:
su - hdfs
-
Create an HDFS directory for the user. For example, you would create the following directory for the default user admin:
hdfs dfs -mkdir /user/admin
-
Assign ownership of the new directory to the user. For example, for the new /user/admin directory, make the admin user the owner of the directory:
hdfs dfs -chown admin:hadoop /user/admin
Install Cloudera Data Science Workbench on the Master Host
Use the following steps to install Cloudera Data Science Workbench on the master host. Note that airgapped clusters and non-airgapped clusters use different files for installation.
-
Download Cloudera Data Science Workbench:
Red Hat 7 Repository File RPM For non-airgapped installations, download this file and save it to /etc/yum.repos.d/:
For airgapped installations, download the Cloudera Data Science Workbench RPM file:
-
Skip this step for airgapped installations. The Cloudera Public GPG repository key verifies that you are downloading genuine packages. Add the repository key:
sudo rpm --import https://archive.cloudera.com/cdsw1/1.5.0/redhat7/yum/RPM-GPG-KEY-cloudera
-
Non-airgapped Installation - Install the latest RPM with the following command:
sudo yum install cloudera-data-science-workbench
Air-gapped Installation - Copy the RPM to the appropriate gateway host and use the complete filename to install the package. For example:For guidance on any warnings displayed during the installation process, see Understanding Installation Warnings.sudo yum install cloudera-data-science-workbench-1.5.0.12345.rpm
-
Edit the configuration file at /etc/cdsw/config/cdsw.conf. The following table lists the configuration properties that can be configured in cdsw.conf.
cdsw.conf Properties Properties Description Required Configuration DOMAIN
Wildcard DNS domain configured to point to the master host.
If the wildcard DNS entries are configured as cdsw.<your_domain>.com and *.cdsw.<your_domain>.com, then DOMAIN should be set to cdsw.<your_domain>.com. Users' browsers should then contact the Cloudera Data Science Workbench web application at http://cdsw.<your_domain>.com.
This domain for DNS and is unrelated to Kerberos or LDAP domains.
MASTER_IP
IPv4 address for the master host that is reachable from the worker hosts.
Within an AWS VPC, MASTER_IP should be set to the internal IP address of the master host; for instance, if your hostname is ip-10-251-50-12.ec2.internal, set MASTER_IP to the corresponding IP address, 10.251.50.12.
DISTRO
The Hadoop distribution installed on the cluster. Set this property to HDP.
DOCKER_BLOCK_DEVICES
Block device(s) for Docker images (space separated if there are multiple).
Use the full path to specify the image(s), for instance, /dev/xvde.
JAVA_HOME
Path where Java is installed on the Cloudera Data Science Workbench hosts.
This path must match the JAVA_HOME environment variable that is configured for your HDP cluster. You can find the value in hadoop-env.sh on any node in the HDP cluster.
Note that Spark 2.3 requires JDK 1.8. For more details on the specific versions of Oracle JDK recommended for HDP clusters, see the Hortonworks Support Matrix - https://supportmatrix.hortonworks.com/.
Optional Configuration APPLICATION_BLOCK_DEVICE
(Master Host Only) Configure a block device for application state.
If this property is left blank, the filesystem mounted at /var/lib/cdsw on the master host will be used to store all user data. For production deployments, Cloudera strongly recommends you use this option with a dedicated SSD block device for the /var/lib/cdsw mount.
(Not recommended) If set, Cloudera Data Science Workbench will format the provided block device as ext4, mount it to /var/lib/cdsw, and store all user data on it. This option has only been provided for proof-of-concept setups, and Cloudera is not responsible for any data loss.
Use the full path to specify the mount point, for instance, /dev/xvdf.
RESERVE_MASTER
Set this property to true to reserve the master host for Cloudera Data Science Workbench's internal components and services, such as Livelog, the PostgreSQL database, and so on. User workloads will now run exclusively on worker hosts, while the master is reserved for internal application services.
DISTRO_DIR
Path where the Hadoop distribution is installed on the Cloudera Data Science Workbench hosts. For HDP clusters, the default location of the packages is /usr/hdp. Specify this property only if you are using a non-default location.
ANACONDA_DIR
Path where Anaconda is installed. Set this property only if you are using Anaconda for package management.
By default, the Anaconda package is installed at: /home/<your-username>/anaconda<2 or 3>. Refer to the Anaconda FAQs for more details.
If you choose to start using Anaconda anytime post-installation, you must set this property and then restart Cloudera Data Science Workbench to have this change take effect.
TLS_ENABLE
Enable and enforce HTTPS (TLS/SSL) for web access.
Set to true to enable and enforce HTTPS access to the web application.
You can also set this property to true to enable external TLS termination. For more details on TLS termination, see Enabling TLS/SSL for Cloudera Data Science Workbench.
TLS_CERT
TLS_KEY
Certificate and private key for internal TLS termination.
Setting TLS_CERT and TLS_KEY will enable internal TLS termination. You must also set TLS_ENABLE to true above to enable and enforce internal termination. Set these only if you are not terminating TLS externally.
Make sure you specify the full path to the certificate and key files, which must be in PEM format.
For details on certificate requirements and enabling TLS termination, see Enabling TLS/SSL for Cloudera Data Science Workbench.
HTTP_PROXY
HTTPS_PROXY
If your deployment is behind an HTTP or HTTPS proxy, set the respective HTTP_PROXY or HTTPS_PROXY property in /etc/cdsw/config/cdsw.conf to the hostname of the proxy you are using.HTTP_PROXY="<http://proxy_host>:<proxy-port>" HTTPS_PROXY="<http://proxy_host>:<proxy_port>"
If you are using an intermediate proxy, such as Cntlm, to handle NTLM authentication, add the Cntlm proxy address to the HTTP_PROXY or HTTPS_PROXY fields in cdsw.conf.HTTP_PROXY="http://localhost:3128" HTTPS_PROXY="http://localhost:3128"
If the proxy server uses TLS encryption to handle connection requests, you will need to add the proxy's root CA certificate to your host's store of trusted certificates. This is because proxy servers typically sign their server certificate with their own root certificate. Therefore, any connection attempts will fail until the Cloudera Data Science Workbench host trusts the proxy's root CA certificate. If you do not have access to your proxy's root certificate, contact your Network / IT administrator.
To enable trust, copy the proxy's root certificate to the trusted CA certificate store (ca-trust) on the Cloudera Data Science Workbench host.cp /tmp/<proxy-root-certificate>.crt /etc/pki/ca-trust/source/anchors/
Use the following command to rebuild the trusted certificate store.update-ca-trust extract
ALL_PROXY
If a SOCKS proxy is in use, set to socks5://<host>:<port>/.
NO_PROXY
Comma-separated list of hostnames that should be skipped from the proxy.
Starting with version 1.4, if you have defined a proxy in the HTTP_PROXY(S) or ALL_PROXY properties, Cloudera Data Science Workbench automatically appends the following list of IP addresses to the NO_PROXY configuration. Note that this is the minimum required configuration for this field.
This list includes 127.0.0.1, localhost, and any private Docker registries and HTTP services inside the firewall that Cloudera Data Science Workbench users might want to access from the engines.
"127.0.0.1,localhost,100.66.0.1,100.66.0.2,100.66.0.3,
100.66.0.4,100.66.0.5,100.66.0.6,100.66.0.7,100.66.0.8,100.66.0.9,
100.66.0.10,100.66.0.11,100.66.0.12,100.66.0.13,100.66.0.14,
100.66.0.15,100.66.0.16,100.66.0.17,100.66.0.18,100.66.0.19,
100.66.0.20,100.66.0.21,100.66.0.22,100.66.0.23,100.66.0.24,
100.66.0.25,100.66.0.26,100.66.0.27,100.66.0.28,100.66.0.29,
100.66.0.30,100.66.0.31,100.66.0.32,100.66.0.33,100.66.0.34,
100.66.0.35,100.66.0.36,100.66.0.37,100.66.0.38,100.66.0.39,
100.66.0.40,100.66.0.41,100.66.0.42,100.66.0.43,100.66.0.44,
100.66.0.45,100.66.0.46,100.66.0.47,100.66.0.48,100.66.0.49,
100.66.0.50,100.77.0.10,100.77.0.128,100.77.0.129,100.77.0.130,
100.77.0.131,100.77.0.132,100.77.0.133,100.77.0.134,100.77.0.135,
100.77.0.136,100.77.0.137,100.77.0.138,100.77.0.139"
NVIDIA_GPU_ENABLE
Set this property to true to enable GPU support for Cloudera Data Science Workbench workloads. When this property is enabled on a host is equipped with GPU hardware, the GPU(s) will be available for use by Cloudera Data Science Workbench hosts.
If this property is set to true on a host that does not have GPU support, there will be no effect. By default, this property is set to false.
For detailed instructions on how to enable GPU-based workloads on Cloudera Data Science Workbench, see Using NVIDIA GPUs for Cloudera Data Science Workbench Projects.
NVIDIA_LIBRARY_PATH
Complete path to the NVIDIA driver libraries.
-
Initialize and start Cloudera Data Science Workbench:
cdsw init
The application will take a few minutes to bootstrap. You can watch the status of application installation and startup with watch cdsw status.
(Optional) Install Cloudera Data Science Workbench on Worker Hosts
Cloudera Data Science Workbench supports adding and removing additional worker hosts at any time. Worker hosts allow you to transparently scale the number of concurrent workloads users can run.
-
Download Cloudera Data Science Workbench:
Red Hat 7 Repository File RPM For non-airgapped installations, download this file and save it to /etc/yum.repos.d/:
For airgapped installations, download the Cloudera Data Science Workbench RPM file:
-
Skip this step for airgapped installations. The Cloudera Public GPG repository key verifies that you are downloading genuine packages. Add the repository key:
sudo rpm --import https://archive.cloudera.com/cdsw1/1.5.0/redhat7/yum/RPM-GPG-KEY-cloudera
-
Non-airgapped Installation - Install the latest RPM with the following command:
sudo yum install cloudera-data-science-workbench
Air-gapped Installation - Copy the RPM to the appropriate gateway host and use the complete filename to install the package. For example:For guidance on any warnings displayed during the installation process, see Understanding Installation Warnings.sudo yum install cloudera-data-science-workbench-1.5.0.12345.rpm
-
Copy cdsw.conf file from the master host:
scp root@<cdsw-master-hostname.your_domain.com>:/etc/cdsw/config/cdsw.conf /etc/cdsw/config/cdsw.conf
After initialization, the cdsw.conf file includes a generated bootstrap token that allows worker hosts to securely join the cluster. You can get this token by copying the configuration file from master and ensuring it has 600 permissions.
If your hosts have heterogeneous block device configurations, modify the Docker block device settings in the worker host configuration file after you copy it. Worker hosts do not need application block devices, which store the project files and database state, and this configuration option is ignored.
-
Create /var/lib/cdsw on the worker host. This directory must exist on all worker hosts. Without it, the next step that registers the worker host with the master will fail.
Unlike the master host, the /var/lib/cdsw directory on worker hosts does not need to be mounted to an Application Block Device. It is only used to store client configuration for HDP services on workers.
-
On the worker host, run the following command to add the host to the cluster:
cdsw join
This causes the worker hosts to register themselves with the Cloudera Data Science Workbench master host and increase the available pool of resources for workloads.
-
Return to the master host and verify the host is registered with this command:
cdsw status
Create the Site Administrator Account
Installation typically takes 30 minutes although it might take an additional 60 minutes for the R, Python, and Scala engine to be available on all hosts.
After installation is complete, go to the Cloudera Data Science Workbench web application at http://cdsw.<your_domain>.com.
Sign up for a new account. The first account that you create becomes the site administrator. As a site administrator, you can invite new users, secure the deployment, and upload a license key for the product. For more details on these tasks, see the Administration and Security guides.
Getting Started with a New Project on Cloudera Data Science Workbench
To sign up, open the Cloudera Data Science Workbench web application in a browser. The application is typically hosted on the master host at http://cdsw.<your_domain>.com. The first time you log in, you will be prompted to create a username and password. Note that if your site administrator has configured your deployment to require invitations, you will need an invitation link to sign up.
You can use this account to create a new project and start using the workbench to run data science workloads. Watch the following video for a quick demo (demo starts at 00:30):
Related Documentation:
- Creating and Managing Projects
- Collaborating on Projects
- Accessing Data from HDFS, Hive, HBase, etc.
- Model Training and Deployment: Experiments, Models
Upgrading a CDSW 1.5.x Deployment from HDP 2 to HDP 3
Cloudera Data Science Workbench ships a single RPM that can be used to install CDSW on both, HDP 2, and HDP 3 clusters. The upgrade path for RPM deployments is:
-
Upgrade from HDP 2.6.5 (or higher) to HDP 3.1.x (or higher).
-
Restart Cloudera Data Science Workbench. Check Ambari to ensure that there are no more stale configs on the cluster hosts.
Frequently Asked Questions (FAQs)
Does CDSW-on-HDP require a license key?
Cloudera Data Science Workbench is fully functional during a 60-day, non-renewable trial period. The trial period starts when you create your first user. When the 60-day period ends, functionality will be limited. You will not be able to create any new projects or schedule any more workloads.
At this point, you must obtain a Cloudera Enterprise license and upload it to Cloudera Data Science Workbench. Cloudera Data Science Workbench will then go back to being fully functional.
For details, see Managing License Keys for Cloudera Data Science Workbench.
How do I file a support case for CDSW-on-HDP?
If you have encountered an issue, you can create a support ticket in the Cloudera Support portal.
cdsw logs
You can also use SmartSense to collect diagnostic data and cluster metrics from Ambari.