Creating a Cluster
Before You Deploy Cloudera Manager and CDH
This topic describes how to set up Cloudera Manager and a CDH cluster in Microsoft Azure using the Cloudera Director web UI. The following resources must be created and prerequisites must be met
before beginning the deployment:
- An AD application and a service principal for the AD application. The AD application must have the contributor or similar role so that it has permission to create and delete resources in the subscription.
- A virtual network and network security group that is readily available for the cluster to use.
- The virtual network configured to use a customer-provided DNS service that supports reverse lookup. If using the provided DNS service setup guide, the VM that provides the DNS service must be created and running.
- Resource group to house cluster VMs.
- An availability set created in corresponding resource groups to house cluster VMs.
- Cloudera Director server VM.
- Cloudera Director server installed and running.
- Cloudera Director server access to the Azure virtual network (VNet).
- Database server that is readily available and reachable from the VNet to be used by cluster nodes.
Details of setting up individual items above is covered in earlier sections.
Deploying Cloudera Manager and CDH on Microsoft Azure
To deploy Cloudera Manager and CDH on an Azure VM instance, begin by creating an environment. The environment defines common settings, like region and key pair, that Cloudera Director uses with Azure. While creating an environment, you are also prompted to deploy its first cluster.
To create an environment:
- Open a web browser and go to the private IP address of the instance you created running Cloudera Director server. Include port 7189 in the address, for example: http://192.0.2.0:7189.
- In the Cloudera Director login screen, enter admin in both the Username and the Password fields.
- In the Cloudera Director Welcome screen, click Let's get started. This opens a wizard for adding an environment, Cloudera Manager, and a CDH cluster.
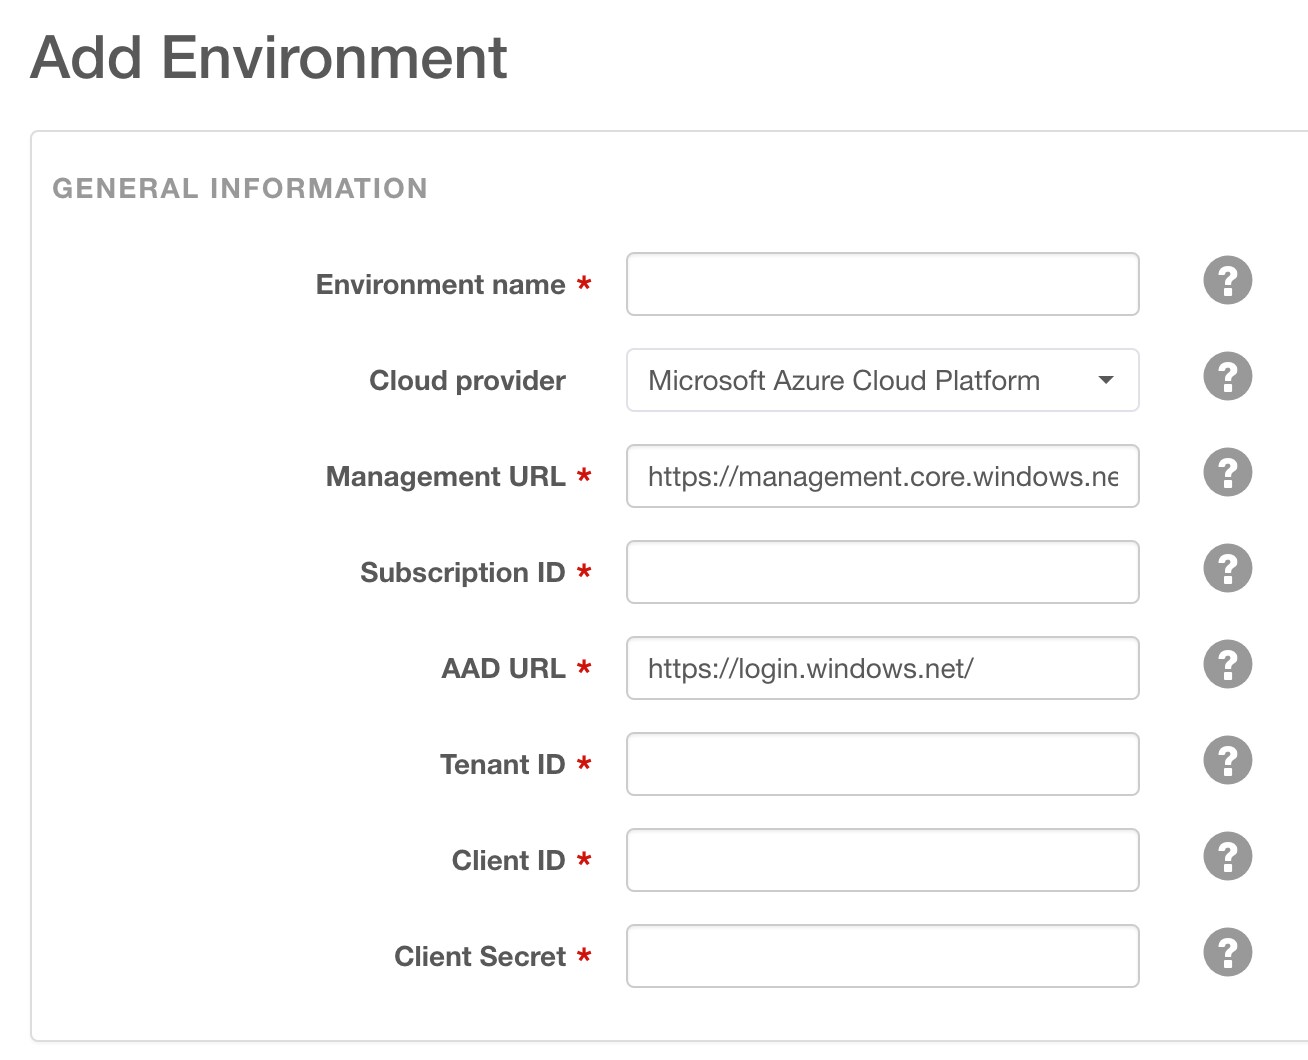
- In the Add Environment screen:
- Enter a name in the Environment Name field.
- In the Cloud provider field, select Azure Cloud Platform.
- In the Management URL field, enter the Azure management URL provided by Microsoft. You do not need to change the default value unless you are in an Azure region that uses a different URL.
- In the Subscription ID field, enter the Azure subscription ID.
- In the AAD URL field, enter the Azure Active Directory (AAD) URL provided by Microsoft. You do not need to change the default value unless you are in an Azure region that uses a different URL.
- In the Tenant ID field, enter the ID of your ADD tenant. See Obtain Obtaining Credentials for Cloudera Director for details on obtaining the AAD tenant ID.
- In the Client ID field, enter the client ID of the Azure service principal you created earlier. See Obtaining Credentials for Cloudera Director for details on obtaining the client ID.
- In the Client Secret field, enter the client secret of the Azure service principal you created earlier. See Obtaining Credentials for Cloudera Director for details on obtaining the client secret.
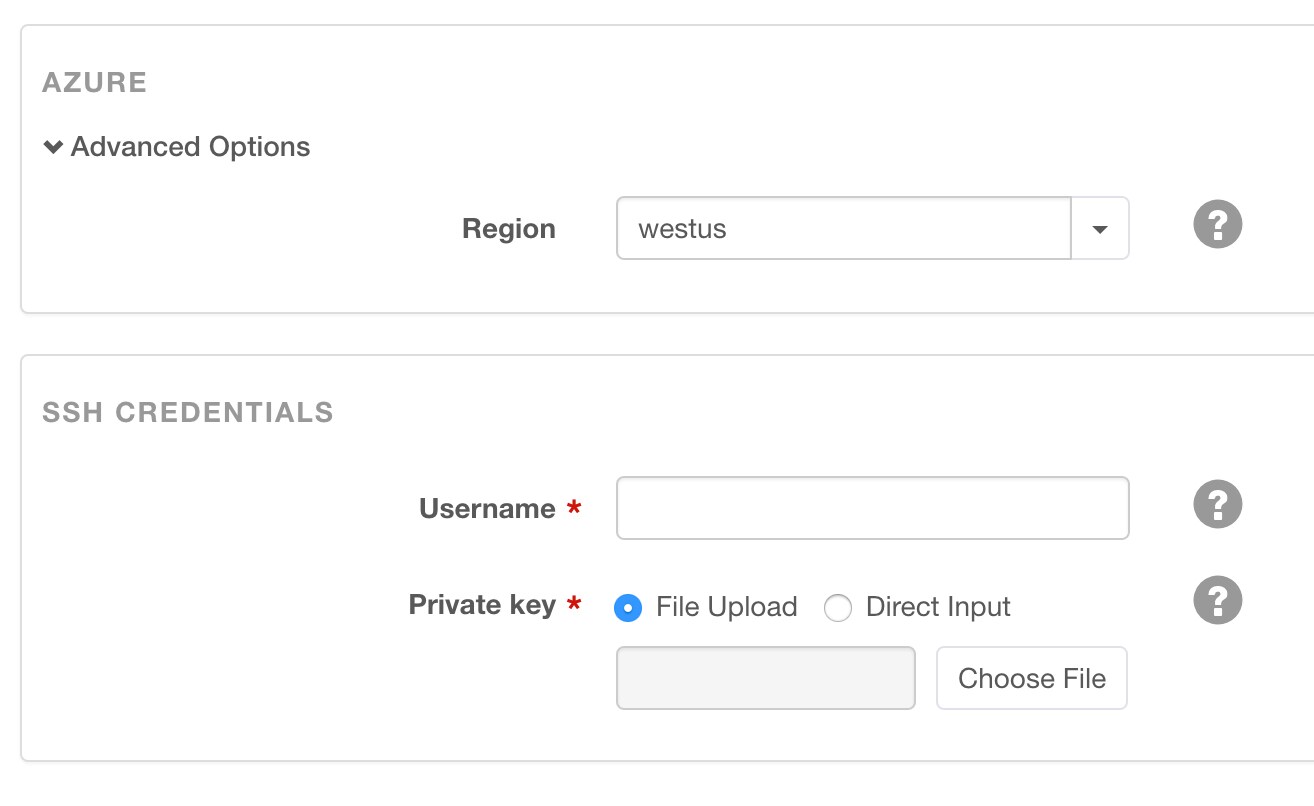
- In the Advanced Options area, select the Azure region where your cluster is located from the drop down list.
- In the Advanced Options section, enter the Azure region where your Cloudera Director instance is located.
- In the SSH Credentials section:
- Enter a username in the Username field. Azure creates the user specified here.
- Create an SSH key with the following command:
ssh-keygen -f ~/.ssh/my_azure_vm_keyname -t rsa
- Copy the SSH private key into the Private key field. Cloudera Director uses the SSH key pairs to create and access VMs in Azure.
- Click Continue to add Cloudera Manager.
- In the Add Cloudera Manager screen:
- Enter a name for this deployment of Cloudera Manager in the Cloudera Manager name field.
- In the Instance Template field, select Create New Instance Template.
- The Instance Template model screen displays.
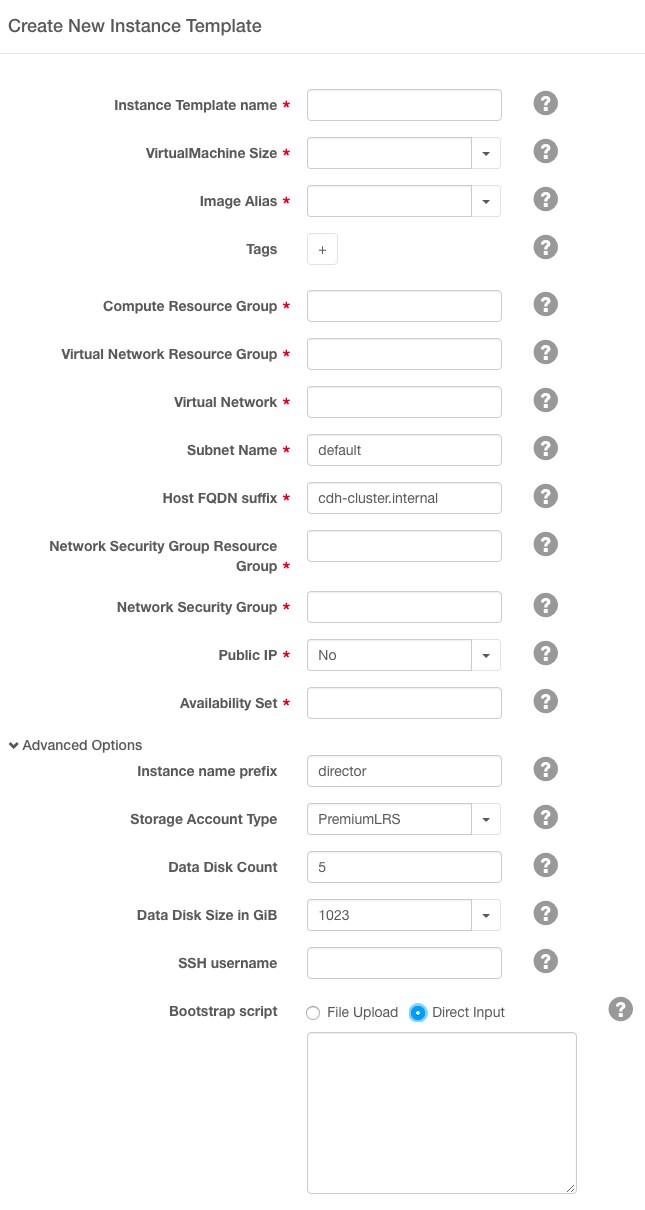
- In the Instance Template model screen:
- In the Instance Template name field, enter a name for the template.
- In the VirtualMachine Size field, select one of the available sizes.
- In the Image Alias field, select one of the available images.
- In the Tags field, add one or more tags to associate with the instance.
- In the Compute Resource Group field, enter the name of the resource group you created earlier to house the VM.
- In the Virtual Network Resource Group field, enter the name where the virtual network resource resides.
- In the Virtual Network field, enter the name of the virtual network.
- In the Subnet Name field, enter the name of the subnet you want to use.
- In the Host FQDN suffix field, enter the name of the host FQDN suffix you want your cluster host to use. This is the DNS domain of your cluster hosts.
- In the Network Security Group Resource Group field, enter the name of the resource group where the network security group resource resides.
- In the Network Security Group field, enter the name of the network security group.
- Select Yes in the Public IP field if you want to assign a public IP address to the VM. The default value is No.
- In the Availability Set field, enter the name of the availability set you created in earlier steps.
- In the Instance name prefix field under Advanced Options, enter the desired instance name prefix.
- In the Storage Account Type field, select PremiumLRS. For instance templates intended for worker nodes, you can select StandardLRS. See the Cloudera Reference Architecture for Microsoft Azure Deployments for details on supported storage account types and configurations.
- In the Data Disk Count field in Advanced Options, enter the number of data disks to attach for the VM.
- In the Data Disk Size in GiB field, select 1023.
- Leave the SSH username field blank to use the username you set at step 4.k above.
- In the Bootstrap script field in Advanced Options, paste or upload the desired custom bootstrap script.
- In the Desired License Type field, select one of the following license types:
- Cloudera Enterprise: Includes the core CDH services (HDFS, Hive, Hue, MapReduce, Oozie, Sqoop, YARN, and ZooKeeper) and, depending on the license edition, one or more additional services (Accumulo, HBase, Impala, Navigator, Solr, or Spark). For more information on Cloudera Enterprise licenses, see Managing Licenses in the Cloudera Manager documentation.
- Cloudera Enterprise Trial: A 60-day trial license that includes all CDH services.
- Cloudera Express: No license required.
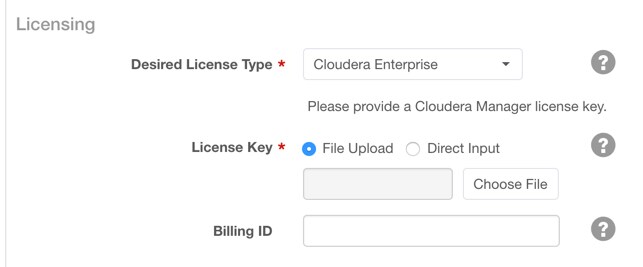
To enable usage-based billing, you must have a Cloudera Enterprise license and a billing ID provided by Cloudera. In the Add Cloudera Manager screen:- In the Desired License Type field, select Cloudera Enterprise.
- In the License Key field, either select a Cloudera Enterprise license file to upload or select Direct Input and input the license file text directly into the text area.
- To enable usage-based billing, in the Billing ID field, enter the billing ID provided by Cloudera.
- By default, the version of Cloudera Manager installed depends on the version of Cloudera Director you are using:
To install a version of Cloudera Manager higher or lower than the default version, perform the following steps:
Cloudera Director version Cloudera Manager version installed Cloudera Director 2.0 Latest released version of Cloudera Manager 5.5 Cloudera Director 2.1 Latest released version of Cloudera Manager 5.7 Cloudera Director 2.2 Latest released version of Cloudera Manager 5.8 Cloudera Director 2.3 Latest released version of Cloudera Manager 5.10 - In the Configurations section, check Override default Cloudera Manager repository.
- In the Repository URL field, enter the repository URL for the version of Cloudera Manager to install. Repository URLs for versions of Cloudera Manager 5 have the form http://archive.cloudera.com/cm5/ followed by the operating system, operating system major version, processor architecture, cm (for Cloudera Manager), and the Cloudera Manager major, minor, and (if applicable) maintenance release number. For example, for Cloudera Manager 5.5.4, the repository URL is http://archive.cloudera.com/cm5/redhat/7/x86_64/cm/5.5.4/.
- In the Repository Key URL field, enter the URL for the repository key. Repository key URLs have the same form as repository URLs except they end with the name of the key file instead of the Cloudera Manager version. For example, the repository key URL for any version of Cloudera Manager 5 on any supported version of Red Hat 7 is http://archive.cloudera.com/cm5/redhat/7/x86_64/cm/RPM-GPG-KEY-cloudera.
- In the Add Cloudera Manager screen, click Continue.
- At the Confirmation prompt, click OK to begin adding a cluster.
- On the Add Cluster screen:
- Enter a name for the cluster in the Cluster name field.
- Enter the version of CDH to deploy in the Version field, or leave the default value. By default, the version of CDH installed depends on the version
of Cloudera Director you are using:
To install a version of CDH higher or lower than the default version, perform the following steps:
Cloudera Director version CDH version installed Cloudera Director 2.0 Latest released version of CDH 5.5 Cloudera Director 2.1 Latest released version of CDH 5.7 Cloudera Director 2.2 Latest released version of CDH 5.9 Cloudera Director 2.3 Latest released version of CDH 5.10 - Enter the desired CDH version in the Version field of the Products section. For example, for CDH 5.4.8, enter 5.4.8.
- Scroll down to Configurations (optional) and expand the section.
- Click Override default parcel repositories.
- Enter the repository parcel URL for the version of CDH you want to install. Parcel URLs for versions of CDH 5 have the form http://archive.cloudera.com/cdh5/parcels/, followed by the major, minor, and (if applicable) maintenance release number. For example, the URL for CDH 5.4.8 is http://archive.cloudera.com/cdh5/parcels/5.4.8.
- In the Services section, select the services you want to install.
- In the Instance groups area, create a new template for the groups or for each group and the number of instances you want.
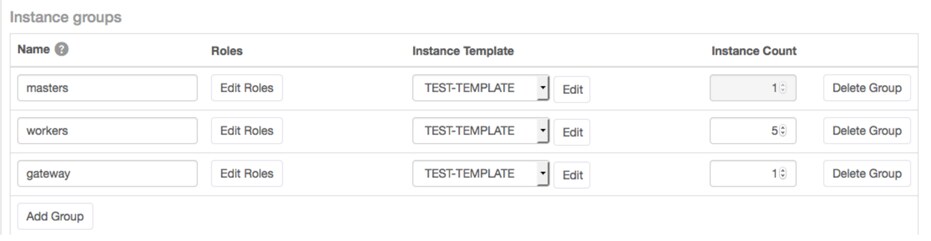
- Click Continue.
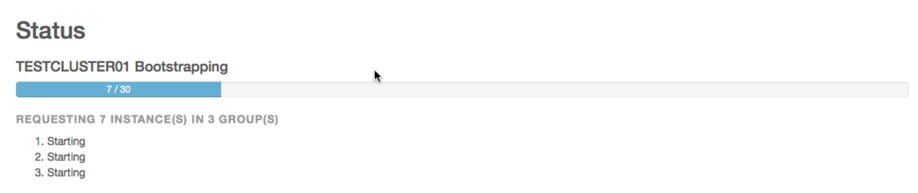
- At the confirmation prompt, click OK to deploy the cluster. Cloudera Director displays a status screen.
- When the cluster is ready, click Continue.
Cleaning Up Your Azure Deployment
When you are done testing or using Cloudera Director, terminate your instances to stop incurring charges to your Azure account.
- In Cloudera Director, terminate each instance in your clusters.
- Click an environment name.
- In the Actions column, select Terminate Cluster.
- Repeat for each environment you configured.
- To save anything in Cloudera Director (the configuration file or database, for example), back it up.
- In the Azure web UI, terminate the Cloudera Director instance and any other instance Cloudera Director was unable to terminate.
- If applicable, terminate any external database you configured Cloudera Director to use.