Deploying Cloudera Manager and CDH on Google Compute Engine
To deploy Cloudera Manager and CDH on an Google Compute VM instance, begin by creating an environment. The environment defines common settings, like region and key pair, that Cloudera Director uses with Google Cloud Platform. While creating an environment, you are also prompted to deploy its first cluster.
To create an environment:
- Open a web browser and go to the private IP address of the instance you created in Creating a Google Compute Engine VM
Instance. Include port 7189 in the address. For example:
http://192.0.2.0:7189
- In the Cloudera Director login screen, enter admin in both the Username and the Password fields.
- In the Cloudera Director Welcome screen, click Let's get started.
This opens a wizard for adding an environment, adding Cloudera Manager, and adding a CDH cluster.
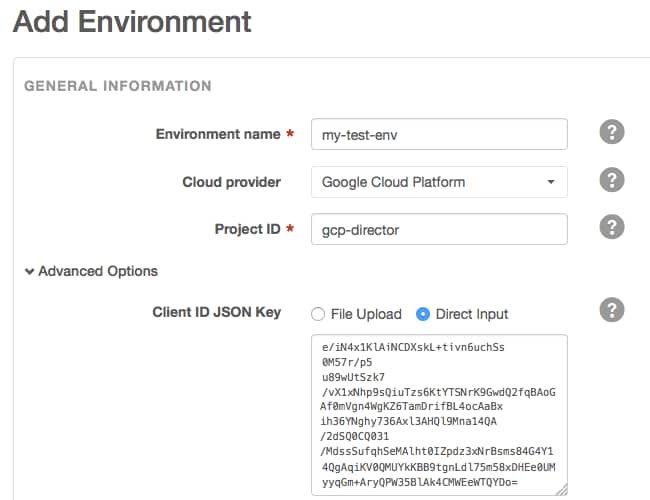
- In the Add Environment screen:
- Enter a name in the Environment Name field.
- In the Cloud provider field, select Google Cloud Provider.
- In the Project ID field, enter the ID for the project you created in Creating a Google Cloud Platform Project.
- In the Advanced Options area, upload or copy the JSON key to the Client ID JSON Key field. You created this key in
Configuring Tools for Your Google Cloud Platform Account.
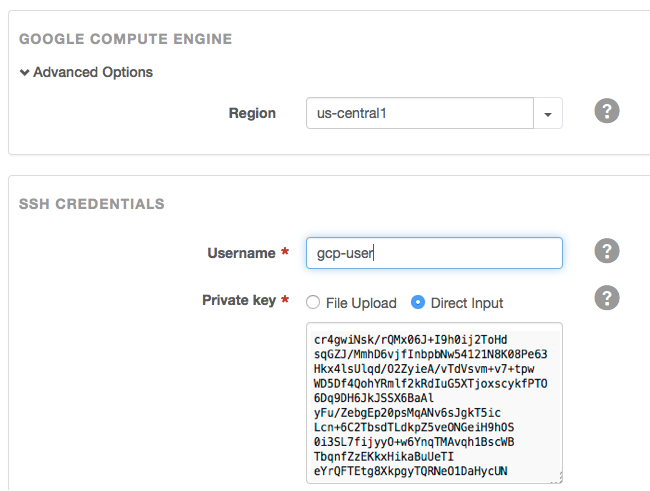
- In the Advanced Options section, enter the same region that your Cloudera Director instance was created in.
- In the SSH Credentials section:
- Enter a username in the Username field. Google Compute will create the user specified here.
- Copy the SSH private key you created in Creating and Uploading an SSH Key in the Private key field.
- Click Continue to add Cloudera Manager.
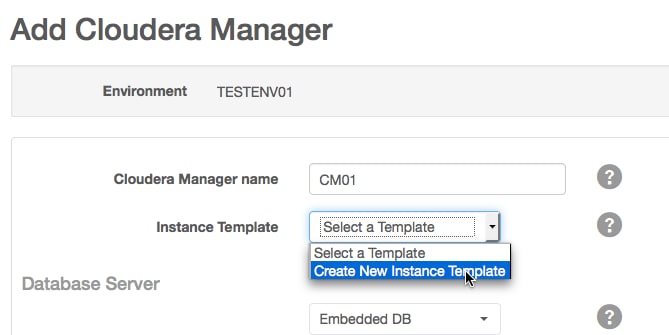
- In the Add Cloudera Manager screen:
- Enter a name for this deployment of Cloudera Manager in the Cloudera Manager name field.
- In the Instance Template field, select Create New Instance Template.
The Instance Template modal screen displays.
- In the Instance Template modal screen, do the following:
- In the Instance Template name field, enter a name for the template.
- In the Instance type field, select n1-highmem-4 or n1-highmem-8.
- In the Machine type field, enter the machine type you chose in Creating a Google Compute Engine VM Instance.
- In the Tags field, add one or more tags to associate with the instance.
- Click Save changes.
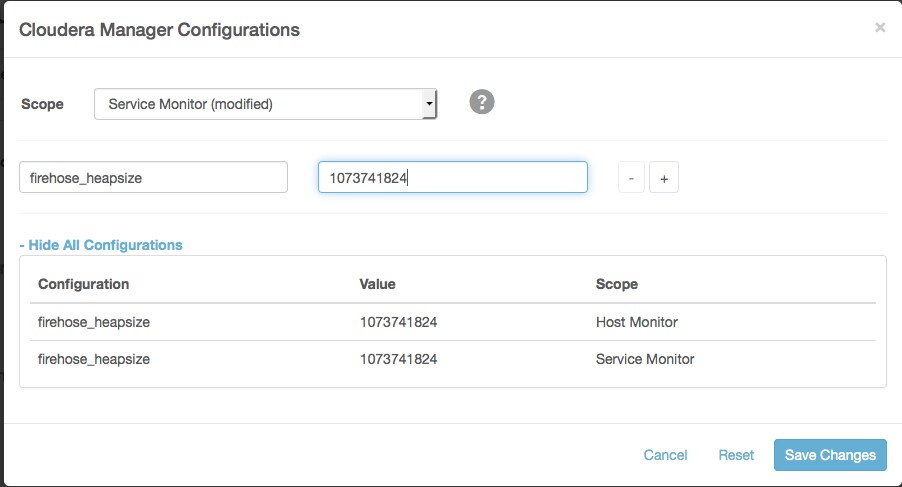
- In the Add Cloudera Manager screen, click Cloudera Manager Configurations.
The Cloudera Manager Configurations modal screen displays.
- In the Cloudera Manager Configurations modal screen, set the heap size:
- In the Scope field, select Host Monitor and add firehose_heapsize and 1073741824 in the respective Name and Value fields.
- Click +.
- In the Scope field, select Service Monitor and add firehose_heapsize and 1073741824 in the respective Name and Value fields.
- Click Save Changes.
- By default, the version of Cloudera Manager installed depends on the version of Cloudera Director you are using:
- If you are using Cloudera Director 2.0, the latest released version of Cloudera Manager 5.5 is installed by default.
- If you are using Cloudera Director 2.1, the latest released version of Cloudera Manager 5.7 is installed by default.
- If you are using Cloudera Director 2.2, the latest released version of Cloudera Manager 5.9 is installed by default.
- If you are using Cloudera Director 2.3, the latest released version of Cloudera Manager 5.10 is installed by default.
- In the Configurations section, check Override default Cloudera Manager repository.
- In the Repository URL field, enter the repository URL for the version of Cloudera Manager to install. Repository URLs for versions of Cloudera Manager 5 have the form http://archive.cloudera.com/cm5/ followed by the operating system, operating system major version, processor architecture, cm (for Cloudera Manager), and the Cloudera Manager major, minor, and (if applicable) maintenance release number. For example, for Cloudera Manager 5.5.4, the repository URL is http://archive.cloudera.com/cm5/redhat/7/x86_64/cm/5.5.4/.
- In the Repository Key URL field, enter the URL for the repository key. Repository key URLs have the same form as repository URLs except they end with the name of the key file instead of the Cloudera Manager version. For example, the repository key URL for any version of Cloudera Manager 5 on any supported version of Red Hat 7 is http://archive.cloudera.com/cm5/redhat/7/x86_64/cm/RPM-GPG-KEY-cloudera.
- In the Add Cloudera Manager screen, click Continue.
- At the Confirmation prompt, click OK to begin adding a cluster.
- On the Add Cluster screen:
- Enter a name for the cluster in the Cluster name field.
- Enter the version of CDH to deploy in the Version field or leave the default value. By default, the version of CDH installed depends on the version of
Cloudera Director you are using:
- If you are using Cloudera Director 2.0, the latest released version of CDH 5.5 is installed by default.
- If you are using Cloudera Director 2.1, the latest released version of CDH 5.7 is installed by default.
- If you are using Cloudera Director 2.2, the latest released version of CDH 5.9 is installed by default.
- If you are using Cloudera Director 2.3, the latest released version of CDH 5.10 is installed by default.
- Enter the desired CDH version in the Version field of the Products section. For example, for CDH 5.4.8 enter 5.4.8.
- Scroll down to Configurations (optional) and expand the section.
- Click Override default parcel repositories.
- Enter the repository parcel URL for the version of CDH you want to install. Parcel URLs for versions of CDH 5 have the form http://archive.cloudera.com/cdh5/parcels/, followed by the major, minor, and (if applicable) dot release number. For example, the URL for CDH 5.4.8 is http://archive.cloudera.com/cdh5/parcels/5.4.8.
- In the Services section, select the services you want to install.
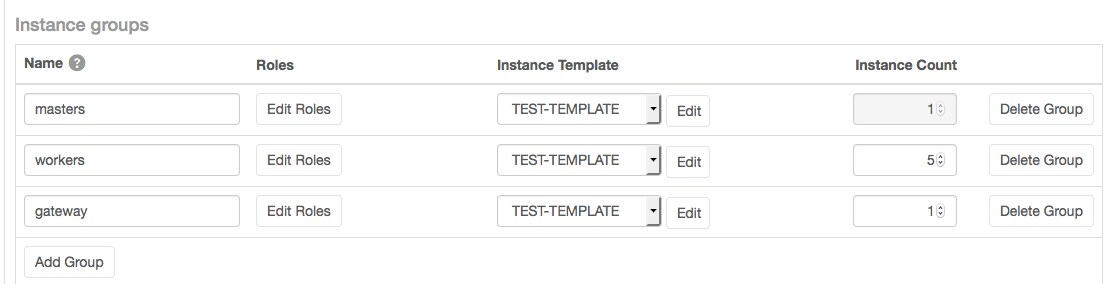
- In the Instance groups area, create a new template for the groups or for each group and the number of instances you want.
- Click Continue.
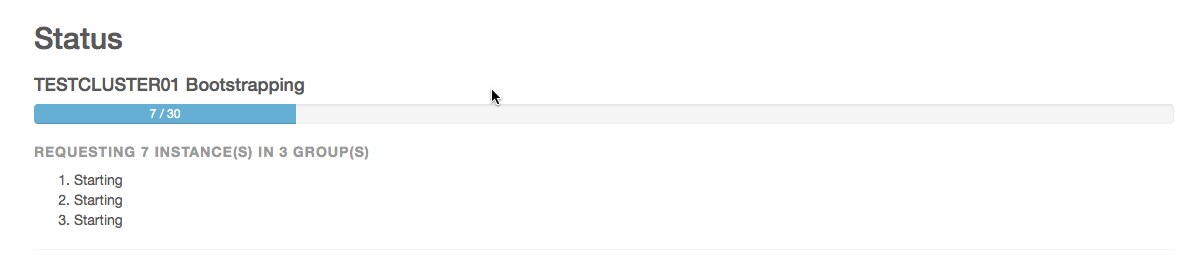
- At the Confirmation prompt, click OK to deploy the cluster. Cloudera Director displays a status screen.
- When the cluster is ready, click Continue.
You are finished with the deployment tasks.