Managing Licenses
Minimum Required Role: Full Administrator
When you install Cloudera Manager, you can select among the following editions: Cloudera Express (no license required), a 60-day Cloudera Enterprise Enterprise Data Hub Edition trial license, or Cloudera Enterprise (which requires a license). To obtain a Cloudera Enterprise license, fill in this form or call 866-843-7207.
- LDAP and SAML authentication
- Configuration history
- Alerts delivered as SNMP traps and custom alert scripts
- Backup and disaster recovery
- Operational reports
- Cloudera Navigator
- Commands such as Rolling Restart, History and Rollback, and Send Diagnostic Data
- Cluster Utilization Reports
- Role Based Access Control
Continue reading:
- Accessing the License Page
- License Expiration
- Trial Licenses
- Ending a Cloudera Enterprise Enterprise Data Hub Edition Trial
- Upgrading from Cloudera Express to a Cloudera Enterprise Enterprise Data Hub Edition Trial
- Upgrading from a Cloudera Enterprise Enterprise Data Hub Edition Trial to Cloudera Enterprise
- Upgrading from Cloudera Express to Cloudera Enterprise
- Renewing a License
Accessing the License Page
To access the license page, select .
If you have a license installed, the license page indicates its status (for example, whether your license is currently valid) and displays the license details: the license owner, the license key, and the expiration date of the license, if there is one.
At the right side of the page a table shows the usage of licensed components based on the number of hosts with those products installed. You can move the cursor over the  to see an explanation of each item.
- Cloudera Express
A free and unlimited license that provides access to CDH, Cloudera's Apache Hadoop distribution and a subset of cluster management features available with Cloudera Manager. You can begin a trial or upgrade to Cloudera Enterprise with a Cloudera Express license.
- Cloudera Enterprise
Cloudera Enterprise is available on a subscription basis in five editions, each designed around how you use the platform:
- Basic Edition provides superior support and advanced management for core Apache Hadoop.
- Data Engineering Edition for programmatic data preparation and predictive modeling.
- Operational Database Edition for online applications with real-time serving needs.
- Analytic Database Edition for BI and SQL analytics.
- Enterprise Data Hub Edition provides for complete use of the platform.
License Expiration
Before a license expires, the Cloudera Manager Admin Console displays a message that indicates the number of days left on a license, starting at 60 days before expiration and counting down to 30, 14, and 0 days.
When a Cloudera Enterprise license expires, the following occurs:- Cloudera Enterprise Enterprise Data Hub Edition Trial - Enterprise features are no longer available.
- Cloudera Enterprise - Cloudera Manager Admin Console displays a banner indicating license expiration. Contact Cloudera Support to receive an updated license. In the meanwhile, all enterprise features will continue to be available.
Trial Licenses
You can use a trial license only once; when the 60-day trial period expires or you have ended the trial, you cannot restart the trial. With the trial license, you can upgrade to a Cloudera Enterprise license or downgrade to an express license.
Ending a Cloudera Enterprise Enterprise Data Hub Edition Trial
- On the License page, click End Trial.
- Confirm that you want to end the trial.
- Restart the Cloudera Management Service, HBase, HDFS, and Hive services to pick up configuration changes.
Upgrading from Cloudera Express to a Cloudera Enterprise Enterprise Data Hub Edition Trial
- Cloudera Manager displays a pop-up describing the features enabled with Cloudera Enterprise Enterprise Data Hub Edition. Click OK to proceed. At this point, your installation is upgraded and the Customize Role Assignments page displays.
- Under Reports Manager click Select a host. The pageable host selection dialog box
displays.
The following shortcuts for specifying hostname patterns are supported:
- Range of hostnames (without the domain portion)
Range Definition Matching Hosts 10.1.1.[1-4] 10.1.1.1, 10.1.1.2, 10.1.1.3, 10.1.1.4 host[1-3].company.com host1.company.com, host2.company.com, host3.company.com host[07-10].company.com host07.company.com, host08.company.com, host09.company.com, host10.company.com - IP addresses
- Rack name
- Range of hostnames (without the domain portion)
- Select a host and click OK.
- When you are finished with the assignments, click Continue.
- Choose the database type:
- Keep the default setting of Use Embedded Database to have Cloudera Manager create and configure required databases. Record the auto-generated
passwords.
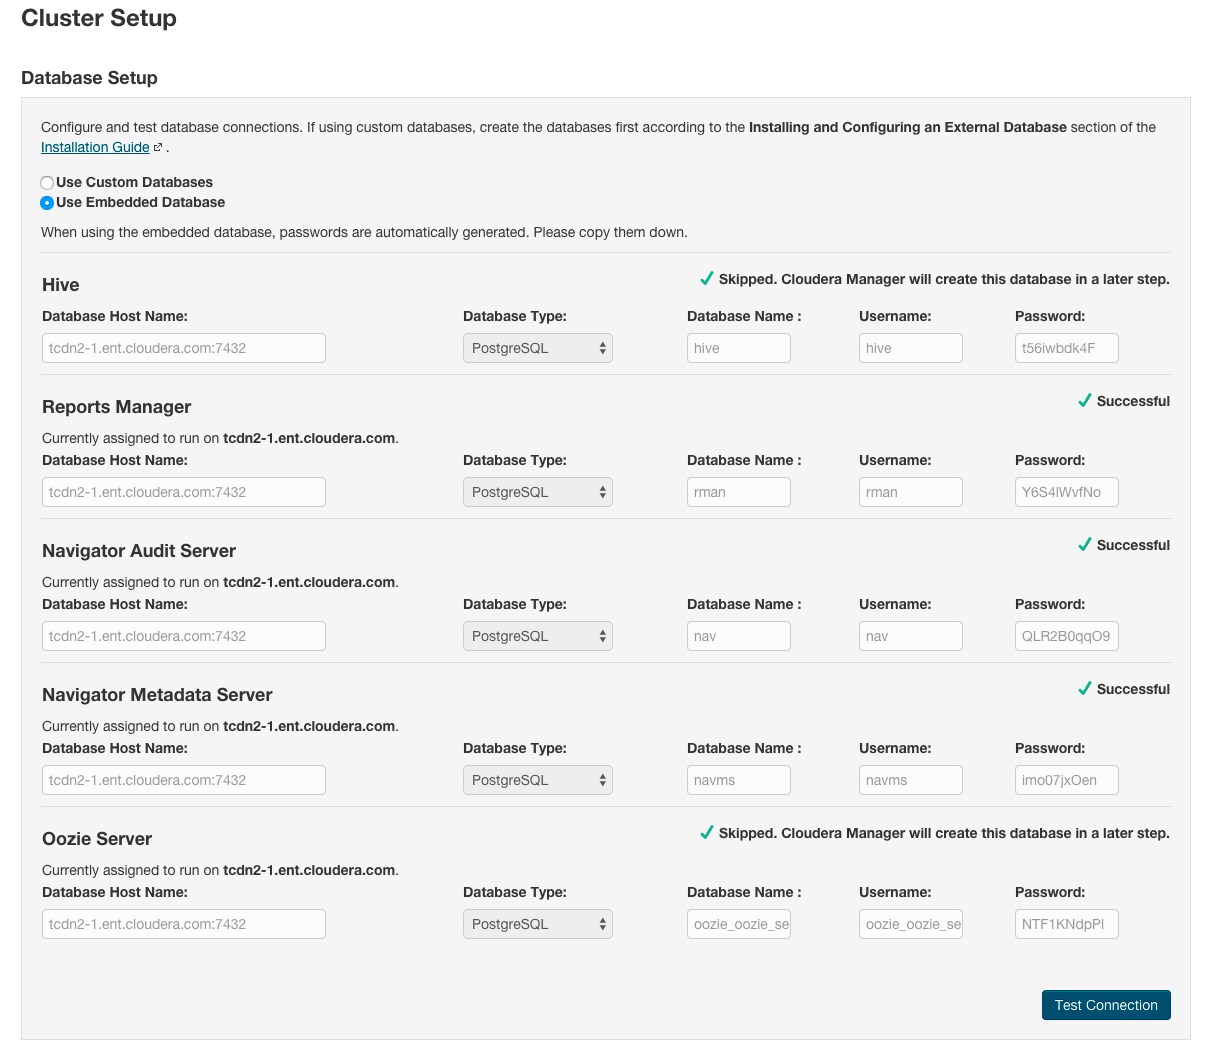
- Select Use Custom Databases to specify the external database host and enter the database type, database name, username, and password for the custom database.
- If you are adding the Oozie service, you can change your Oozie configuration to control when data is purged to improve performance, reduce database disk usage, improve upgrade performance, or to keep the history for a longer period of time. See Configuring Oozie Data Purge Settings Using Cloudera Manager.
- Keep the default setting of Use Embedded Database to have Cloudera Manager create and configure required databases. Record the auto-generated
passwords.
- Click Test Connection to confirm that Cloudera Manager can communicate with the database using the information you have supplied. If the test succeeds in
all cases, click Continue; otherwise, check and correct the information you have provided for the database and then try the test again. (For some servers, if you are
using the embedded database, you will see a message saying the database will be created at a later step in the installation process.)
The Cluster Setup Review Changes screen displays.
- Review the configuration changes to be applied. Confirm the settings entered for file system paths. The file paths required vary based on the services to be installed. If you chose to add the Sqoop service, indicate whether to use the default Derby database or the embedded PostgreSQL database. If the latter, type the database name, host, and user credentials that you specified when you created the database.
- At this point, your installation is upgraded. Click Continue.
- Restart Cloudera Management Services and audited services to pick up configuration changes. The audited services will write audit events to a log file, but the events are not transferred to the Cloudera Navigator Audit Server until you add and start the Cloudera Navigator Audit Server role as described in Adding Cloudera Navigator Roles. For information on Cloudera Navigator, see Cloudera Navigator Data Management Overview.
Upgrading from a Cloudera Enterprise Enterprise Data Hub Edition Trial to Cloudera Enterprise
- Purchase a Cloudera Enterprise license from Cloudera.
- On the License page, click Upload License.
- Click the document icon to the left of the Select a License File text field.
- Go to the location of your license file, click the file, and click Open.
- Click Upload.
Upgrading from Cloudera Express to Cloudera Enterprise
- Purchase a Cloudera Enterprise license from Cloudera.
- On the License page, click Upload License.
- Click the document icon to the left of the Select a License File text field.
- Go to the location of your license file, click the file, and click Open.
- Click Upload.
- Cloudera Manager displays a pop-up describing the features enabled with Cloudera Enterprise Enterprise Data Hub Edition. Click OK to proceed. At this point, your installation is upgraded and the Customize Role Assignments page displays.
- Under Reports Manager click Select a host. The pageable host selection dialog box displays.
The following shortcuts for specifying hostname patterns are supported:
- Range of hostnames (without the domain portion)
Range Definition Matching Hosts 10.1.1.[1-4] 10.1.1.1, 10.1.1.2, 10.1.1.3, 10.1.1.4 host[1-3].company.com host1.company.com, host2.company.com, host3.company.com host[07-10].company.com host07.company.com, host08.company.com, host09.company.com, host10.company.com - IP addresses
- Rack name
- Range of hostnames (without the domain portion)
- When you are satisfied with the assignments, click Continue.
- Choose the database type:
- Keep the default setting of Use Embedded Database to have Cloudera Manager create and configure required databases. Record the auto-generated
passwords.
- Select Use Custom Databases to specify the external database host and enter the database type, database name, username, and password for the custom database.
- If you are adding the Oozie service, you can change your Oozie configuration to control when data is purged to improve performance, reduce database disk usage, improve upgrade performance, or to keep the history for a longer period of time. See Configuring Oozie Data Purge Settings Using Cloudera Manager.
- Keep the default setting of Use Embedded Database to have Cloudera Manager create and configure required databases. Record the auto-generated
passwords.
- Click Test Connection to confirm that Cloudera Manager can communicate with the database using the information you have supplied. If the test succeeds in
all cases, click Continue; otherwise, check and correct the information you have provided for the database and then try the test again. (For some servers, if you are
using the embedded database, you will see a message saying the database will be created at a later step in the installation process.)
The Cluster Setup Review Changes screen displays.
- Review the configuration changes to be applied. Confirm the settings entered for file system paths. The file paths required vary based on the services to be installed. If you chose to add the Sqoop service, indicate whether to use the default Derby database or the embedded PostgreSQL database. If the latter, type the database name, host, and user credentials that you specified when you created the database.
- At this point, your installation is upgraded. Click Continue.
- Restart Cloudera Management Services and audited services to pick up configuration changes. The audited services will write audit events to a log file, but the events are not transferred to the Cloudera Navigator Audit Server until you add and start the Cloudera Navigator Audit Server role as described in Adding Cloudera Navigator Roles. For information on Cloudera Navigator, see Cloudera Navigator Data Management Overview.
If you want to use the Cloudera Navigator Metadata Server, add its role following the instructions in Adding Cloudera Navigator Roles.