Step 1: Setting Up Hosts and the Load Balancer
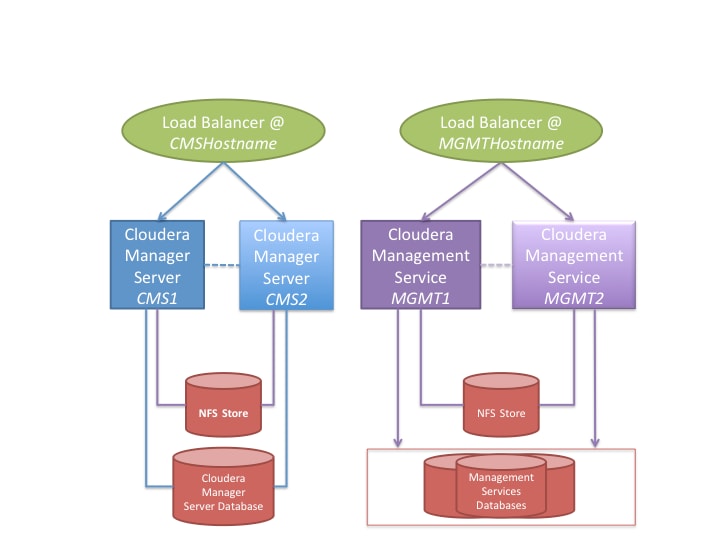
At a high level, you set up Cloudera Manager Server and Cloudera Management Service roles (including Cloudera Navigator) on separate hosts, and make sure that network access to those hosts from other Cloudera services and to the Admin Console occurs through the configured load balancer.
Cloudera Manager Server, Cloudera Navigator, and all of the Cloudera Management Service roles that use a relational database should use an external database server, located off-host. You must make sure that these databases are configured to be highly available. See Database High Availability Configuration.
You configure other Cloudera Management Service roles (such as the Service Monitor and Host Monitor roles) that use a file-backed storage mechanism to store their data on a shared NFS storage mechanism.
Creating Hosts for Primary and Secondary Servers
For this example, Cloudera recommends using four hosts for Cloudera Manager services. All of these hosts must resolve forward and reverse DNS lookups correctly:
- Cloudera Manager Server primary host (hostname: CMS1)
- Cloudera Management Service primary host (hostname: MGMT1)
- Cloudera Manager Server secondary host (hostname: CMS2)
- Cloudera Management Service secondary host (hostname: MGMT2)
In addition, Cloudera recommends the following:
-
Do not host the Cloudera Manager or Cloudera Management Service roles on existing hosts in a CDH cluster, because this complicates failover configuration, and overlapping failure domains can cause problems with fault containment and error tracing.
-
Configure both the primary and the secondary hosts using the same host configuration. This helps to ensure that failover does not lead to decreased performance.
-
Host the primary and secondary hosts on separate power and network segments within your organization to limit overlapping failure domains.
Setting up the Load Balancer
- Reserve two hostnames in your DNS system, and assign them to each of the load balancer hosts. (The names CMSHostname,
and MGMTHostname are used in this example; substitute the correct hostname for your environment.) These hostnames will be the
externally accessible hostnames for Cloudera Manager Server and Cloudera Management Service. (Alternatively, use one load balancer with separate, resolvable IP addresses—one each to back CMSHostname and MGMTHostname respectively).
- CMSHostname is used to access Cloudera Manager Admin Console.
- MGMTHostname is used for internal access to the Cloudera Management Service from Cloudera Manager Server and Cloudera Manager Agents.
- Set up two hosts using any supported Linux distribution (RHEL, CentOS, Ubuntu or SUSE; see CDH and Cloudera Manager Supported Operating Systems) with the hostnames listed above. See the HAProxy documentation for recommendations on configuring the hardware of these hosts.
- Install the version of HAProxy that is recommended for the version of Linux installed on the two hosts:
RHEL/CentOS:
$ yum install haproxy
Ubuntu (use a current Personal Package Archive (PPA) for 1.5 from http://haproxy.debian.net):$ apt-get install haproxy
SUSE:$ zypper install haproxy
- Configure HAProxy to autostart on both the CMSHostname and MGMTHostname hosts:
RHEL, CentOS, and SUSE:
$ chkconfig haproxy on
Ubuntu:$ update-rc.d haproxy defaults
- Configure HAProxy.
-
On CMSHostname, edit the /etc/haproxy/haproxy.cfg files and make sure that the ports listed at Ports Used by Cloudera Manager and Cloudera Navigator for “Cloudera Manager Server” are proxied. For Cloudera Manager 5, this list includes the following ports as defaults:
- 7180
- 7182
- 7183
Sample HAProxy Configuration for CMSHostname
listen cmf :7180 mode tcp option tcplog server cmfhttp1 CMS1:7180 check server cmfhttp2 CMS2:7180 check listen cmfavro :7182 mode tcp option tcplog server cmfavro1 CMS1:7182 check server cmfavro2 CMS2:7182 check #ssl pass-through, without termination listen cmfhttps :7183 mode tcp option tcplog server cmfhttps1 CMS1:7183 check server cmfhttps2 CMS2:7183 check - On MGMTHostname, edit the /etc/haproxy/haproxy.cfg file and make sure that the ports
for Cloudera Management Service are proxied (see Ports Used by Cloudera Manager and Cloudera Navigator). For Cloudera Manager 5, this list
includes the following ports as defaults:
- 5678
- 7184
- 7185
- 7186
- 7187
- 8083
- 8084
- 8086
- 8087
- 8091
- 9000
- 9994
- 9995
- 9996
- 9997
- 9998
- 9999
- 10101
Example HAProxy Configuration for MGMTHostnamelisten mgmt1 :5678 mode tcp option tcplog server mgmt1a MGMT1 check server mgmt1b MGMT2 check listen mgmt2 :7184 mode tcp option tcplog server mgmt2a MGMT1 check server mgmt2b MGMT2 check listen mgmt3 :7185 mode tcp option tcplog server mgmt3a MGMT1 check server mgmt3b MGMT2 check listen mgmt4 :7186 mode tcp option tcplog server mgmt4a MGMT1 check server mgmt4b MGMT2 check listen mgmt5 :7187 mode tcp option tcplog server mgmt5a MGMT1 check server mgmt5b MGMT2 check listen mgmt6 :8083 mode tcp option tcplog server mgmt6a MGMT1 check server mgmt6b MGMT2 check listen mgmt7 :8084 mode tcp option tcplog server mgmt7a MGMT1 check server mgmt7b MGMT2 check listen mgmt8 :8086 mode tcp option tcplog server mgmt8a MGMT1 check server mgmt8b MGMT2 check listen mgmt9 :8087 mode tcp option tcplog server mgmt9a MGMT1 check server mgmt9b MGMT2 check listen mgmt10 :8091 mode tcp option tcplog server mgmt10a MGMT1 check server mgmt10b MGMT2 check listen mgmt-agent :9000 mode tcp option tcplog server mgmt-agenta MGMT1 check server mgmt-agentb MGMT2 check listen mgmt11 :9994 mode tcp option tcplog server mgmt11a MGMT1 check server mgmt11b MGMT2 check listen mgmt12 :9995 mode tcp option tcplog server mgmt12a MGMT1 check server mgmt12b MGMT2 check listen mgmt13 :9996 mode tcp option tcplog server mgmt13a MGMT1 check server mgmt13b MGMT2 check listen mgmt14 :9997 mode tcp option tcplog server mgmt14a MGMT1 check server mgmt14b MGMT2 check listen mgmt15 :9998 mode tcp option tcplog server mgmt15a MGMT1 check server mgmt15b MGMT2 check listen mgmt16 :9999 mode tcp option tcplog server mgmt16a MGMT1 check server mgmt16b MGMT2 check listen mgmt17 :10101 mode tcp option tcplog server mgmt17a MGMT1 check server mgmt17b MGMT2 checkAfter updating the configuration, restart HAProxy on both the MGMTHostname and CMSHostname hosts:
$ service haproxy restart
-
Setting up the Database
- Create databases on your preferred external database server. See Step 4: Install and Configure Databases.
- Configure your databases to be highly available. Consult the vendor documentation for specific information.
MySQL, PostgreSQL, and Oracle each have many options for configuring high availability. See Database High Availability Configuration for some external references on configuring high availability for your Cloudera Manager databases.
Setting up an NFS Server
The procedures outlined for setting up the Cloudera Manager Server and Cloudera Management Service hosts presume there is a shared store configured that can be accessed from both the primary and secondary instances of these hosts. This usually requires that this store be accessible over the network, and can be one of a variety of remote storage mechanisms (such as an iSCSI drive, a SAN array, or an NFS server).
This section describes how to configure an NFS server and assumes that you understand how to configure highly available remote storage devices. Further details are beyond the scope and intent of this guide.
There are no intrinsic limitations on where this NFS server is located, but because overlapping failure domains can cause problems with fault containment and error tracing, Cloudera recommends that you not co-locate the NFS server with any CDH or Cloudera Manager servers or the load-balancer hosts detailed in this document.
- Install NFS on your designated server:
RHEL/CentOS
$ yum install nfs-utils nfs-utils-lib
Ubuntu$ apt-get install nfs-kernel-server
SUSE$ zypper install nfs-kernel-server
- Start nfs and rpcbind, and configure them to autostart:
RHEL/CentOS:
$ chkconfig nfs on
$ service rpcbind start
$ service nfs start
Ubuntu:$ update-rc.d nfs defaults $ service rpcbind start $ service nfs-kernel-server
SUSE:$ chkconfig nfs on $ service rpcbind start $ service nfs-kernel-server start