Managing Solr
You can install the Solr service through the Cloudera Manager installation wizard, using either parcels or packages. See Cloudera Installation Guide.
You can elect to have the service created and started as part of the Installation wizard. If you elect not to create the service using the Installation wizard, you can use the Add Service wizard to perform the installation. The wizard will automatically configure and start the dependent services and the Solr service. See Adding a Service for instructions.
For further information on the Solr service, see Cloudera Search Guide.
The following sections describe how to configure other CDH components to work with the Solr service.
Configuring the Flume Morphline Solr Sink for Use with the Solr Service
Minimum Required Role: Configurator (also provided by Cluster Administrator, Full Administrator)
To use a Flume Morphline Solr sink, the Flume service must be running on your cluster. See the Flume Near Real-Time Indexing Reference (CDH 5) for information about the Flume Morphline Solr Sink and Configuring Apache Flume.
- Go to the Flume service.
- Click the Configuration tab.
- Select
- Select .
- Edit the following settings, which are templates that you must modify for your deployment:
- Morphlines File (morphlines.conf) - Configures Morphlines for Flume agents. You must use $ZK_HOST in this field instead of specifying a ZooKeeper quorum. Cloudera Manager automatically replaces the $ZK_HOST variable with the correct value during the Flume configuration deployment.
- Custom MIME-types File (custom-mimetypes.xml) - Configuration for the detectMimeTypes command. See the Cloudera Morphlines Reference Guide for details on this command.
- Grok Dictionary File (grok-dictionary.conf) - Configuration for the grok command. See the Cloudera Morphlines Reference Guide for details on this command.
To apply this configuration property to other role groups as needed, edit the value for the appropriate role group. See Modifying Configuration Properties Using Cloudera Manager.
Once configuration is complete, Cloudera Manager automatically deploys the required files to the Flume agent process directory when it starts the Flume agent. Therefore, you can reference the files in the Flume agent configuration using their relative path names. For example, you can use the name morphlines.conf to refer to the location of the Morphlines configuration file.
Using a Load Balancer with Solr
- Go to the Solr service.
- Click the Configuration tab.
- Select
- Select
- Enter the hostname and port number of the load balancer in the Solr Load Balancer property in the format hostname:port number.
- Click Save Changes to commit the changes.
Migrating Solr Replicas
When you replace a host, migrating replicas on that host to the new host, instead of depending on failure recovery, can help ensure optimal performance.
- For adding replicas, the node parameter ensures the new replica is created on the intended host. If no host is specified, Solr selects a host with relatively fewer replicas.
- For deleting replicas, the request is routed to the host that hosts the replica to be deleted.
Adding replicas can be resource intensive. For best results, add replicas when the system is not under heavy load. For example, do not add replicas when heavy indexing is occurring or when MapReduceIndexerTool jobs are running.
Cloudera recommends using API calls to create and unload cores. Do not use the Cloudera Manager Admin Console or the Solr Admin UI for these tasks.
- Host names:
- Origin: solr01.example.com.
- Destination: solr02.example.com.
- Collection name: email
- Replicas:
- The original replica email_shard1_replica1, which is on solr01.example.com.
- The new replica email_shard1_replica2, which will be on solr02.example.com.
To migrate a replica to a new host:
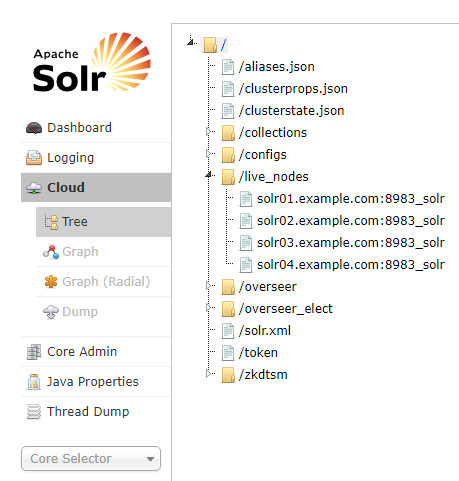
- (Optional) If you want to add a replica to a particular node, review the contents of the live_nodes directory on ZooKeeper to find all nodes available to
host replicas. Open the Solr Administration User interface, click Cloud, click Tree, and expand live_nodes. The Solr Administration User Interface, including live_nodes, might appear as follows:
- Add the new replica on solr02.example.com using the ADDREPLICA API call.
http://solr01.example.com:8983/solr/admin/collections?action=ADDREPLICA&collection=email&shard=shard1&node=solr02.example.com:8983_solr
- Verify that the replica creation succeeds and moves from recovery state to ACTIVE. You can check the replica status in the Cloud view, which can be found at a URL similar to: http://solr02.example.com:8983/solr/#/~cloud.
- Use the CLUSTERSTATUS API call to retrieve information about the cluster, including current cluster status:
http://solr01.example.com:8983/solr/admin/collections?action=clusterstatus&wt=json&indent=true
Review the returned information to find the correct replica to remove. An example of the JSON file might appear as follows:
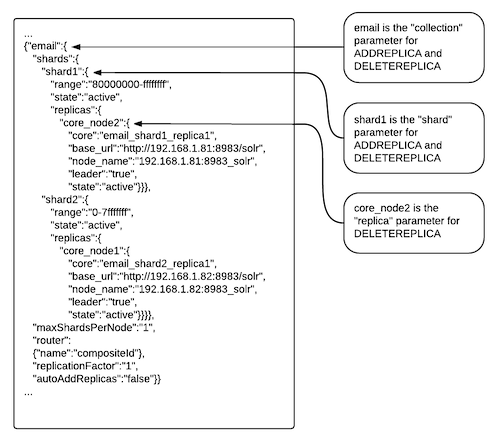
- Delete the old replica on solr01.example.com server using the DELETEREPLICA API call:
http://solr01.example.com:8983/solr/admin/collections?action=DELETEREPLICA&collection=email&shard=shard1&replica=core_node2
The DELETEREPLICA call removes the datadir.