Hue Custom Database Tutorial
This page explains how to configure Hue with a custom database from end to end by migrating your existing database and synching to a new custom database. Learn how to switch databases for:
- A new installation of CDH, with the Cloudera Manager Installation Wizard
- An existing installation of CDH, with the Cloudera Manager Admin Console.
Prepare Hosts
Create, or prepare, five machines, each with CentOS 6 and at least 8 GB of RAM:
- Create a cluster of four machines. Name them cdh-cluster-[1-4].<your domain>.com.
- Create one machine for the database. Name it cdh-db.<your domain>.com.
Install Custom Database
Install MySQL on the single machine you designated for this purpose (cdh-db.<your domain>.com).
- Install MySQL server on cdh-db.<your domain>.com:
sudo yum install -y mysql-server
- Start the server:
sudo service mysqld start
- Secure your installation:
sudo /usr/bin/mysql_secure_installation
Enter current password for root (enter for none): [Press Enter if the password is unset]
OK, successfully used password, moving on...
[...]
Set root password? [Y/n] Y
New password:
Re-enter new password:
Remove anonymous users? [Y/n] Y
[...]
Disallow root login remotely? [Y/n] N
[...]
Remove test database and access to it [Y/n] Y
[...]
Reload privilege tables now? [Y/n] Y
- Configure /etc/my.cnf:
[mysqld]
...
bind-address=0.0.0.0
default-storage-engine=innodb
sql_mode=STRICT_ALL_TABLES
- Restart the server
sudo service mysqld restart
- Log on with your new root password:
mysql -u root -p<root password>
- Create the hue database with UTF8 collation and configure the hue user (with your own password):
create database hue collate = 'utf8_general_ci';
grant all on hue.* to 'hue'@'%' identified by 'huepassword';
quit
Install CM and CDH
In this section, we test connecting to a custom database with the installation wizard; then we undo the connection so we can connect with the admin console in Dump, Synchronize, and Load.
When you run the Cloudera Manager Installation Wizard, stop at the Database Setup page.
Populate Database (optional)
Populate the Hue database with user account information, a Hive query, and an Oozie workflow (to ensure that the database migration works).
Dump, Synchronize, and Load
To connect to other supported databases, see Hue Custom Databases.
- Stop the Hue service: go to Hue and select .
- Dump the existing database:
- Select .
- Click Dump Database. The file is written to /tmp/hue_database_dump.json on the host of the Hue server.
- Log on to the host of the Hue server in a command-line terminal.
- Edit /tmp/hue_database_dump.json by removing all objects with useradmin.userprofile in the
model field. For example:
# Count number of objects
grep -c useradmin.userprofile /tmp/hue_database_dump.json
vi /tmp/hue_database_dump.json
{
  "pk": 1,
  "model": "useradmin.userprofile",
  "fields": {
    "last_activity": "2016-10-03T10:06:13",
    "creation_method": "HUE",
    "first_login": false,
    "user": 1,
    "home_directory": "/user/admin"
  }
},
{
  "pk": 2,
  "model": "useradmin.userprofile",
  "fields": {
    "last_activity": "2016-10-03T10:27:10",
    "creation_method": "HUE",
    "first_login": false,
    "user": 2,
    "home_directory": "/user/alice"
  }
},
- Connect Hue to the new MySQL database:
- Go to .
- Filter by category, Database.
- Set the following database parameters :
DB Hostname  = <fqdn of host with postgres server>:3306
DB Type      = <PostgreSQL>
DB Name      = hue
Username     = hue
Password     = <hue database password set when granting hue permissions>
- Click Save Changes.
- Synchronize the new database: select and click Synchronize Database.
- Load the database after removing the foreign key constraint:
- Log on to the host of the MySQL server in a command-line terminal.
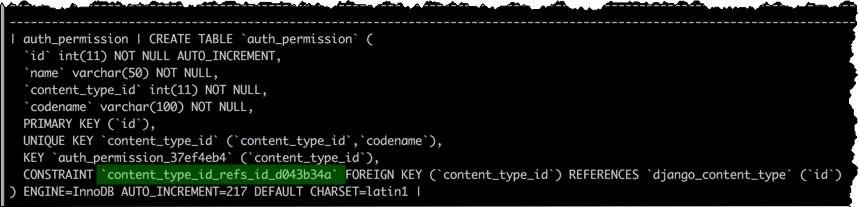
- Delete the foreign key constraint and clean the table, django_content_type:
mysql -u root -p
SHOW CREATE table hue.auth_permission;
ALTER TABLE hue.auth_permission DROP FOREIGN KEY content_type_id_refs_id_<input id>;
DELETE FROM hue.django_content_type;
- In Cloudera Manager, load the JSON file: select and click Load Database.
- Add the foreign key back:
ALTER TABLE hue.auth_permission ADD FOREIGN KEY (content_type_id) REFERENCES django_content_type (id);
- Start the Hue service: select and click Start. If you went through Use Hue, ensure your data was migrated properly.