Cloudera Navigator Metadata Server
- Obtains connection information about CDH services from the Cloudera Manager Server
- At periodic intervals, extracts metadata for the entities managed by those services
- Manages and applies metadata extraction policies during metadata extraction
- Indexes and stores entity metadata
- Manages authorization data for Cloudera Navigator users
- Manages audit report metadata
- Generates metadata and audit analytics
- Implements the Navigator UI and API
Continue reading:
- Adding the Navigator Metadata Server
- Starting, Stopping, and Restarting the Navigator Metadata Server
- Navigator Metadata Server Memory Sizing Recommendations
- Setting the Navigator Metadata Server Java Heap Size
- Moving the Navigator Metadata Server to a New Host
- Configuring the Navigator Metadata Server Storage Directory
- Configuring the Navigator Metadata Server Port
- Configuring the Navigator Metadata Server Log Directory
- Configuring the Navigator Metadata Server Session Timeout
- Managing Anonymous Usage Data Collection
Adding the Navigator Metadata Server
Minimum Required Role: Navigator Administrator (also provided by Full Administrator)
- Configure the database where policies, roles, and audit report metadata is stored.
- Do one of the following:
- Select .
- On the tab, in Cloudera Management Service table, click the Cloudera Management Service link.
- Click the Instances tab.
- Click the Add Role Instances button. The Customize Role Assignments page displays.
- Assign the Navigator role to a host.
- Customize the assignment of role instances to hosts. The wizard evaluates the hardware configurations of the hosts to determine the best hosts for each role. The wizard assigns all
worker roles to the same set of hosts to which the HDFS DataNode role is assigned. You can reassign role instances if necessary.
Click a field below a role to display a dialog box containing a list of hosts. If you click a field containing multiple hosts, you can also select All Hosts to assign the role to all hosts, or Custom to display the pageable hosts dialog box.
The following shortcuts for specifying hostname patterns are supported:- Range of hostnames (without the domain portion)
Range Definition Matching Hosts 10.1.1.[1-4] 10.1.1.1, 10.1.1.2, 10.1.1.3, 10.1.1.4 host[1-3].company.com host1.company.com, host2.company.com, host3.company.com host[07-10].company.com host07.company.com, host08.company.com, host09.company.com, host10.company.com - IP addresses
- Rack name
Click the View By Host button for an overview of the role assignment by hostname ranges.
- Range of hostnames (without the domain portion)
- Customize the assignment of role instances to hosts. The wizard evaluates the hardware configurations of the hosts to determine the best hosts for each role. The wizard assigns all
worker roles to the same set of hosts to which the HDFS DataNode role is assigned. You can reassign role instances if necessary.
- When you are satisfied with the assignments, click Continue.
- Configure database settings:
- Choose the database type:
- Keep the default setting of Use Embedded Database to have Cloudera Manager create and configure required databases. Record the auto-generated
passwords.
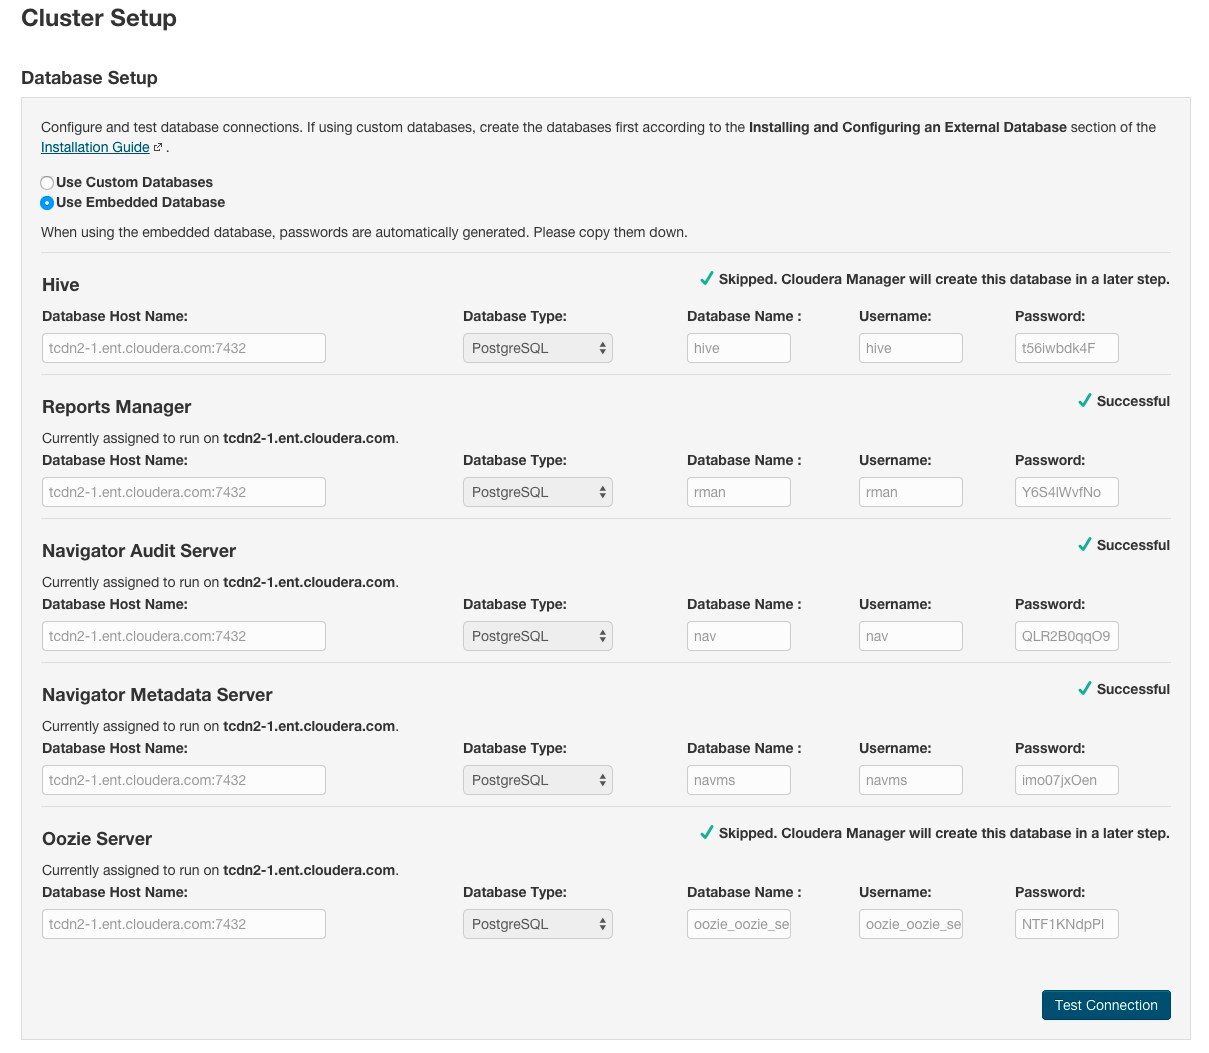
- Select Use Custom Databases to specify external database host, enter the database type, database name, username, and password for the database that you created when you set up the database.
- If you are adding the Oozie service, you can change your Oozie configuration to control when data is purged to improve performance, cut down on database disk usage, improve upgrade performance, or to keep the history for a longer period of time. See Configuring Oozie Data Purge Settings Using Cloudera Manager.
- Keep the default setting of Use Embedded Database to have Cloudera Manager create and configure required databases. Record the auto-generated
passwords.
- Click Test Connection to confirm that Cloudera Manager can communicate with the database
using the information you have supplied. If the test succeeds in all cases, click Continue; otherwise, check and correct the information you have provided for the
database and then try the test again. (For some servers, if you are using the embedded database, you will see a message saying the database will be created at a later step in the installation
process.)
The Cluster Setup Review Changes screen displays.
- Choose the database type:
- Click Finish.
Starting, Stopping, and Restarting the Navigator Metadata Server
Minimum Required Role: Navigator Administrator (also provided by Full Administrator)
- Do one of the following:
- Select .
- On the tab, in Cloudera Management Service table, click the Cloudera Management Service link.
- Click the Instances tab.
- Do one of the following depending on your role:
-
Minimum Required Role: Full Administrator
- Select the checkbox next to the Navigator Metadata Server role.
- Select . Click Action to confirm the action, where Action is Start, Stop, or Restart.
-
Minimum Required Role: Navigator Administrator (also provided by Full Administrator)
- Click the Navigator Metadata Server role link.
- Select . Click Action this Navigator Metadata Server, where Action is Start, Stop, or Restart, to confirm the action.
-
Navigator Metadata Server Memory Sizing Recommendations
Minimum Required Role: Navigator Administrator (also provided by Full Administrator)
- Extracting metadata from the cluster and creating relationships
- Querying
The Navigator Metadata Server uses Solr to store, index, and query metadata. Indexing happens during extraction. Querying is fast and efficient because the data is indexed. The Navigator Metadata Server memory requirements are based on amount of data that is stored and indexed. The Solr instance runs in process with Navigator, so you should set Java heap for the Navigator Metadata Server accordingly.
When the Navigator Metadata Server starts up it logs the number of documents contained in Solr. For example:
2015-11-11 09:24:58,013 INFO com.cloudera.nav.server.NavServerUtil: Found 68813088 documents in solr core nav_elements
2015-11-11 09:24:58,705 INFO com.cloudera.nav.server.NavServerUtil: Found 78813930 documents in solr core nav_relations
To compute the memory required by the Metadata Server during normal operation, use the number of documents in nav_elements * 200. So for the above example, the recommended amount of memory would be (68813088 * 200) or about 14 GB.
If you are upgrading the Navigator Metadata Server, use the number of documents in nav_elements + nav_relations. If you use the number in the example above, you would need ((68813088 + 78813930) * 200), or about 30 GB, to upgrade Navigator Metatdata Server.
By default, during the Cloudera Manager Installation wizard the Navigator Audit Server and Navigator Metadata Server are assigned to the same host as the Cloudera Management Service monitoring roles. This configuration works for a small cluster, but should be updated before the cluster grows. You can either change the configuration at installation time or move the Navigator Metadata Server if necessary.
Setting the Navigator Metadata Server Java Heap Size
Minimum Required Role: Navigator Administrator (also provided by Full Administrator)
- Do one of the following:
- Select .
- On the tab, in Cloudera Management Service table, click the Cloudera Management Service link.
- Click the Configuration tab.
- Select .
- Specify the memory value in the Java Heap Size of Navigator Metadata Server in Bytes property.
- Click Save Changes to commit the changes.
- Click the Instances tab.
- Restart the role.
Moving the Navigator Metadata Server to a New Host
Minimum Required Role: Navigator Administrator (also provided by Full Administrator)
- Stop the Navigator Metadata Server, delete it from existing host, and add it to a new host.
- If the storage directory is not on NFS/SAN, move the data to the same path on the new host.
- Start the Navigator Metadata Server.
Configuring the Navigator Metadata Server Storage Directory
Minimum Required Role: Navigator Administrator (also provided by Full Administrator)
The Navigator Metadata Server stores extracted and indexed data in a directory on the host on which the Server runs. The default is /var/lib/cloudera-scm-navigator. To configure the storage directory:
- Do one of the following:
- Select .
- On the tab, in Cloudera Management Service table, click the Cloudera Management Service link.
- Click the Instances tab.
- Stop the Navigator Metadata Server.
- In a terminal window, log into the host on which the Navigator Metadata Server is running and copy the current storage directory to the new location.
- Click the Configuration tab.
- Select .
- Specify the directory in the Navigator Metadata Server Storage Dir property.
If more than one role group applies to this configuration, edit the value for the appropriate role group. See Modifying Configuration Properties Using Cloudera Manager.
- Click Save Changes to commit the changes.
- Click the Instances tab.
- Restart the role.
Configuring the Navigator Metadata Server Port
Minimum Required Role: Navigator Administrator (also provided by Full Administrator)
You can set the port on which the Navigator UI is accessed. The default is 7187.
- Do one of the following:
- Select .
- On the tab, in Cloudera Management Service table, click the Cloudera Management Service link.
- Click the Configuration tab.
- In the Search box, type ports.
- Specify the port in the Navigator Metadata Server Port property.
If more than one role group applies to this configuration, edit the value for the appropriate role group. See Modifying Configuration Properties Using Cloudera Manager.
- Click Save Changes to commit the changes.
- Click the Instances tab.
- Restart the role.
Configuring the Navigator Metadata Server Log Directory
Minimum Required Role: Navigator Administrator (also provided by Full Administrator)
You can configure the location of the Navigator Metadata Server logs (by default, /var/log/cloudera-scm-navigator) as follows:- Do one of the following:
- Select .
- On the tab, in Cloudera Management Service table, click the Cloudera Management Service link.
- Click the Configuration tab.
- Select .
- Select .
- Set the Navigator Metadata Server Log Directory property.
If more than one role group applies to this configuration, edit the value for the appropriate role group. See Modifying Configuration Properties Using Cloudera Manager.
- Click Save Changes to commit the changes.
- Restart the role.
Configuring the Navigator Metadata Server Session Timeout
Minimum Required Role: Navigator Administrator (also provided by Full Administrator)
The default session timeout is 30 minutes. To change the timeout period:- Do one of the following:
- Select .
- On the tab, in Cloudera Management Service table, click the Cloudera Management Service link.
- Click the Configuration tab.
- Select .
- In Navigator Metadata Server Advanced Configuration Snippet (Safety Valve) for cloudera-navigator.properties, set the property
nav.max_inactive_interval=period (s)
If more than one role group applies to this configuration, edit the value for the appropriate role group. See Modifying Configuration Properties Using Cloudera Manager.
- Click Save Changes to commit the changes.
- Restart the role.
Managing Anonymous Usage Data Collection
Minimum Required Role: Navigator Administrator (also provided by Full Administrator)
Cloudera Navigator uses Google Analytics to send anonymous usage information to Cloudera. The information helps Cloudera improve Navigator. By default, anonymous usage data collection is enabled. To enable and disable data collection:
- Do one of the following:
- Select .
- On the tab, in Cloudera Management Service table, click the Cloudera Management Service link.
- Click the Configuration tab.
- Select .
- Select or clear the Allow Usage Data Collection checkbox.
If more than one role group applies to this configuration, edit the value for the appropriate role group. See Modifying Configuration Properties Using Cloudera Manager.
- Click Save Changes to commit the changes.
- Restart the role.