Parcels
Minimum Required Role: Cluster Administrator (also provided by Full Administrator)
- Parcels are self-contained and installed in a versioned directory, which means that multiple versions of a given parcel can be installed side-by-side. You can then designate one of these installed versions as the active one. With packages, only one package can be installed at a time so there is no distinction between what is installed and what is active.
- You can install parcels at any location in the filesystem. They are installed by default in /opt/cloudera/parcels. In contrast, packages are installed in /usr/lib.
- When you install from the Parcels page, Cloudera Manager automatically downloads, distributes, and activates the correct parcel for the operating system running on each host in the cluster. All CDH hosts that make up a logical cluster need to run on the same major OS release to be covered by Cloudera Support. Cloudera Manager needs to run on the same OS release as one of the CDH clusters it manages, to be covered by Cloudera Support. The risk of issues caused by running different minor OS releases is considered lower than the risk of running different major OS releases. Cloudera recommends running the same minor release cross-cluster, because it simplifies issue tracking and supportability.
For detailed installation instructions using parcels, and other methods, see Installing Cloudera Manager and CDH.
Advantages of Parcels
- Distribution of CDH as a single object - Instead of having a separate package for each part of CDH, parcels have just a single object to install. This makes it easier to distribute software to a cluster that is not connected to the Internet.
- Internal consistency - All CDH components are matched, eliminating the possibility of installing parts from different versions of CDH.
- Installation outside of /usr - In some environments, Hadoop administrators do not have privileges to install system packages. These administrators needed to use CDH tarballs, which do not provide the infrastructure that packages do. With parcels, administrators can install to /opt, or anywhere else, without completing the additional manual steps of regular tarballs.
- Installation of CDH without sudo - Parcel installation is handled by the Cloudera Manager Agent running as root or another user, so you can install CDH without sudo.
- Decoupled distribution from activation - With side-by-side install capabilities, you can stage a new version of CDH across the cluster before switching to it. This allows the most time-consuming part of an upgrade to be done ahead of time without affecting cluster operations, thereby reducing downtime.
- Rolling upgrades - Packages require you to shut down the old process, upgrade the package, and then start the new process. Any errors in the process can be difficult to recover from, and upgrading requires extensive integration with the package management system to function seamlessly. With parcels, when a new version is staged side-by-side, you can switch to a new minor version by simply changing which version of CDH is used when restarting each process. You can then perform upgrades with rolling restarts, in which service roles are restarted in the correct order to switch to the new version with minimal service interruption. Your cluster can continue to run on the existing installed components while you stage a new version across your cluster, without impacting your current operations. Major version upgrades (for example, CDH 4 to CDH 5) require full service restarts because of substantial changes between the versions. Finally, you can upgrade individual parcels or multiple parcels at the same time.
- Upgrade management - Cloudera Manager manages all the steps in a CDH version upgrade. With packages, Cloudera Manager only helps with initial installation.
- Additional components - Parcels are not limited to CDH. Impala, Cloudera Search, LZO, Apache Kafka, and add-on service parcels are also available.
- Compatibility with other distribution tools - Cloudera Manager works with other tools you use for download and distribution. For example, you can use Puppet. Or, you can download the parcel to Cloudera Manager Server manually if your cluster has no Internet connectivity and then have Cloudera Manager distribute the parcel to the cluster.
Parcel Life Cycle
- Downloaded -The parcel software is copied to a local parcel directory on the Cloudera Manager Server, where it is available for distribution to other hosts in any of the clusters managed by this Cloudera Manager Server. You can have multiple parcels for a product downloaded to your Cloudera Manager Server. After a parcel has been downloaded to the Server, it is available for distribution on all clusters managed by the Server. A downloaded parcel appears in the cluster-specific section for every cluster managed by this Cloudera Manager Server.
- Distributed - The parcel is copied to the cluster hosts, and components of the parcel are unpacked. Distributing a parcel does not upgrade the components running on your cluster; the current services continue to run unchanged. You can have multiple parcels distributed on your cluster. Distributing parcels does not require Internet access; the Cloudera Manager Agent on each cluster member downloads the parcels from the local parcel repository on the Cloudera Manager Server.
- Activated - Links to the parcel components are created. Activation does not automatically stop the current services or perform a restart. You can restart
services after activation, or the system administrator can determine when to perform those operations.
If you are upgrading CDH or managed services when you activate a parcel, follow the instructions in Upgrading CDH and Managed Services Using Cloudera Manager to complete the upgrade.
- In Use - The parcel components on the cluster hosts are in use when you start or restart the services that use those components.
- Deactivated - The links to the parcel components are removed from the cluster hosts.
- Removed - The parcel components are removed from the cluster hosts.
- Deleted - The parcel is deleted from the local parcel repository on the Cloudera Manager Server.
Cloudera Manager detects when new parcels are available. You can configure Cloudera Manager to download and distribute parcels automatically. See Configuring Cloudera Manager Server Parcel Settings.
Parcel Locations
The default location for the local parcel directory on the Cloudera Manager Server is /opt/cloudera/parcel-repo. To change this location, follow the instructions in Configuring Cloudera Manager Server Parcel Settings.
Managing Parcels
On the Parcels page in Cloudera Manager, you can manage parcel installation and activation and determine which parcel versions are running across your clusters. The Parcels page displays a list of parcels managed by Cloudera Manager. Cloudera Manager displays the name, version, and status of each parcel and provides available actions on the parcel.
Accessing the Parcels Page
- Click the parcel indicator
 in the top navigation bar.
 - Click the Hosts in the top navigation bar, then the Parcels tab.
Use the selectors on the left side of the console to filter the displayed parcels:
- Location selector - View only parcels that are available remotely, only parcels pertaining to a particular cluster, or parcels pertaining to all clusters. When you access the Parcels page, the selector is set to Available Remotely.
- Error Status section of the Filters selector - Limit the list of displayed parcels by error status.
- Parcel Name section of the Filters selector - Limit the list of displayed parcels by parcel name.
- Status section of the Filters selector - Limit the list to parcels that have been distributed, parcels that have not been distributed (Other), or all parcels.
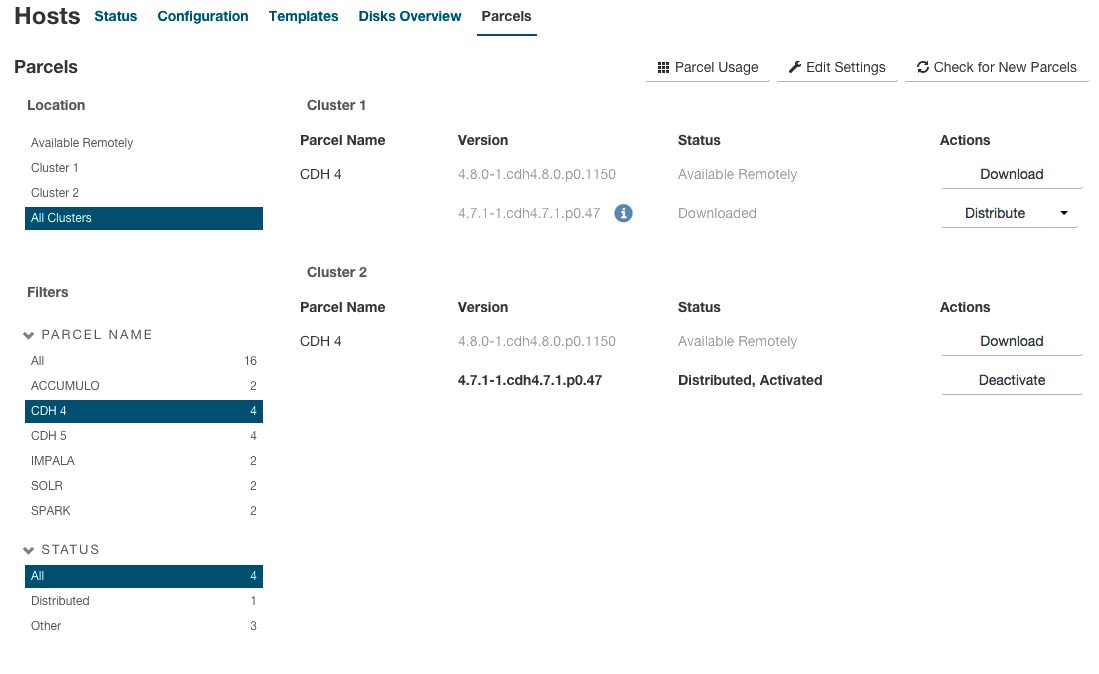
When you download a parcel, it appears in the list for each cluster managed by Cloudera Manager, indicating that the parcel is available for distribution on those clusters. Only one copy of the downloaded parcel resides on the Cloudera Manager Server. After you distribute the parcel, Cloudera Manager copies the parcel to the hosts in that cluster.
For example, if Cloudera Manager is managing two clusters, the rows in the All Clusters page list the information about the parcels on the two clusters. The Status column displays the
current status of the parcels. The Version column displays version information about the parcel. Click the ![]() icon to view the release notes for the parcel. The Actions column shows actions you can perform on the parcels, such as download, distribute, delete, deactivate, and remove from host.
icon to view the release notes for the parcel. The Actions column shows actions you can perform on the parcels, such as download, distribute, delete, deactivate, and remove from host.
Downloading a Parcel
- Go to the Parcels page. In the Location selector, click ClusterName or Available
Remotely. Parcels that are available for download display the Available Remotely status and a Download button.
If the parcel you want is not shown here—for example, you want to upgrade to a version of CDH that is not the most current version—you can make additional remote parcel repositories available. You can also configure the location of the local parcel repository and other settings. See Parcel Configuration Settings.
If a parcel version is too new to be supported by the Cloudera Manager version, the parcel appears with a red background and error message:

Such parcels are also listed when you select the Error status in the Error Status section of the Filters selector. - Click the Download button of the parcel you want to download to your local repository. The status changes to Downloading.
After a parcel has been downloaded, it is removed from the Available Remotely page.
Distributing a Parcel
Downloaded parcels can be distributed to the hosts in your cluster and made available for activation. Parcels are downloaded to the Cloudera Manager Server, so with multiple clusters, the downloaded parcels are shown as available to all clusters managed by the Cloudera Manager Server. However, you select distribution to a specific cluster's hosts on a cluster-by-cluster basis.
- From the Parcels page, in the Location selector, select the cluster where you want to distribute the parcel, or select All Clusters. (The first cluster in the list is selected by default when you open the Parcels page.)
- Click Distribute for the parcel you want to distribute. The status changes to Distributing. During distribution, you
can:
- Click the Details link in the Status column to view the Parcel Distribution Status page.
- Click Cancel to cancel the distribution. When the Distribute action completes, the button changes to Activate, and you can click the Distributed status link to view the status page.
Distribution does not require Internet access; the Cloudera Manager Agent on each cluster member downloads the parcel from the local parcel repository hosted on the Cloudera Manager Server.
If you have a large number of hosts to which parcels must be distributed, you can control how many concurrent uploads Cloudera Manager performs. See Parcel Configuration Settings.
To delete a parcel that is ready to be distributed, click the triangle at the right end of the Distribute button and select Delete. This deletes the parcel from the local parcel repository.
Distributing parcels to the hosts in the cluster does not affect the current running services.
Activating a Parcel
Parcels that have been distributed to the hosts in a cluster are ready to be activated.
- From the Parcels page, in the Location selector, choose ClusterName or All Clusters, and click the Activate button for the parcel you want to activate. This updates Cloudera Manager to point to the new software, which is ready to run the next time a service is restarted. A pop-up indicates which services must be restarted to use the new parcel.
- Choose one of the following:
- Restart - Activate the parcel and restart services affected by the new parcel.
- Activate Only - Active the parcel. You can restart services at a time that is convenient. If you do not restart services as part of the activation process, you must restart them at a later time. Until you restart services, the current parcel continues to run.
- Click OK.
Activating a new parcel also deactivates the previously active parcel for the product you just upgraded. However, until you restart the services, the previously active parcel displays a status of Still in use because the services are using that parcel, and you cannot remove the parcel until it is no longer being used.
If the parcel you activate updates the software for only a subset of services, even if you restart all of that subset, the previously active parcel displays Still in use until you restart the remaining services. For example, if you are running HDFS, YARN, Oozie, Hue, Impala, and Spark services, and you activate a parcel that updates only the Oozie service, the pop-up that displays instructs you to restart only the Oozie and Hue services. Because the older parcel is still in use by the HDFS, YARN, Impala, and Spark services, the parcel page shows that parcel as Still in use until you restart these remaining services.
Sometimes additional upgrade steps may be required. In this case, instead of Activate, the button will say Upgrade. When you click the Upgrade button, the upgrade wizard starts. See Upgrading CDH and Managed Services Using Cloudera Manager.
Deactivating a Parcel
You can deactivate an active parcel; this updates Cloudera Manager to point to the previous software version, which is ready to run the next time a service is restarted. From the Parcels page, choose ClusterName or All Clusters in the Location selector, and click the Deactivate button on an activated parcel.
To use the previous version of the software, restart your services.
Removing a Parcel
From the Parcels page, in the Location selector, choose ClusterName or All
Clusters, click the ![]() to the right of an Activate button, and select
Remove from Hosts.
to the right of an Activate button, and select
Remove from Hosts.
Deleting a Parcel
From the Parcels page, in the Location selector, choose ClusterName or All
Clusters, and click the ![]() to the right of a Distribute button, and
select Delete.
to the right of a Distribute button, and
select Delete.
Changing the Parcel Directory
The default location of the parcel directory is /opt/cloudera/parcels. To relocate distributed parcels to a different directory, do the following:- Stop all services.
- Deactivate all in-use parcels.
- Shut down the Cloudera Manager Agent on all hosts.
- Move the existing parcels to the new location.
- Configure the host parcel directory.
- Start the Cloudera Manager Agents.
- Activate the parcels.
- Start all services.
Troubleshooting
If you experience an error while performing parcel operations, click the red 'X' icons on the parcel page to display a message that identifies the source of the error.If a parcel is being distributed but never completes, make sure you have enough free space in the parcel download directories, because Cloudera Manager will try to download and unpack parcels even if there is insufficient space.
Viewing Parcel Usage
- Do one of the following:
- Click in the top navigation bar
- Click Hosts in the top navigation bar and click the Parcels tab.
- Click
- Click the Parcel Usage button.
This page only shows the usage of parcels, not components that were installed as packages. If you select a cluster running packages, the cluster is not displayed, and instead you see a message indicating the cluster is not running parcels.
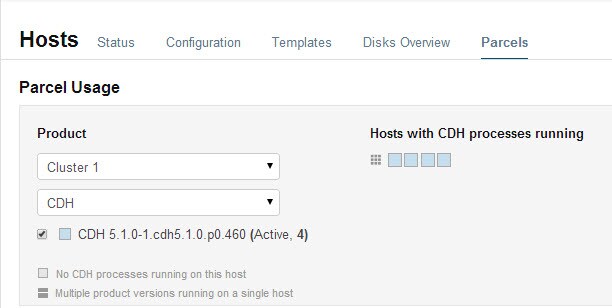
You can view parcel usage by cluster or by product.
You can also view just the hosts running only the active parcels, or just hosts running older parcels (not the currently active parcels), or both.
The host map at the right shows each host in the cluster, with the status of the parcels on that host. If the host is running the processes from the currently activated parcels, the host is indicated in blue. A black square indicates that a parcel has been activated, but that all the running processes are from an earlier version of the software. This occurs, for example, if you have not restarted a service or role after activating a new parcel. If you have individual hosts running components installed as packages, the square is empty.
Move the cursor over the  icon to see the rack to which the hosts are assigned. Hosts on
different racks are displayed in separate rows.
icon to see the rack to which the hosts are assigned. Hosts on
different racks are displayed in separate rows.
To view the exact versions of the software running on a given host, click the square representing the host. This displays the parcel versions installed on that host.
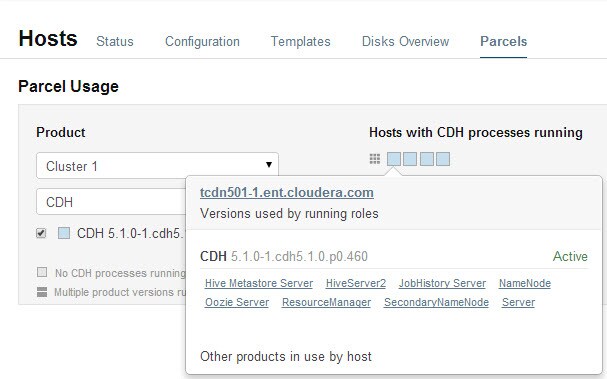
For CDH 4.4, Impala 1.1.1, and Solr 0.9.3 or higher, the pop-up lists the roles running on the selected host that are part of the listed parcel. Clicking a role opens the Cloudera Manager page for that role. It also shows whether the parcel is active or not.
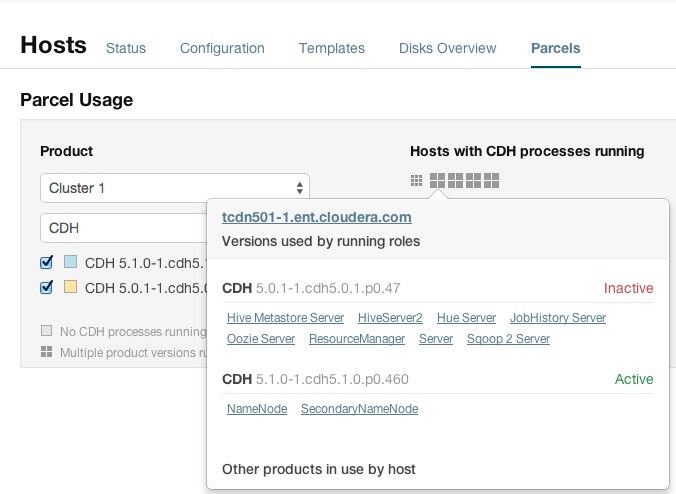
If a host is running various software versions, the square representing the host is a four-square icon  . When you move the cursor over that host, both the active and inactive components are shown. For example, in the image below, the older CDH parcel has been
deactivated, but only the HDFS service has been restarted.
. When you move the cursor over that host, both the active and inactive components are shown. For example, in the image below, the older CDH parcel has been
deactivated, but only the HDFS service has been restarted.
Parcel Configuration Settings
You can configure where parcels are stored on the Cloudera Manager Server host, the URLs of parcel repositories, the properties of a proxy server through which parcels are downloaded, and where parcels distributed to cluster hosts are stored.
Configuring Cloudera Manager Server Parcel Settings
- Use one of the following methods to open the parcel settings page:
- Navigation bar
- Click in the top navigation bar or click Hosts and
click the Parcels tab.
- Click the Configuration button.
- Click
- Menu
- Select .
- Select .
- Navigation bar
- Specify a property:
- Local Parcel Repository Path defines the path on the Cloudera Manager Server host where downloaded parcels are stored.
- Remote Parcel Repository URLs is a list of repositories that Cloudera Manager checks for parcels. Initially this points to the latest released CDH 4, CDH
5, Impala, and Solr repositories, but you can add your own repository locations to the list. Use this mechanism to add Cloudera repositories that are not listed by default, such as older versions of
CDH, or the Sentry parcel for CDH 4.3. You can also use this to add your own custom repositories. The locations of the
Cloudera parcel repositories are https://archive.cloudera.com/product/parcels/version, where
product is a product name and version is a specific product version, latest, or the substitution
variable {latest_supported}. The substitution variable appears after the parcel for the CDH version with the same major number as the Cloudera Manager version to enable
substitution of the latest supported maintenance version of CDH.
To add a parcel repository:
- In the Remote Parcel Repository URLs list, click
 to open an additional row.
 - Enter the path to the repository.
- In the Remote Parcel Repository URLs list, click
- Click Save Changes.
- Set the frequency with which Cloudera Manager checks for new parcels.
- Configure a proxy to access to the remote repositories.
- Configure whether downloads and distribution of parcels should occur automatically when new ones are detected. If automatic downloading and distribution are not enabled (the default), go to the Parcels page to initiate these actions.
- Control which products can be downloaded if automatic downloading is enabled.
- Control whether to retain downloaded parcels.
- Control whether to retain old parcel versions and how many parcel versions to retain
- Theoretically, the concurrent upload count (Maximum Parcel Uploads) is unimportant if all hosts have the same speed Ethernet. Fifty concurrent uploads is acceptable in most cases. However, if the server has more bandwidth (for example, 10 GbE, and the normal hosts are using 1 GbE), then the count is important to maximize bandwidth. It should be at least the difference in speeds (10x in this case).
- The bandwidth limit (Parcel Distribution Rate Limit) should be your Ethernet speed (in MiB/seconds) divided by approximately 16. You can use a higher limit if you have QoS configured to prevent starving other services, or if you can accept the risk associated with higher bandwidth load.
Configuring a Proxy Server
To configure a proxy server through which parcels are downloaded, follow the instructions in Configuring Network Settings.
Configuring the Host Parcel Directory
- Click Hosts in the top navigation bar.
- Click the Configuration tab.
- Select .
- Configure the value of the Parcel Directory property. The setting of the parcel_dir property in the Cloudera Manager Agent configuration file overrides this setting.
- Click Save Changes to commit the changes.
- Restart the Cloudera Manager Agent on all hosts.
Configuring Peer-to-Peer Distribution of Parcels
Cloudera Manager uses a peer-to-peer service to efficiently distribute parcels to cluster hosts. The service is enabled by default and is configured to run on port 7191. You can change this port number, and you can disable peer-to-peer distribution.
- Open Cloudera Manager and select .
- Change the value of the P2P Parcel Distribution Port property to the new port number.
Set the value to 0 to disable peer-to-peer distribution of parcels.
- Click Save Changes to commit the changes.