Modifying Configuration Properties
Minimum Required Role: Configurator (also provided by Cluster Administrator, Full Administrator)
When a service is added to Cloudera Manager, either through the installation or upgrade wizard or with the Add Services workflow, Cloudera Manager automatically sets the configuration properties, based on the needs of the service and characteristics of the cluster in which it will run. These configuration properties include both service-wide configuration properties, as well as specific properties for each role type associated with the service, managed through role groups. A role group is a set of configuration properties for a role type, as well as a list of role instances associated with that group. Cloudera Manager automatically creates a default role group named Role Type Default Group for each role type. See Role Groups.
Changing the Configuration of a Service or Role Instance
- Go to the service status page.
- Click the Configuration tab.
- Under the appropriate role group, select the category for the properties you want to change.
- To search for a text string (such as "snippet"), in a property, value, or description, enter the text string in the Search box at the top of the category list.
- Moving the cursor over the value cell highlights the cell; click anywhere in the highlighted area to enable editing of the value. Then type the new value in the field provided (or
check or uncheck the box, as appropriate).
- To facilitate entering some types of values, you can specify not only the value, but also the units that apply to the value. for example, to enter a setting that specifies bytes per second, you can choose to enter the value in bytes (B), KiBs, MiBs, or GiBs—selected from a drop-down menu that appears when you edit the value.
- If the property allows a list of values, click the
 icon to the right of the edit field to add an
additional field. An example of this is the HDFS DataNode Data Directory property, which can have a comma-delimited list of directories as its value. To remove an item from such a list, click the
icon to the right of the edit field to add an
additional field. An example of this is the HDFS DataNode Data Directory property, which can have a comma-delimited list of directories as its value. To remove an item from such a list, click the
 icon to the right of the field you want to remove.
- Click Save Changes to commit the changes. You can add a note that will be included with the change in the Configuration History. This will change the
setting for the role group, and will apply to all role instances associated with that role group. Depending on the change you made, you may need to restart the service or roles associated with the
configuration you just changed. Or, you may need to redeploy your client configuration for the service. You should see a message to that effect at the top of the Configuration page, and services will
display an outdated configuration
 (Restart Needed),
 (Refresh Needed), or outdated client configuration
  indicator. Click the indicator to display the Stale Configurations page.
Validation of Configuration Properties
Cloudera Manager validates the values you specify for configuration properties. If you specify a value that is outside the recommended range of values or is invalid, Cloudera Manager displays a warning at the top of the Configuration tab and in the text box after you click Save Changes. The warning is yellow if the value is outside the recommended range of values and red if the value is invalid.
Overriding Configuration Properties
- Go to the Status page for the service whose role you want to change.
- Click the Instances tab.
- Click the role instance you want to change.
- Click the Configuration tab.
- Change the configuration values as appropriate.
- Save your changes.
You will most likely need to restart your service or role to have your configuration changes take effect.
Viewing and Editing Overridden Configuration Properties
To see a list of all role instances that have an override value for a particular configuration setting, navigate to the entry for the configuration setting in the Status page, expand the Overridden by n instance(s) link in the value cell for the overridden value.
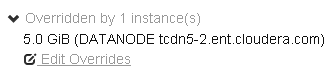
To view the override values, and change them if appropriate, click the Edit Overrides link. This opens the Edit Overrides page, and lists the role instances that have override properties for the selected configuration setting.
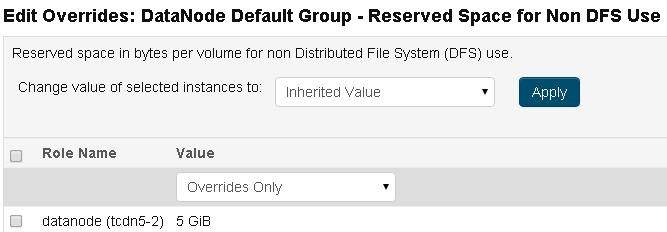
On the Edit Overrides page, you can do any of the following:
- View the list of role instances that have overridden the value specified in the role group. Use the selections on the drop-down menu below the Value column header to view a list of instances that use the inherited value, instances that use an override value, or all instances. This view is especially useful for finding inconsistent properties in a cluster. You can also use the Host and Rack text boxes to filter the list.
- Change the override value for the role instances to the inherited value from the associated role group. To do so, select the role instances you want to change, choose Inherited Value from the drop-down menu next to Change value of selected instances to and click Apply.
- Change the override value for the role instances to a different value. To do so, select the role instances you want to change, choose Other from the drop-down menu next to Change value of selected instances to. Enter the new value in the text box and then click Apply.
Resetting Configuration Properties to the Default Value
To reset a property back to its default value, click the Reset to the default value link below the text box in the value cell. The default value is inserted and both the text box and the Reset link disappear. Explicitly setting a configuration to the same value as its default (inherited value) has the same effect as using the Reset to the default value link.
There is no mechanism for resetting to an autoconfigured value. However, you can use the configuration history and rollback feature to revert any configuration changes.
Restarting Services and Instances after Configuration Changes
- Follow the instructions in Restarting a Service or Starting, Stopping, and Restarting Role Instances.
- If you see a Finished status, the service or role instances have restarted.
- Navigate to the Home page. The service should show a Status of Started for all instances and a health status of Good.