Cloudera Manager and CDH QuickStart Guide
This quick start guide describes how to quickly create a new installation of Cloudera Manager 5, CDH 5, and managed services on a cluster of four hosts. The resulting deployment can be used for demonstrations and proof of concept applications, but is not recommended for production.
Requirements
- The hosts must have at least 10 GB RAM
- You must have root or password-less sudo access to the hosts
- If using root, the hosts must accept the same root password
- The hosts must have Internet access to allow the wizard to install software from archive.cloudera.com
- Run a supported OS:
- RHEL-compatible
- Red Hat Enterprise Linux and CentOS
- 5.7, 64-bit
- 6.4, 64-bit
- 6.4 in SE Linux mode
- 6.5, 64-bit
- Oracle Enterprise Linux (OEL) with Unbreakable Enterprise Kernel (UEK), 64-bit
- 5.6 (UEK R2)
- 6.4 (UEK R2)
- 6.5 (UEK R2, UEK R3)
- Red Hat Enterprise Linux and CentOS
- SLES - SUSE Linux Enterprise Server 11, 64-bit. Service Pack 2 or higher is required. The Updates repository must be active and SUSE Linux Enterprise Software Development Kit 11 SP1 is required.
- Debian - Wheezy (7.0 and 7.1), 64-bit
- Ubuntu - Trusty (14.04) and (Precise) 12.04, 64-bit
- RHEL-compatible
Download and Run the Cloudera Manager Server Installer
- Download the Cloudera Manager installer binary from Cloudera Manager 5.2.7 Downloads to the cluster host where you want to install the Cloudera Manager Server.
- Click Download Cloudera Express or Download Cloudera Enterprise. See Cloudera Express and Cloudera Enterprise Features.
- Optionally register and click Submit or click the Just take me to the download page link. The cloudera-manager-installer.bin file downloads.
- Change cloudera-manager-installer.bin to have executable permission.
$ chmod u+x cloudera-manager-installer.bin
- Run the Cloudera Manager Server installer.
$ sudo ./cloudera-manager-installer.bin
- Read the Cloudera Manager README and then press Return or Enter to choose Next.
- Read the Cloudera Express License and then press Return or Enter to choose Next. Use the arrow keys and press Return or Enter to choose Yes to confirm you accept the license.
- Read the Oracle Binary Code License Agreement and then press Return or Enter to choose Next.
- When the installation completes, the complete URL provided for the Cloudera Manager Admin Console, including the port number, which is 7180 by default. Press Return or Enter to choose OK to continue.
- Press Return or Enter to choose OK to exit the installer.
- On RHEL 5 and CentOS 5, install Python 2.6 or 2.7. Download the appropriate repository rpm packages to the Cloudera Manager Server host and then install Python using yum. For example, use the following commands:
$ su -c 'rpm -Uvh http://download.fedoraproject.org/pub/epel/5/i386/epel-release-5-4.noarch.rpm'
...
$ yum install python26
Start the Cloudera Manager Admin Console
- Wait several minutes for the Cloudera Manager Server to complete its startup. To observe the startup process you can perform tail -f /var/log/cloudera-scm-server/cloudera-scm-server.log on the Cloudera Manager Server host. If the Cloudera Manager Server does not start, see Troubleshooting Installation and Upgrade Problems.
- In a web browser, enter http://Server host:7180, where Server host is the fully-qualified domain name or IP address of the host where the Cloudera Manager Server is running. The login screen for Cloudera Manager Admin Console displays.
- Log into Cloudera Manager Admin Console with the credentials: Username: admin Password: admin.
Install and Configure Software Using the Cloudera Manager Wizard
Installing and configuring Cloudera Manager, CDH, and managed service software on the cluster hosts involves the following three main steps.
Choose Cloudera Manager Edition and Specify Hosts
- Choose Cloudera Enterprise Data Hub Edition Trial, which does not require a license, but expires after 60 days and cannot be renewed. The trial allows you to create all CDH and managed services supported by Cloudera Manager. Click Continue.
- Information is displayed indicating what edition of Cloudera Manager will be installed and the services you can choose from. Click Continue. The Specify hosts for your CDH cluster installation screen displays.
- Specify the four hosts on which to install CDH and managed services. You can specify hostnames or IP addresses and ranges, for example: 10.1.1.[1-4] or host[1-3].company.com. You can specify multiple addresses and address ranges by separating them by commas, semicolons, tabs, or blank spaces, or by placing them on separate lines.
- Click Search. Cloudera Manager identifies the hosts on your cluster. Verify that the number of hosts shown matches the number of hosts where you want to install services. Deselect host entries that do not exist and deselect the hosts where you do not want to install services. Click Continue. The Select Repository screen displays.
Install CDH and Managed Service Software
- Keep the default distribution method Use Parcels and the default version of CDH 5. Leave the Additional Parcels selections at None.
- For the Cloudera Manager Agent, keep the default Matched release for this Cloudera Manager Server. Click Continue. The JDK Installation Options screen displays.
- Select the Install Oracle Java SE Development Kit (JDK) checkbox to allow Cloudera Manager to install the JDK on each cluster host or uncheck if you plan to install it yourself. Leave the Install Java Unlimited Strength Encryption Policy Files checkbox deselected. Click Continue. The Enable Single User Mode screen displays.
- Leave the Single User Mode checkbox deselected and click Continue. The Provide SSH login credentials page displays.
- Specify host SSH login properties:
- Keep the default login root or enter the user name for an account that has password-less sudo permission.
- If you choose to use password authentication, enter and confirm the password.
- Click Continue. Cloudera Manager installs the Oracle JDK and the Cloudera Manager Agent packages on each host and starts the Agent.
- Click Continue. The Installing Selected Parcels screen displays. Cloudera Manager installs CDH. During the parcel installation, progress is indicated for the phases of the parcel installation process in separate progress bars. When the Continue button at the bottom of the screen turns blue, the installation process is completed.
- Click Continue. The Host Inspector runs to validate the installation, and provides a summary of what it finds, including all the versions of the installed components. You can ignore the "Cloudera recommends setting /proc/sys/vm/swappiness to 0" warning and if the validation is otherwise successful, click Finish. The Cluster Setup screen displays.
Add and Configure Services
- Click the All Services radio button to create HDFS, YARN (includes MapReduce 2), ZooKeeper, Oozie, Hive, Hue, Sqoop, HBase, Impala, Solr, Spark, and Key-Value Store Indexer services. Click Continue. The Customize Role Assignments screen displays.
- Configure the following role assignments:
- Click the text field under the HBase Thrift Server role. In the host selection dialog box that displays, select the checkbox next to any host and click OK at the bottom right.
- Click the text field under the Server role of the ZooKeeper service. In the host selection dialog box that displays, uncheck the checkbox next to the host assigned by default (the master host) and select checkboxes next to the remaining three hosts. Click OK at the bottom right.
- Leave the default setting of Use Embedded Database to have Cloudera Manager create and configure all required databases in an embedded PostgreSQL database. Click Test Connection. When the test completes, click Continue. The Review Changes screen displays.
- Review the configuration changes to be applied. Click Continue. The Command Progress page displays.
- The wizard performs 32 steps to configure and starts the services. When the startup completes, click Continue.
- A success message displays indicating that the cluster has been successfully started. Click Finish to proceed to the Home page.
Test the Installation
The Home page looks something like this:
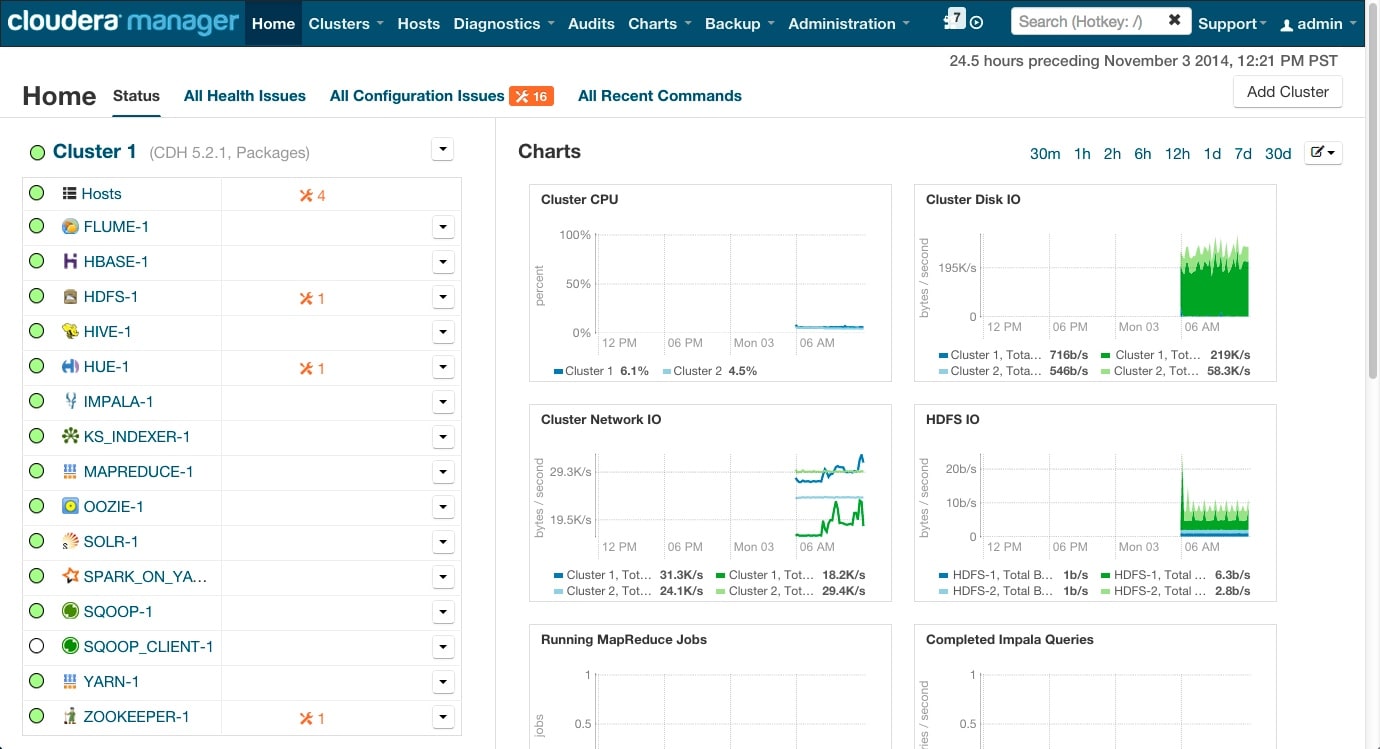
On the left side of the screen is a list of services currently running with their status information. All the services should be running with Good Health
 , however there may be a small number of configuration warnings
indicated by a wrench icon and a number
, however there may be a small number of configuration warnings
indicated by a wrench icon and a number  , which you can ignore.
You can click each service to view more detailed information about the service. You can also test your installation by running a MapReduce job or interacting with the cluster with a Hue application.
Running a MapReduce Job
- Log into a cluster host.
- Run the Hadoop PiEstimator example:
sudo -u hdfs hadoop jar \
/opt/cloudera/parcels/CDH/lib/hadoop-mapreduce/hadoop-mapreduce-examples.jar \
pi 10 100
- View the result of running the job by selecting the following from the top navigation bar in the Cloudera Manager Admin Console: . You
will see an entry like the following:

Testing with Hue
- In the Cloudera Manager Admin Console Home page, click the Hue service.
- Click the Hue Web UI link, which opens Hue in a new window.
- Log in with the credentials, username: hdfs, password: hdfs.
- Choose an application in the navigation bar at the top of the browser window.
For more information, see the Hue User Guide.