Step 3: Installing and Configuring Cloudera Management Service for High Availability
This section demonstrates how to set up shared mounts on MGMT1 and MGMT2, and then install Cloudera Management Service to use those mounts on the primary and secondary servers.
Setting up NFS Mounts for Cloudera Management Service
- Create directories on the NFS server:
$ mkdir -p /media/cloudera-host-monitor
$ mkdir -p /media/cloudera-scm-agent
$ mkdir -p /media/cloudera-scm-eventserver
$ mkdir -p /media/cloudera-scm-headlamp
$ mkdir -p /media/cloudera-service-monitor
$ mkdir -p /media/cloudera-scm-navigator
$ mkdir -p /media/etc-cloudera-scm-agent
- Mark these mounts by adding the following lines to the /etc/exports file on the NFS server:
/media/cloudera-host-monitor MGMT1(rw,sync,no_root_squash,no_subtree_check)
/media/cloudera-scm-agent MGMT1(rw,sync,no_root_squash,no_subtree_check)
/media/cloudera-scm-eventserver MGMT1(rw,sync,no_root_squash,no_subtree_check)
/media/cloudera-scm-headlamp MGMT1(rw,sync,no_root_squash,no_subtree_check)
/media/cloudera-service-monitor MGMT1(rw,sync,no_root_squash,no_subtree_check)
/media/cloudera-scm-navigator MGMT1(rw,sync,no_root_squash,no_subtree_check)
/media/etc-cloudera-scm-agent MGMT1(rw,sync,no_root_squash,no_subtree_check)
/media/cloudera-host-monitor MGMT2(rw,sync,no_root_squash,no_subtree_check)
/media/cloudera-scm-agent MGMT2(rw,sync,no_root_squash,no_subtree_check)
/media/cloudera-scm-eventserver MGMT2(rw,sync,no_root_squash,no_subtree_check)
/media/cloudera-scm-headlamp MGMT2(rw,sync,no_root_squash,no_subtree_check)
/media/cloudera-service-monitor MGMT2(rw,sync,no_root_squash,no_subtree_check)
/media/cloudera-scm-navigator MGMT2(rw,sync,no_root_squash,no_subtree_check)
/media/etc-cloudera-scm-agent MGMT2(rw,sync,no_root_squash,no_subtree_check)
- Export the mounts running the following command on the NFS server:
$ exportfs -a
- Set up the filesystem mounts on MGMT1 and MGMT2
hosts:
- Make sure that the NFS mount helper is installed:
RHEL/CentOS:
$ yum install nfs-utils-lib
Ubuntu:$ apt-get install nfs-common
SUSE:$ zypper install nfs-client
- Create the mount points on both MGMT1 and MGMT2:
$ mkdir -p /var/lib/cloudera-host-monitor
$ mkdir -p /var/lib/cloudera-scm-agent
$ mkdir -p /var/lib/cloudera-scm-eventserver
$ mkdir -p /var/lib/cloudera-scm-headlamp
$ mkdir -p /var/lib/cloudera-service-monitor
$ mkdir -p /var/lib/cloudera-scm-navigator
$ mkdir -p /etc/cloudera-scm-agent
- Mount the following directories to the NFS mounts, on both MGMT1 and MGMT2 (NFS refers to the server NFS hostname or IP address):
$ mount -t nfs NFS:/media/cloudera-host-monitor /var/lib/cloudera-host-monitor
$ mount -t nfs NFS:/media/cloudera-scm-agent /var/lib/cloudera-scm-agent
$ mount -t nfs NFS:/media/cloudera-scm-eventserver /var/lib/cloudera-scm-eventserver
$ mount -t nfs NFS:/media/cloudera-scm-headlamp /var/lib/cloudera-scm-headlamp
$ mount -t nfs NFS:/media/cloudera-service-monitor /var/lib/cloudera-service-monitor
$ mount -t nfs NFS:/media/cloudera-scm-navigator /var/lib/cloudera-scm-navigator
$ mount -t nfs NFS:/media/etc-cloudera-scm-agent /etc/cloudera-scm-agent
- Make sure that the NFS mount helper is installed:
- Set up fstab to persist the mounts across restarts. Edit the /etc/fstab file and add these lines:
NFS:/media/cloudera-host-monitor /var/lib/cloudera-host-monitor nfs auto,noatime,nolock,intr,tcp,actimeo=1800 0 0
NFS:/media/cloudera-scm-agent /var/lib/cloudera-scm-agent nfs auto,noatime,nolock,intr,tcp,actimeo=1800 0 0
NFS:/media/cloudera-scm-eventserver /var/lib/cloudera-scm-eventserver nfs auto,noatime,nolock,intr,tcp,actimeo=1800 0 0
NFS:/media/cloudera-scm-headlamp /var/lib/cloudera-scm-headlamp nfs auto,noatime,nolock,intr,tcp,actimeo=1800 0 0
NFS:/media/cloudera-service-monitor /var/lib/cloudera-service-monitor nfs auto,noatime,nolock,intr,tcp,actimeo=1800 0 0
NFS:/media/cloudera-scm-navigator /var/lib/cloudera-scm-navigator nfs auto,noatime,nolock,intr,tcp,actimeo=1800 0 0
NFS:/media/etc-cloudera-scm-agent /etc/cloudera-scm-agent nfs auto,noatime,nolock,intr,tcp,actimeo=1800 0 0
Installing the Primary
- Connect to a shell on MGMT1, and then install the cloudera-manager-daemons and
cloudera-manager-agent packages:
- Install packages cloudera-manager-daemons and cloudera-manager-agent packages using instructions from Installation Path B (See Installation Path B - Manual Installation Using Cloudera Manager Packages).
- Install the Oracle Java JDK version that is required for your deployment, if it is not already installed on the host. See Supported JDK Versions.
- Configure the agent to report its hostname as <MGMTHostname> to Cloudera Manager. This ensures that the
connections from the Cloudera Manager Agents on the CDH cluster hosts report to the correct Cloudera Management Service host in the event of a failover.
- Edit the/etc/cloudera-scm-agent/config.ini file to update the following lines:
server_host=CMSHostname
listening_hostname=MGMTHostname
- Edit the /etc/hosts file and add MGMTHostname as an alias for your public IP address
for MGMT1 by adding a line like this at the end of your /etc/hosts file:
MGMT1 IP MGMTHostname
- Confirm that the alias has taken effect by running the ping command. For example:
[root@MGMT1 ~]# ping MGMTHostname
PING MGMTHostname (MGMT1 IP) 56(84) bytes of data.
64 bytes from MGMTHostname (MGMT1 IP): icmp_seq=1 ttl=64 time=0.034 ms
64 bytes from MGMTHostname (MGMT1 IP): icmp_seq=2 ttl=64 time=0.018 ms
...
- Make sure that the cloudera-scm user and the cloudera-scm group have access to the mounted directories under /var/lib, by using the chown command on cloudera-scm. For example, run the following on MGMT1:
$ chown -R cloudera-scm:cloudera-scm /var/lib/cloudera-scm-eventserver
$ chown -R cloudera-scm:cloudera-scm /var/lib/cloudera-scm-navigator
$ chown -R cloudera-scm:cloudera-scm /var/lib/cloudera-service-monitor
$ chown -R cloudera-scm:cloudera-scm /var/lib/cloudera-host-monitor
$ chown -R cloudera-scm:cloudera-scm /var/lib/cloudera-scm-agent
$ chown -R cloudera-scm:cloudera-scm /var/lib/cloudera-scm-headlamp
- Restart the agent on MGMT1 (this also starts the agent if it is not running):
$ service cloudera-scm-agent restart
- Connect to the Cloudera Manager Admin Console running on <CMSHostname> and:
- Go to the Hosts tab and make sure that a host with name <MGMTHostname> is reported. (If it is not available yet, wait for it to show up before you proceed.)
- Click Add Cloudera Management Service.
- Make sure you install all of the roles of the Cloudera Management Service on the host named MGMTHostname.
- Proceed through the steps to configure the roles of the service to use your database server, and use defaults for the storage directory for Host Monitor or Service Monitor.
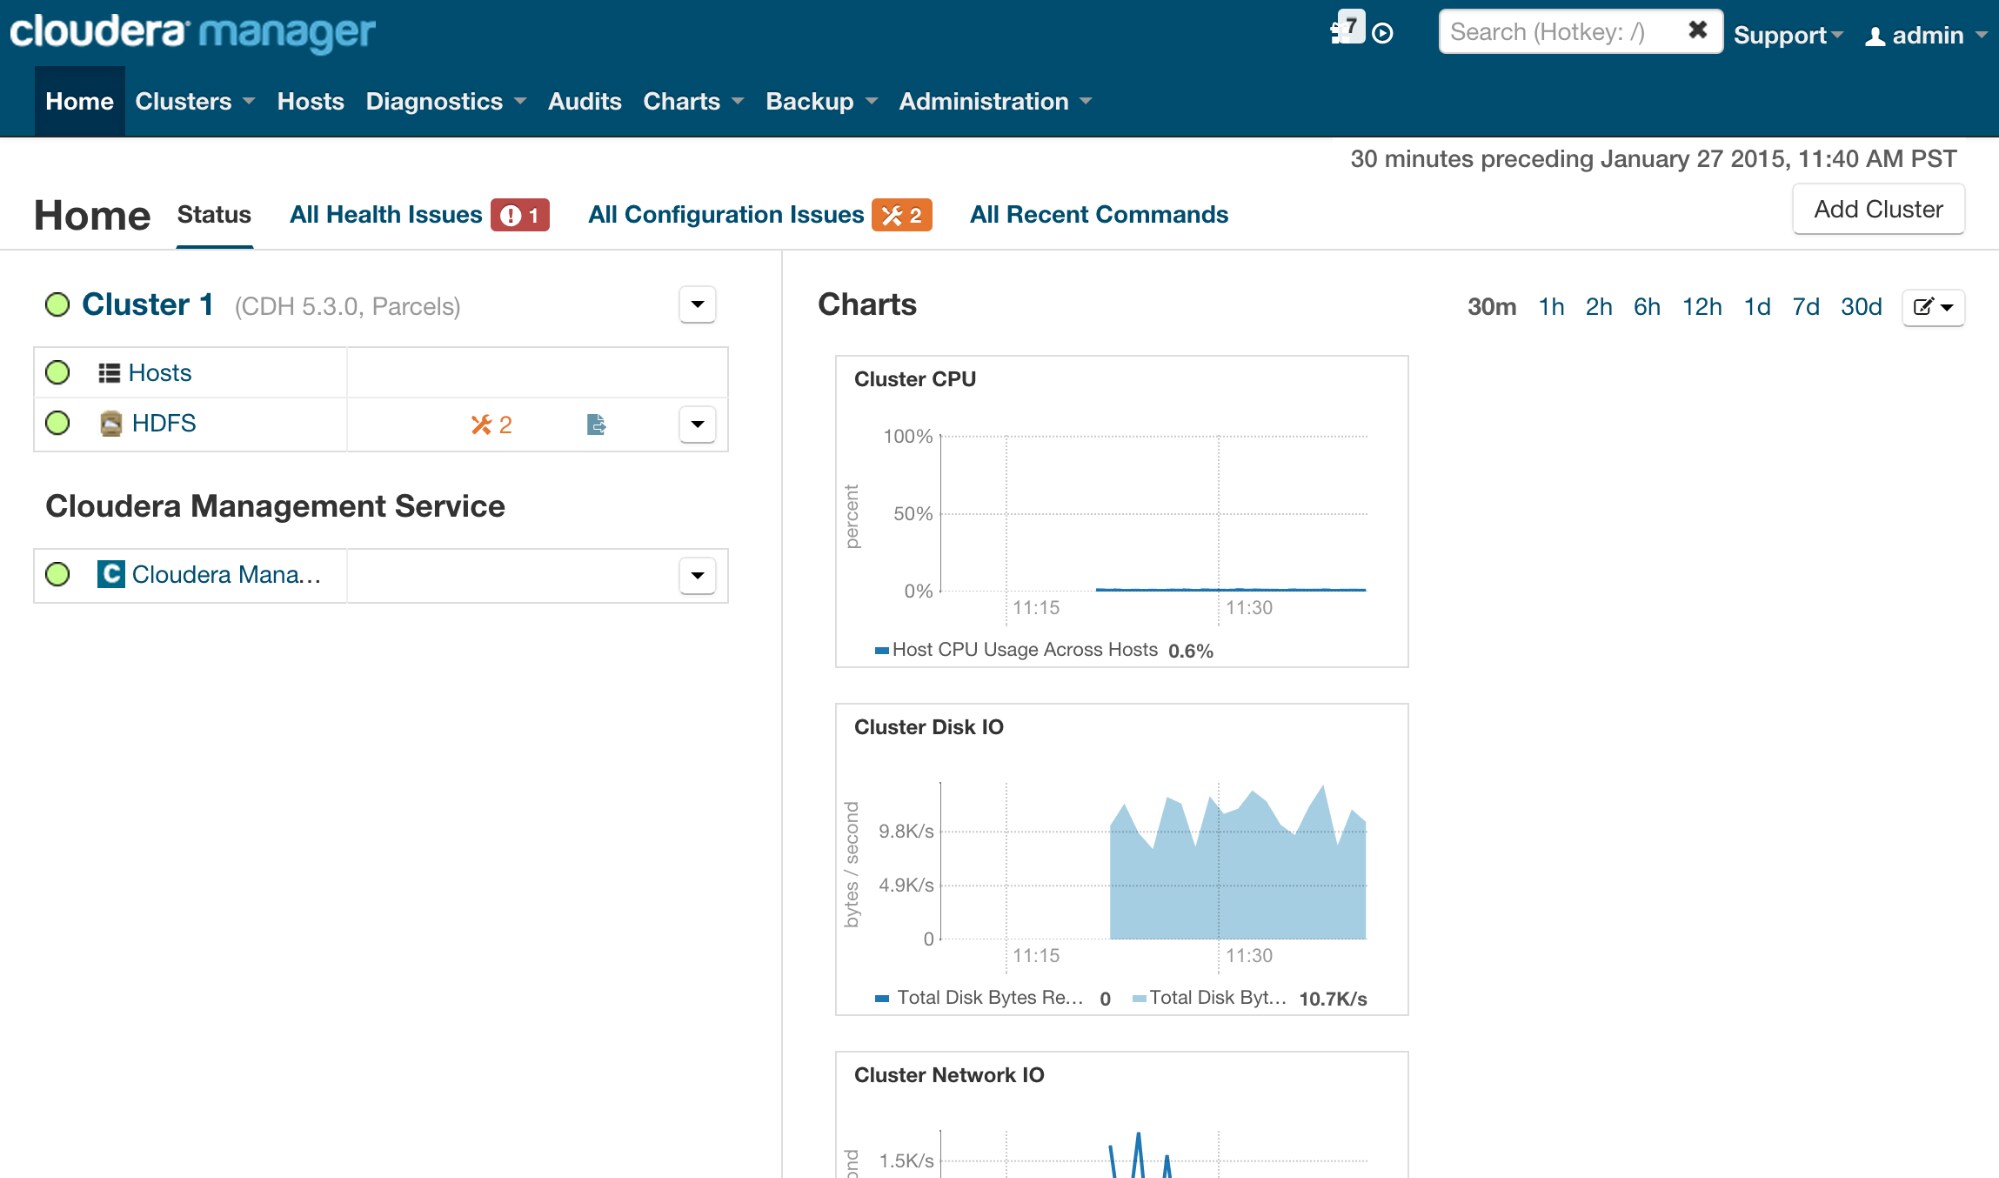
- After you have completed the steps, wait for the Cloudera Management Service to finish starting, and verify the health status of your clusters as well as the health of the Cloudera
Management Service as reported in the Cloudera Manager Admin Console. The health status indicators should be green, as shown:
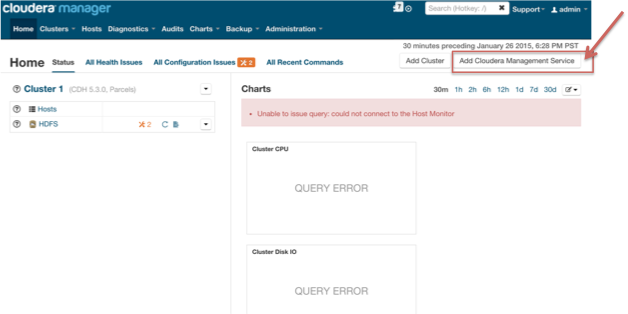
The service health for Cloudera Management Service might, however, show as red:
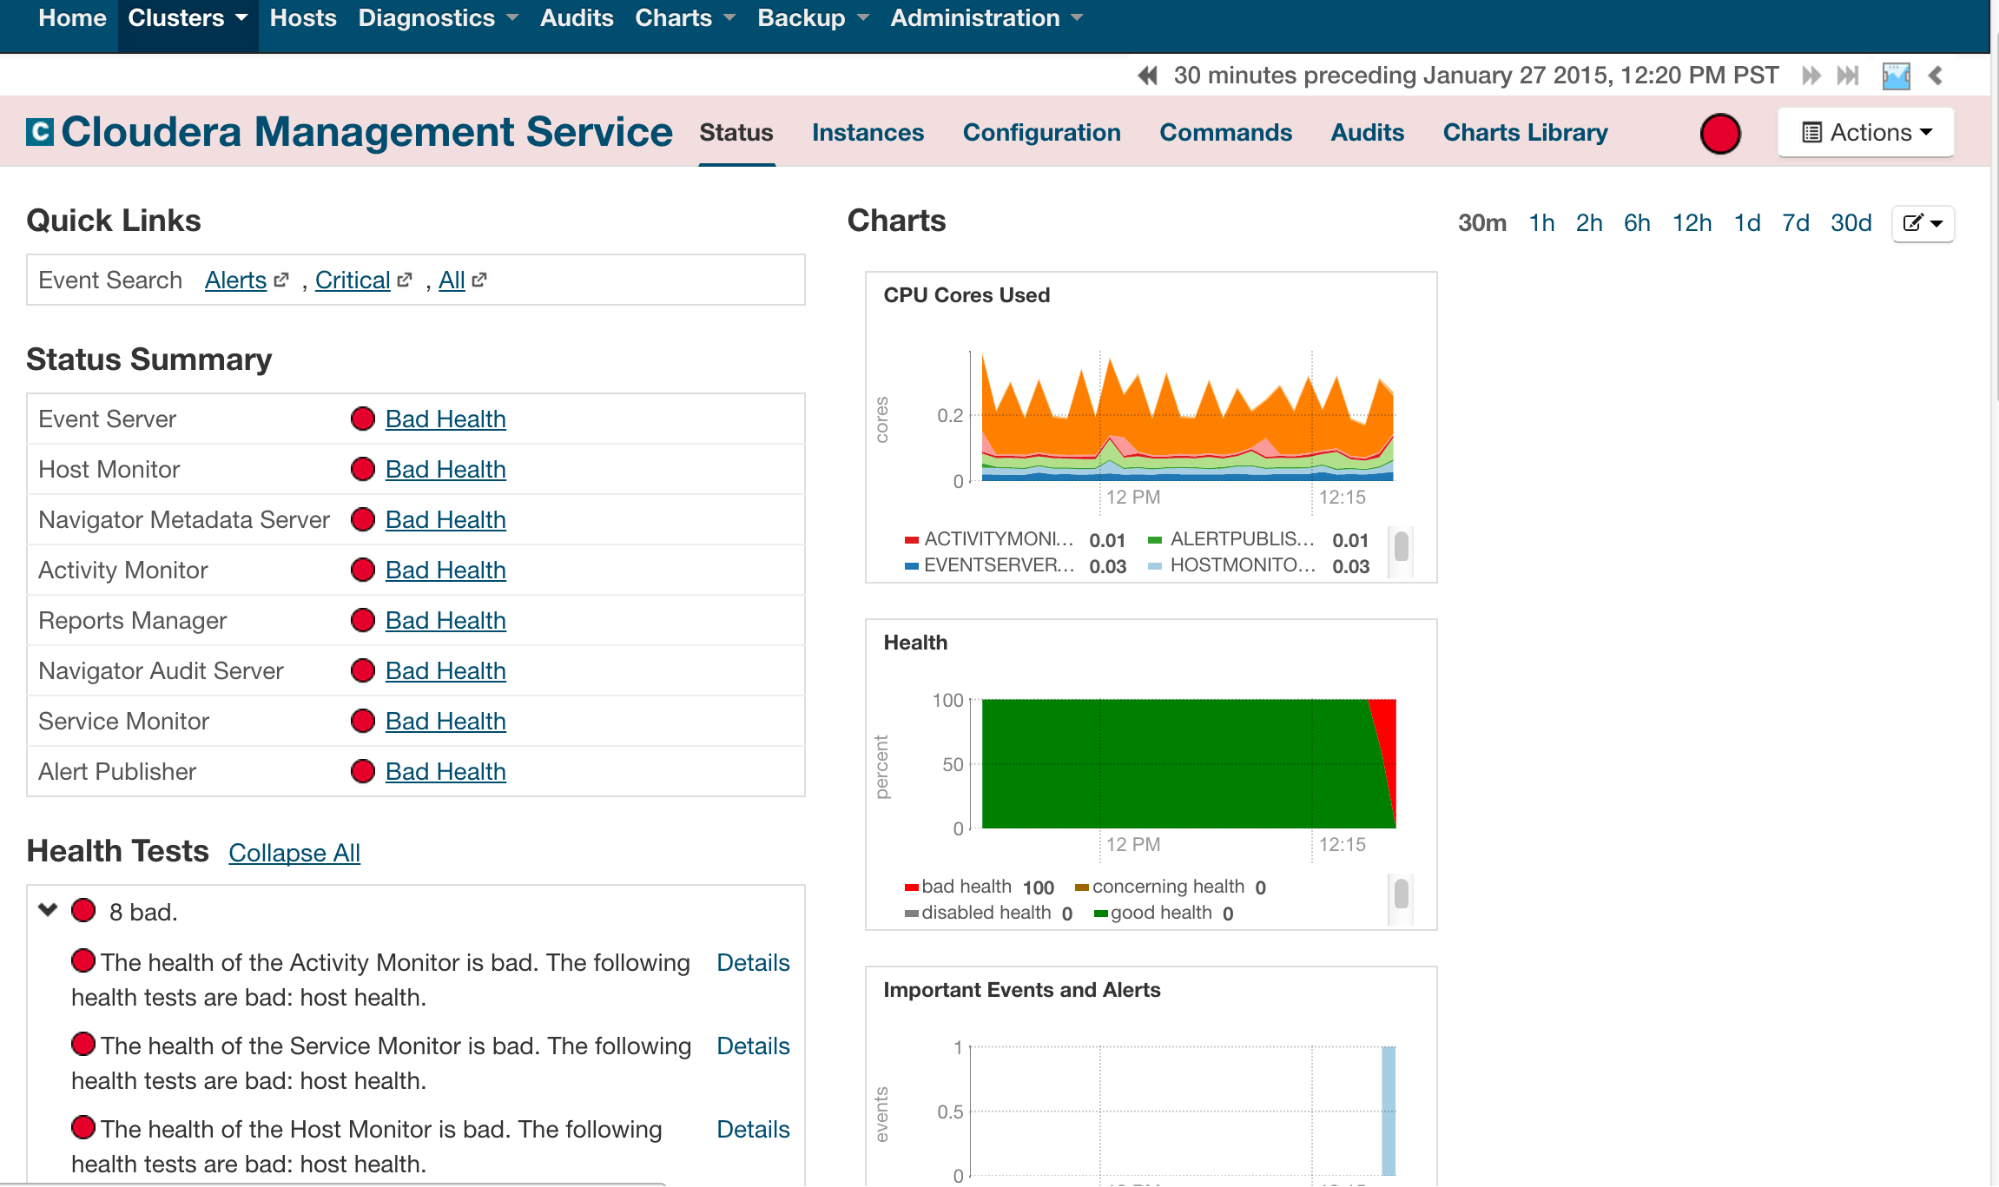
In this case, you need to identify whether the health test failure is caused by the Hostname and Canonical Name Health Check for the MGMTHostname host, which might look like this:

This test can fail in this way because of the way you modified /etc/hosts on MGMT1 and MGMT2 to allow the resolution of MGMTHostname locally. This test can be safely disabled on the MGMTHostname host from the Cloudera Manager Admin Console.
- If you are configuring Kerberos and SSL, see TLS and Kerberos Configuration for Cloudera Manager High Availability for configuration changes as part of this step.
- Edit the/etc/cloudera-scm-agent/config.ini file to update the following lines:
Installing the Secondary
- Stop all Cloudera Management Service roles using the Cloudera Manager Admin Console:
- On the Home page, click
 to the right of Cloudera Management Service and select Stop.
 - Click Stop to confirm. The Command Details window shows the progress of stopping the roles.
- When Command completed with n/n successful subcommands appears, the task is complete. Click Close.
- On the Home page, click
- Stop the cloudera-scm-agent service on MGMT1:
$ service cloudera-scm-agent stop
- Connect to a shell on MGMT2, and then install cloudera-manager-daemons and cloudera-manager-agent:
- Install the cloudera-manager-daemons and cloudera-manager-agent packages using instructions from Installation Path B. See Installation Path B - Manual Installation Using Cloudera Manager Packages.
- Install the Oracle Java JDK version that is required for your deployment, if it is not already installed on the host. See Supported JDK Versions.
- Configure the agent to report its hostname as MGMTHostname to Cloudera Manager, as described previously in Installing the Primary.
- Make sure that /etc/cloudera-scm-agent/config.ini has the following lines (because this is a shared mount with the primary, it should be the same as in
the primary installation):
server_host=<CMHostname>
listening_hostname=<MGMTHostname>
- Edit the /etc/hosts file and add MGMTHostname as an alias for your public IP address
for MGMT2, by adding a line like this at the end of your /etc/hosts file:
<MGMT2-IP> <MGMTHostname>
- Confirm that the alias is working by running the ping command. For example:
[root@MGMT2 ~]# ping MGMTHostname
PING MGMTHostname (MGMT2 IP) 56(84) bytes of data.
64 bytes from MGMTHostname (MGMT2 IP): icmp_seq=1 ttl=64 time=0.034 ms
64 bytes from MGMTHostname (MGMT2 IP): icmp_seq=2 ttl=64 time=0.018 ms
- Make sure that /etc/cloudera-scm-agent/config.ini has the following lines (because this is a shared mount with the primary, it should be the same as in
the primary installation):
- Start the agent on MGMT2 by running the following command:
$ service cloudera-scm-agent start
- Log into the Cloudera Manager Admin Console in a web browser and start all Cloudera Management Service roles.
This starts the Cloudera Management Service on MGMT2.
- Wait for the Cloudera Manager Admin Console to report that the services have started.
- Confirm that the services have started on this host by running the following command on MGMT2:
$ ps -elf | grep “scm”
You should see ten total processes running on that host, including the eight Cloudera Management Service processes, a Cloudera Manager Agent process, and a Supervisor process.
- Test the secondary installation through the Cloudera Management Admin Console, and inspect the health of the Cloudera Management Service roles, before proceeding.
Failing Back to the Primary
Before finishing the installation, fail back to the primary host (MGMT1):
- Stop the cloudera-scm-agent service on MGMT2:
$ service cloudera-scm-agent hard_stop_confirmed
- Start the cloudera-scm-agent service on MGMT1:
$ service cloudera-scm-agent start