Cloudera Navigator Metadata Server
- Obtains connection information about CDH services from the Cloudera Manager Server
- Extracts metadata for the entities managed by those services at periodic intervals
- Manages and applies metadata extraction policies during metadata extraction
- Indexes and stores entity metadata
- Manages authorization data for Navigator users
- Manages audit report metadata
- Implements the Navigator UI and API
Continue reading:
- Adding the Navigator Metadata Server
- Starting, Stopping, and Restarting the Navigator Metadata Server
- Navigator Metadata Server Sizing and Performance Recommendations
- Moving the Navigator Metadata Server
- Configuring the Navigator Metadata Server Storage Directory
- Configuring the Navigator Metadata Server Port
- Enabling Hive Metadata Extraction in a Secure Cluster
- Enabling Spark Metadata Extraction
- Configuring a JMS Server for Policy Messages
- Enabling and Disabling Metadata Policy Expression Input
- Configuring the Session Timeout
- Managing Anonymous Usage Data Collection
Adding the Navigator Metadata Server
Minimum Required Role: Navigator Administrator (also provided by Full Administrator)
- Configure the database where policies, roles, and audit report metadata is stored.
- Do one of the following:
- Select .
- On the Status tab of the Home page, in Cloudera Management Service table, click the Cloudera Management Service link.
- Click the Instances tab.
- Click the Add Role Instances button. The Customize Role Assignments page displays.
- Assign the Navigator role to a host.
- Customize the assignment of role instances to hosts. The wizard evaluates the hardware configurations of the hosts to determine the best hosts for each role. The wizard assigns all
worker roles to the same set of hosts to which the HDFS DataNode role is assigned. You can reassign role instances if necessary.
Click a field below a role to display a dialog containing a list of hosts. If you click a field containing multiple hosts, you can also select All Hosts to assign the role to all hosts, or Custom to display the pageable hosts dialog.
The following shortcuts for specifying hostname patterns are supported:- Range of hostnames (without the domain portion)
Range Definition Matching Hosts 10.1.1.[1-4] 10.1.1.1, 10.1.1.2, 10.1.1.3, 10.1.1.4 host[1-3].company.com host1.company.com, host2.company.com, host3.company.com host[07-10].company.com host07.company.com, host08.company.com, host09.company.com, host10.company.com - IP addresses
- Rack name
Click the View By Host button for an overview of the role assignment by hostname ranges.
- Range of hostnames (without the domain portion)
- Customize the assignment of role instances to hosts. The wizard evaluates the hardware configurations of the hosts to determine the best hosts for each role. The wizard assigns all
worker roles to the same set of hosts to which the HDFS DataNode role is assigned. You can reassign role instances if necessary.
- When you are satisfied with the assignments, click Continue.
- Configure database settings:
- Choose the database type:
- Keep the default setting of Use Embedded Database to have Cloudera Manager create and configure required databases. Record the auto-generated
passwords.
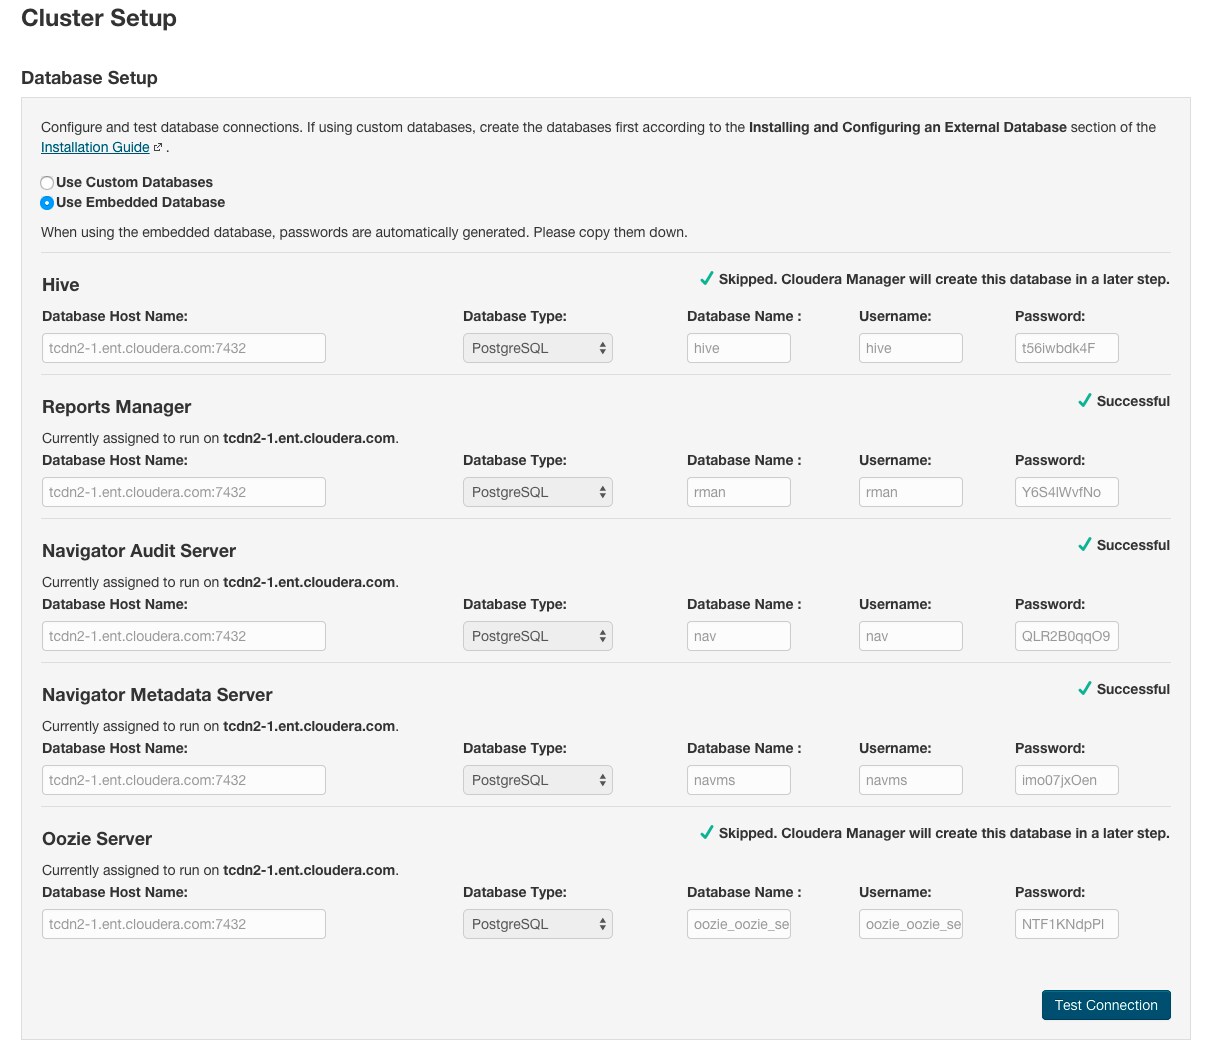
- Select Use Custom Databases to specify external databases.
- Enter the database host, database type, database name, username, and password for the database that you created when you set up the database.
- If you are adding the Oozie service, you can change your Oozie configuration to control when data is purged in order to improve performance, cut down on database disk usage, improve upgrade performance, or to keep the history for a longer period of time. See Configuring Oozie Data Purge Settings Using Cloudera Manager.
- Keep the default setting of Use Embedded Database to have Cloudera Manager create and configure required databases. Record the auto-generated
passwords.
- Click Test Connection to confirm that Cloudera Manager can communicate with the database using the information you have supplied. If the test succeeds in all cases, click Continue; otherwise, check and correct the information you have provided for the database and then try the test again. (For some servers, if you are using the embedded database, you will see a message saying the database will be created at a later step in the installation process.) The Review Changes screen displays.
- Choose the database type:
- Click Finish.
Starting, Stopping, and Restarting the Navigator Metadata Server
- Do one of the following:
- Select .
- On the Status tab of the Home page, in Cloudera Management Service table, click the Cloudera Management Service link.
- Click the Instances tab.
- Do one of the following depending on your role:
-
Minimum Required Role: Full Administrator
- Select the checkbox next to the Navigator Metadata Server role.
- Select . Click Action to confirm the action, where Action is Start, Stop, or Restart.
-
Minimum Required Role: Navigator Administrator (also provided by Full Administrator)
- Click the Navigator Metadata Server role link.
- Select . Click Action this Navigator Metadata Server, where Action is Start, Stop, or Restart, to confirm the action.
-
Navigator Metadata Server Sizing and Performance Recommendations
Minimum Required Role: Navigator Administrator (also provided by Full Administrator)
- Extracting metadata from the cluster and creating relationships
- Querying
The Navigator Metadata Server uses Solr to store, index, and query metadata. Indexing happens during extraction. Querying is fast and efficient because the data is indexed.
Memory and CPU requirements are based on amount of data that is stored and indexed. With 6 GB of RAM and 8-10 cores Solr can process 6 million entities in 25-30 minutes or 80 million entities in 8 to 9 hours. Any less RAM than 6GB and will result in excessive garbage collection and possibly out-of-memory exceptions. For large clusters, Cloudera advises at least 8 GB of RAM and 8 cores. The Solr instance runs in process with Navigator, so the Java heap for the Navigator Metadata Server should be set according to the size of cluster.
By default, during the Cloudera Manager Installation wizard the Navigator Audit Server and Navigator Metadata Server are assigned to the same host as the Cloudera Management Service monitoring roles. This configuration works for a small cluster, but should be updated before the cluster grows. You can either change the configuration at installation time or move the Navigator Metadata Server if necessary.
Moving the Navigator Metadata Server
Minimum Required Role: Navigator Administrator (also provided by Full Administrator)
- Stop the Navigator Metadata Server, delete it from existing host, and add it to a new host.
- If the Solr data path is not on NFS/SAN, move the data to the same path on the new host.
- Start the Navigator Metadata Server.
Configuring the Navigator Metadata Server Storage Directory
Minimum Required Role: Navigator Administrator (also provided by Full Administrator)
The section describes how to configure where the Navigator Metadata Server stores extracted and indexed data. The default is /var/lib/cloudera-scm-navigator.
- Do one of the following:
- Select .
- On the Status tab of the Home page, in Cloudera Management Service table, click the Cloudera Management Service link.
- Click the Configuration tab.
- Select .
- Specify the directory in the Navigator Metadata Server Storage Dir property.
If more than one role group applies to this configuration, edit the value for the appropriate role group. See Modifying Configuration Properties.
- Click Save Changes.
- Click the Instances tab.
- Restart the role.
Configuring the Navigator Metadata Server Port
Minimum Required Role: Navigator Administrator (also provided by Full Administrator)
Describes how to configure the port on which the Navigator UI is accessed. The default is 7187.
- Do one of the following:
- Select .
- On the Status tab of the Home page, in Cloudera Management Service table, click the Cloudera Management Service link.
- Click the Configuration tab.
- In the Search box, type ports.
- Specify the port in the Navigator Metadata Server Port property.
If more than one role group applies to this configuration, edit the value for the appropriate role group. See Modifying Configuration Properties.
- Click Save Changes.
- Click the Instances tab.
- Restart the role.
Enabling Hive Metadata Extraction in a Secure Cluster
Minimum Required Role: Navigator Administrator (also provided by Full Administrator)
The Navigator Metadata Server uses the hue user to connect to the Hive Metastore. The hue user is able to connect to the Hive Metastore by default. However, if the Hive service Hive Metastore Access Control and Proxy User Groups Override property and/or the HDFS service Hive Proxy User Groups property have been changed from their default values to settings that prevent the hue user from connecting to the Hive Metastore, Navigator Metadata Server will be unable to extract metadata from Hive. If this is the case, modify the Hive service Hive Metastore Access Control and Proxy User Groups Override property and/or the HDFS service Hive Proxy User Groups property so that the hue user can connect as follows:- Go to the Hive or HDFS service.
- Click the Configuration tab.
- In the Search box, type proxy.
- In the Hive service Hive Metastore Access Control and Proxy User Groups Override or the HDFS service Hive Proxy User Groups
property, click
 to add a new row.
If more than one role group applies to this configuration, edit the value for the appropriate role group. See Modifying Configuration Properties.
- Type hue.
- Click Save Changes to commit the changes.
- Restart the service.
Enabling Spark Metadata Extraction
Minimum Required Role: Navigator Administrator (also provided by Full Administrator)
Spark is an unsupported service and by default Spark metadata extraction is disabled. To enable Spark metadata extraction:- Do one of the following:
- Select .
- On the Status tab of the Home page, in Cloudera Management Service table, click the Cloudera Management Service link.
- Click the Configuration tab.
- Select .
- In Navigator Metadata Server Advanced Configuration Snippet (Safety Valve) for cloudera-navigator.properties, set the property
nav.spark.extraction.enable=true
If more than one role group applies to this configuration, edit the value for the appropriate role group. See Modifying Configuration Properties.
- Click Save Changes to commit the changes.
- Restart the role.
Configuring a JMS Server for Policy Messages
Minimum Required Role: Navigator Administrator (also provided by Full Administrator)
- Do one of the following:
- Select .
- On the Status tab of the Home page, in Cloudera Management Service table, click the Cloudera Management Service link.
- Click the Configuration tab.
- Select .
- Set the following properties:
Property Description JMS URL The URL of the JMS server to which notifications of changes to entities affected by policies are sent. Default: tcp://localhost:61616.
JMS User The JMS user to which notifications of changes to entities affected by policies are sent. Default: admin.
JMS Password The password of the JMS user to which notifications of changes to entities affected by policies are sent. Default: admin.
JMS Queue The JMS queue to which notifications of changes to entities affected by policies are sent. Default: Navigator.
If more than one role group applies to this configuration, edit the value for the appropriate role group. See Modifying Configuration Properties.
- Click Save Changes to commit the changes.
- Restart the role.
Enabling and Disabling Metadata Policy Expression Input
Minimum Required Role: Navigator Administrator (also provided by Full Administrator)
- Do one of the following:
- Select .
- On the Status tab of the Home page, in Cloudera Management Service table, click the Cloudera Management Service link.
- Click the Configuration tab.
- Select .
- Select or deselect the Enable Expression Input checkbox.
If more than one role group applies to this configuration, edit the value for the appropriate role group. See Modifying Configuration Properties.
- Click Save Changes to commit the changes.
- Restart the role.
Configuring the Session Timeout
Minimum Required Role: Navigator Administrator (also provided by Full Administrator)
The default session timeout is 30 minutes. To change the timeout period:- Do one of the following:
- Select .
- On the Status tab of the Home page, in Cloudera Management Service table, click the Cloudera Management Service link.
- Click the Configuration tab.
- Select .
- In Navigator Metadata Server Advanced Configuration Snippet (Safety Valve) for cloudera-navigator.properties, set the property
nav.max_inactive_interval=period (s)
If more than one role group applies to this configuration, edit the value for the appropriate role group. See Modifying Configuration Properties.
- Click Save Changes to commit the changes.
- Restart the role.
Managing Anonymous Usage Data Collection
Minimum Required Role: Navigator Administrator (also provided by Full Administrator)
Cloudera Navigator sends anonymous usage information using Google Analytics to Cloudera. The information helps Cloudera improve Cloudera Navigator. By default anonymous usage data collection is enabled. To enable and disable data collection:
- Do one of the following:
- Select .
- On the Status tab of the Home page, in Cloudera Management Service table, click the Cloudera Management Service link.
- Click the Configuration tab.
- Select .
- Select or deselect the Allow Usage Data Collection checkbox.
If more than one role group applies to this configuration, edit the value for the appropriate role group. See Modifying Configuration Properties.
- Click Save Changes to commit the changes.
- Restart the role.