Dynamic Resource Pools
Minimum Required Role: Configurator (also provided by Cluster Administrator, Full Administrator)
A dynamic resource pool is a named configuration of resources and a policy for scheduling the resources among YARN applications and Impala queries running in the pool. Dynamic resource pools allow you to schedule and allocate resources to YARN applications and Impala queries based on a user's access to specific pools and the resources available to those pools. If a pool's allocation is not in use it can be given to other pools. Otherwise, a pool receives a share of resources in accordance with the pool's weight. Dynamic resource pools have ACLs that restrict who can submit work to and administer them.
A configuration set defines the allocation of resources across pools that may be active at a given time. For example, you can define "weekday" and "weekend" configuration sets, which define different resource pool configurations for different days of the week.
A scheduling rule defines when a configuration set is active. The configuration set is updated in affected services every hour.
Resource pools can be nested, with sub-pools restricted by the settings of their parent pool.
The resources available for sharing are subject to the allocations made for each service if static service pools (cgroups) are being enforced. For example, if the static pool for YARN is 75% of the total cluster resources, then resource pools will use only that 75% of resources.
Managing Dynamic Resource Pools
After you create or edit a resource pool,  displays while the settings are propagated to the
service configuration files. You can also manually refresh the files.
displays while the settings are propagated to the
service configuration files. You can also manually refresh the files.
Viewing Dynamic Resource Pool Configuration
- YARN Independent RM - Weight, Virtual Cores, Min and Max Memory, Max Running Apps, and Scheduling Policy
- YARN and Impala Integrated RM
- YARN - Weight, Virtual Cores, Min and Max Memory, Max Running Apps, and Scheduling Policy
- Impala - Max Running Queries and Max Queued Queries
- YARN and Impala Independent RM
- YARN - Weight, Virtual Cores, Min and Max Memory, Max Running Apps, and Scheduling Policy
- Impala - Max Memory, Max Running Queries, and Max Queued Queries
- Impala Independent RM - Max Memory, Max Running Queries, and Max Queued Queries
- Select . If the cluster has a YARN service, the Dynamic Resource Pools Status tab displays. If the cluster has only an Impala service enabled for dynamic resource pools, the Dynamic Resource Pools Configuration tab displays.
- If the Status page is displayed, click the Configuration tab. A list of the currently configured pools with their configured limits displays.
Enabling and Disabling Dynamic Resource Pools for Impala
By default dynamic resource pools for Impala are disabled. If dynamic resource pools are disabled, the Impala section will not appear in the Dynamic Resource Pools tab or in the resource pool dialogs within that page. To modify the Impala dynamic resource pool setting:- Go to the Impala service.
- Click the Configuration tab.
- Select .
- Select or deselect the Enable Dynamic Resource Pools checkbox.
- Click Save Changes to commit the changes.
- Restart the Impala service.
Creating a Dynamic Resource Pool
- Select . If the cluster has a YARN service, the Dynamic Resource Pools Status tab displays. If the cluster has only an Impala service enabled for dynamic resource pools, the Dynamic Resource Pools Configuration tab displays.
- If the Status page is displayed, click the Configuration tab. A list of the currently configured pools with their configured limits displays.
- Click Add Resource Pool. The Add dialog box displays showing the General tab.
- Specify a name and resource limits for the pool:
- In the Resource Pool Name field, specify the pool name. Enter a unique name containing only alphanumeric characters. If referencing a user or group name that contains a ".", replace the "." with "_dot_".
- Specify the policy for scheduling resources among applications running in the pool:
- Dominant Resource Fairness (DRF) (default) - An extension of fair scheduling for more than one resource—it determines resource shares (CPU, memory) for a job separately based on the availability of those resources and the needs of the job.
- Fair Scheduler (FAIR) - Determines resource shares based on memory.
- First-In, First-Out (FIFO) - Determines resource shares based on when the job was added.
- If you have enabled Fair Scheduler preemption, optionally set a preemption timeout to specify how long a job in this pool must wait before it can preempt resources from jobs in other pools. To enable preemption, click the Fair Scheduler Preemption link or follow the procedure in Enabling Preemption.
- Do one or more of the following:
- Click the YARN tab.
- Click a configuration set.
- Specify a weight that indicates that pool's share of resources relative to other pools, minimum and maximums for virtual cores and memory, and a limit on the number of applications that can run simultaneously in the pool.
- Click the Impala tab.
- Click a configuration set.
- Specify the maximum number of concurrently running and queued queries in the pool.
- Click the YARN tab.
- If you have enabled ACLs and specified users or groups, optionally click the Submission and Administration Access Control tabs to specify which users and groups can submit applications and which users can view all and kill applications. The default is that anyone can submit, view all, and kill applications. To restrict either of these permissions, select the Allow these users and groups radio button and provide a comma-delimited list of users and groups in the Users and Groups fields respectively. Click OK.
Adding Sub-Pools
Pools can be nested as sub-pools. They share among their siblings the resources of the parent pool. Each sub-pool can have its own resource restrictions; if those restrictions fall within the configuration of the parent pool, then the limits for the sub-pool take effect. If the limits for the sub-pool exceed those of the parent, then the parent limits take effect.
Once you create sub-pools, jobs cannot be submitted to the parent pool; they must be submitted to a sub-pool.
- Select . If the cluster has a YARN service, the Dynamic Resource Pools Status tab displays. If the cluster has only an Impala service enabled for dynamic resource pools, the Dynamic Resource Pools Configuration tab displays.
- If the Status page is displayed, click the Configuration tab. A list of the currently configured pools with their configured limits displays.
- Click
 at the right of a resource pool row and select Add Sub
Pool. Configure sub-pool properties.
at the right of a resource pool row and select Add Sub
Pool. Configure sub-pool properties. - Click OK.
Configuring Default Scheduler Properties
- Select . If the cluster has a YARN service, the Dynamic Resource Pools Status tab displays. If the cluster has only an Impala service enabled for dynamic resource pools, the Dynamic Resource Pools Configuration tab displays.
- If the Status page is displayed, click the Configuration tab. A list of the currently configured pools with their configured limits displays.
- Click the Default Settings button.
- Specify the default scheduling policy, maximum applications, and preemption timeout properties.
- Click OK.
Editing Dynamic Resource Pools
- Select . If the cluster has a YARN service, the Dynamic Resource Pools Status tab displays. If the cluster has only an Impala service enabled for dynamic resource pools, the Dynamic Resource Pools Configuration tab displays.
- If the Status page is displayed, click the Configuration tab. A list of the currently configured pools with their configured limits displays.
- Click Edit at the right of a resource pool row. Edit the properties and click OK.
- If you have enabled ACLs and specified users or groups, optionally click the Submission and Administration Access Control tabs to specify which users and groups can submit applications and which users can view all and kill applications. The default is that anyone can submit, view all, and kill applications. To restrict either of these permissions, select the Allow these users and groups radio button and provide a comma-delimited list of users and groups in the Users and Groups fields respectively. Click OK.
YARN Pool Status and Configuration Options
Viewing Dynamic Resource Pool Status
Select . The Status tab displays the YARN resource pools currently in use for the cluster. See Monitoring Dynamic Resource Pools for more information.
Setting User Limits
Pool properties determine the maximum number of applications that can run in a pool. To limit the number of applications specific users can run at the same time in a pool:
- Select .
- Click the Configuration tab.
- Click the User Limits tab. The table displays a list of users and the maximum number of jobs each user can submit.
- Click Add User Limit.
- Specify a username. Enter a unique name containing only alphanumeric characters. If referencing a user or group name that contains a ".", replace the "." with "_dot_".
- Specify the maximum number of running applications.
- Click OK.
Enabling ACLs
To specify whether ACLs are checked:
- Select .
- Click the Configuration tab.
- Click Other Settings.
- In the Enable ResourceManager ACLs property, click
 . The YARN service configuration page displays.
 - Select the checkbox.
- Click Save Changes to commit the changes.
- Click
 to invoke the cluster restart
wizard.
to invoke the cluster restart
wizard. - Click Restart Cluster.
- Click Restart Now.
- Click Finish.
Configuring ACLs
To configure which users and groups can submit and kill YARN applications in any resource pool:
- Enable ACLs.
- Select .
- Click the Configuration tab.
- Click Other Settings.
- In the Admin ACL property, click . The YARN service configuration
page displays.
- Specify which users and groups can submit and kill applications.
- Click Save Changes to commit the changes.
- Click to invoke the cluster restart wizard.
- Click Restart Cluster.
- Click Restart Now.
- Click Finish.
Enabling Preemption
- Select .
- Click the Configuration tab.
- Click the User Limits tab. The table shows you a list of users and the maximum number of jobs each user can submit.
- Click Other Settings.
- In the Fair Scheduler Preemption, click . The YARN service
configuration page displays.
- Select the checkbox.
- Click Save Changes to commit the changes.
- Click to invoke the cluster restart wizard.
- Click Restart Cluster.
- Click Restart Now.
- Click Finish.
Placement Rules
Cloudera Manager provides many options for determining how YARN applications and Impala queries are placed in resource pools. You can specify basic rules that place applications and queries in pools based on runtime configurations or the name of the user running the application or query or select an advanced option that allows you to specify a set of ordered rules for placing applications and queries in pools.
To submit a YARN application to a specific resource pool, specify the mapreduce.job.queuename property. The YARN application's queue property is mapped to a resource pool. To submit an Impala query to a specific resource pool, specify the REQUEST_POOL option.
Enabling and Disabling Undeclared Pools
If you do not specify a pool with a job or query property, by default YARN and Impala create a pool "on-the-fly" with the name of the user that submitted the request and assigns it to that resource pool. For YARN, you can change this behavior so that the default pool is used instead:- Select . If the cluster has a YARN service, the Dynamic Resource Pools Status tab displays. If the cluster has only an Impala service enabled for dynamic resource pools, the Dynamic Resource Pools Configuration tab displays.
- If the Status page is displayed, click the Configuration tab. A list of the currently configured pools with their configured limits displays.
- Click the Placement Rules tab.
- Click Basic radio button.
- Click the Allow Undeclared Pools property.
- Select or deselect the Allow Undeclared Pools checkbox.
- Click Save Changes to commit the changes.
- Click to invoke the cluster restart wizard.
- Click Restart Cluster.
- Click Restart Now.
- Click Finish.
Enabling and Disabling the Default Pool
If an application specifies a pool that has not been explicitly configured or is assigned to a pool with the name of user according to the Fair Scheduler User As Default Queue property, by default YARN creates the pool at runtime with default settings. To change the behavior so that under these circumstances the default pool is used instead:- Select . If the cluster has a YARN service, the Dynamic Resource Pools Status tab displays. If the cluster has only an Impala service enabled for dynamic resource pools, the Dynamic Resource Pools Configuration tab displays.
- If the Status page is displayed, click the Configuration tab. A list of the currently configured pools with their configured limits displays.
- Click the Placement Rules tab.
- Click Basic radio button.
- Click the Fair Scheduler User As Default Queue property.
- Select or deselect the checkbox.
- Click Save Changes to commit the changes.
- Click to invoke the cluster restart wizard.
- Click Restart Cluster.
- Click Restart Now.
- Click Finish.
Specifying Advanced Placement Rules and Rule Ordering
- Select the Advanced radio button on the Placement Rules tab.
- Click
 to add a new rule row and
  to remove a rule row.
 - In each row, click and select a rule. The available rules are:
- specified pool; create the pool if it doesn't exist (default 1st)
- root.<username> pool; create the pool if it doesn't exist (default 2nd) - the application or query is placed into a pool with the name of the user who submitted it.
- specified pool only if the poll exists
- root.<username> pool only if the pool exists
- root.<primaryGroupName> pool; create the pool if it doesn't exist - the application or query is placed into a pool with the name of the primary group of the user who submitted it.
- root.<primaryGroupName> pool only if the pool exists
- root.<secondaryGroupName> pool only if one of these pools exists - the application or query is placed into a pool with a name that matches a secondary group of the user who submitted it.
- default pool; create the pool if it doesn't exist
- Click Save. The Fair Scheduler allocation file (by default, fair-scheduler.xml) is updated.
Configuration Sets
A configuration set defines the allocation of resources across pools that may be active at a given time. For example, you can define "weekday" and "weekend" configuration sets, which define different resource pool configurations for different days of the week.
Creating a Configuration Set
- Select . If the cluster has a YARN service, the Dynamic Resource Pools Status tab displays. If the cluster has only an Impala service enabled for dynamic resource pools, the Dynamic Resource Pools Configuration tab displays.
- If the Status page is displayed, click the Configuration tab. A list of the currently configured pools with their configured limits displays.
- Click the Scheduling Rules tab.
- Click Add Scheduling Rule.
- In the Configuration Set field, select the Create New radio button.
- Click Add Configuration Set. The Add Configuration Set dialog displays.
- Type a name in the Name field and select the configuration set to clone from the Clone from Configuration Set drop-down.
- Click OK. The configuration set is added to and selected in the Configuration Sets drop-down.
- For each resource pool, click Edit.
- Select a resource pool configuration set name.
- Edit the pool properties and click OK.
- Define one or more scheduling rules to specify when the configuration set is active.
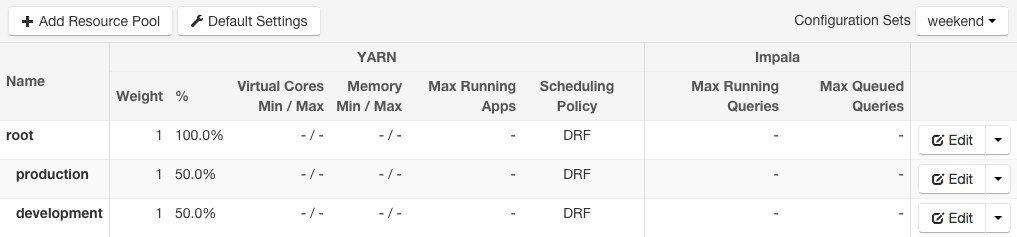
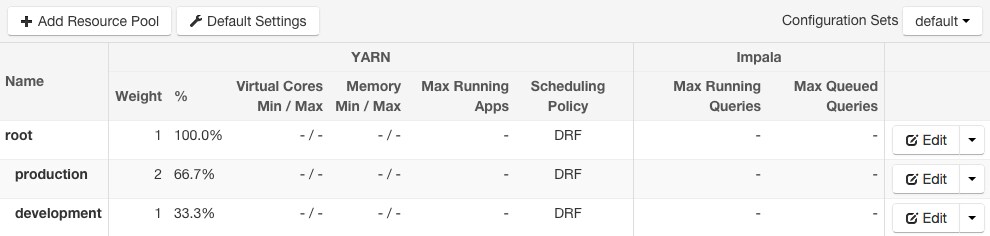
Example Configuration Sets
The weekday configuration set assigns the production pool four times the resources of the development pool:
The weekend configuration set assigns the production and development pools an equal share of the resources:
The default configuration set assigns the production pool twice the resources of the development pool:
See example scheduling rules for these configuration sets.
Viewing the Properties of a Configuration Set
- Select . If the cluster has a YARN service, the Dynamic Resource Pools Status tab displays. If the cluster has only an Impala service enabled for dynamic resource pools, the Dynamic Resource Pools Configuration tab displays.
- If the Status page is displayed, click the Configuration tab. A list of the currently configured pools with their configured limits displays.
- In the Configuration Sets drop-down, select a configuration set. The properties of each pool for that configuration set display.
Deleting a Configuration Set
- Select . If the cluster has a YARN service, the Dynamic Resource Pools Status tab displays. If the cluster has only an Impala service enabled for dynamic resource pools, the Dynamic Resource Pools Configuration tab displays.
- If the Status page is displayed, click the Configuration tab. A list of the currently configured pools with their configured limits displays.
- In the Configuration Sets drop-down, select a configuration set. The properties of each pool for that configuration set display.
- Click Delete.
Scheduling Rules
A scheduling rule defines when a configuration set is active. The configuration set is updated in affected services every hour.
Example Scheduling Rules
Consider the example weekday and weekend configuration sets. To specify that the weekday configuration set is active every weekday, weekend configuration set is active on the weekend (weekly on Saturday and Sunday), and the default configuration set is active all other times, define the following rules:
Adding a Scheduling Rule
- Select . If the cluster has a YARN service, the Dynamic Resource Pools Status tab displays. If the cluster has only an Impala service enabled for dynamic resource pools, the Dynamic Resource Pools Configuration tab displays.
- If the Status page is displayed, click the Configuration tab. A list of the currently configured pools with their configured limits displays.
- Click the Scheduling Rules tab.
- Click Add Scheduling Rule.
- In the Configuration Set drop-down, select a configuration set.
- Choose whether the rule should repeat, the repeat frequency, and if the frequency is weekly, the repeat day or days.
- If the schedule is not repeating, click the left side of the on field to display a drop-down calendar where you set the starting date and time. When you specify the date and time, a default time window of two hours is set in the right side of the on field. Click the right side to adjust the date and time.
- Click OK.
Editing a Scheduling Rule
- Select . If the cluster has a YARN service, the Dynamic Resource Pools Status tab displays. If the cluster has only an Impala service enabled for dynamic resource pools, the Dynamic Resource Pools Configuration tab displays.
- If the Status page is displayed, click the Configuration tab. A list of the currently configured pools with their configured limits displays.
- Click Scheduling Rules.
- Click Edit at the right of a rule.
- Edit the rule as desired.
- Click OK.
Deleting a Scheduling Rule
- Select . If the cluster has a YARN service, the Dynamic Resource Pools Status tab displays. If the cluster has only an Impala service enabled for dynamic resource pools, the Dynamic Resource Pools Configuration tab displays.
- If the Status page is displayed, click the Configuration tab. A list of the currently configured pools with their configured limits displays.
- Click Scheduling Rules.
- Click at the right of a rule and select Delete.
- Click OK.