Cloudera Navigator Metadata Server
The Navigator Metadata Server is one of the two roles (daemons) that supports Cloudera Navigator data management functionality. The Navigator Metadata Server manages, indexes, and stores entity metadata extracted from cluster services. Using policies defined by data stewards and others, the Navigator Metadata Server can tag entities with metadata or take other actions during the extraction process.
These are just some of the capabilities. See Cloudera Navigator Metadata Architecture for more information. This page includes common administration tasks for the Navigator Metadata Server.
- Memory Sizing Considerations for Navigator Metadata Server
- Adding the Navigator Metadata Server Role
- Starting, Stopping, and Restarting the Navigator Metadata Server Role
- Moving the Navigator Metadata Server to a New Host
- Configuring Properties for Navigator Metadata Server:
- Navigator Metadata Server Configuration Settings Reference Table
Memory Sizing Considerations for Navigator Metadata Server
- Extracting metadata from the cluster and creating relationships among the metadata entities (facilitating lineage)
- Querying to find entities
Navigator Metadata Server uses Solr to index, store, and query metadata. Indexing occurs during the extraction process, with the resulting Solr documents—data structure used by Solr for index and search—stored in the specified Navigator Metadata Server Storage Dir. Because the metadata is indexed, querying is fast and efficient. However, Solr indexing runs in-process with Navigator Metadata Server, so the amount of memory configured for the Java heap is critical.
There is a direct correlation between the number of Solr documents contained in the index and required Navigator Metadata Server Java heap size, so this setting may need to be changed over time as the number of Solr documents making up the index increases. To calculate optimal Java heap setting for your system, see Estimating Optimal Java Heap Size Using Solr Document Counts.
Estimating Optimal Java Heap Size Using Solr Document Counts
2016-11-11 09:24:58,013 INFO com.cloudera.nav.server.NavServerUtil:
  Found 68813088 documents in solr core nav_elements
2016-11-11 09:24:58,705 INFO com.cloudera.nav.server.NavServerUtil:
  Found 78813930 documents in solr core nav_relations
- Open the log file for Navigator Metadata Server. By default, logs are located in /var/log/cloudera-scm-navigator.
- Find the number of documents in solr core nav_elements line in the log.
- Multiply the number of documents by 200 bytes per document and add to a baseline of 2 GB:
(num_nav_elements * 200 bytes) + 2 GB
For example, using the log shown above, the recommended Java heap size is ~14 GiB:(68813088 * 200 bytes) + 2 GB 13762617600 bytes = ~12.8 GiB + 2 GB (~1.8 GiB) = ~ 14–15 GiB
See Setting the Navigator Metadata Server Java Heap Size for details about changing the Java heap using Cloudera Manager Admin Console.
To estimate Java heap size needed during an upgrade:
- Open the log as above.
- Add the documents for nav_elements to nav_relations.
- Multiply the total by 200 and add 2GB
((num_nav_elements + num_nav_relations) * 200) + 2GB
For example, using the log shown above, the recommended Java heap size to upgrade this system is ~30 GiB:((68813088 + 78813930) * 200) + 2GB
Purging the Navigator Metadata Server of Deleted and Stale Metadata
In addition to adjusting the Java heap size, administrators can also purge the Navigator Metadata Server of stale and deleted metadata. Deleted metadata is not fully removed until the Purge is run. For Cloudera Navigator 2.10 (and prior releases), the Purge capability can be directly invoked using the Cloudera Navigator APIs. See Using the Purge APIs for Metadata Maintenance Tasks for details.
For Cloudera Navigator 2.11 (and higher) releases, Cloudera Navigator console (Administration tab provides a fully configurable Purge Settings page:
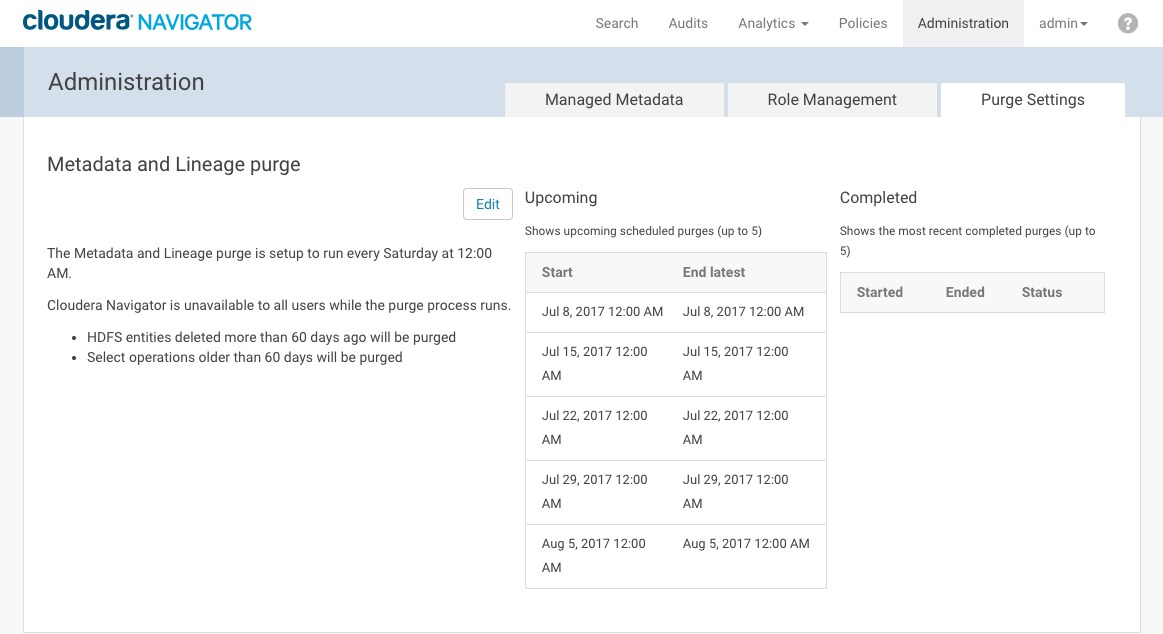
See Cloudera Navigator Administration Tasks in the Cloudera Navigator Data Management guide.
Setting up Navigator Roles on Different Hosts
By default, the Cloudera Manager installation wizard assigns the Navigator Audit Server and Navigator Metadata Server roles to the same Cloudera Management Service host. This configuration may be acceptable for a small cluster, but larger clusters may require distributing the roles to different nodes. You can distribute these two Navigator Server roles to different nodes at install time or you can move the Navigator Metadata Server later, if necessary.
Adding the Navigator Metadata Server Role
Cloudera Manager Required Role: Navigator Administrator (or Full Administrator)
- Configure the database where policies, roles, and audit report metadata is stored. For production
environments, Cloudera supports only external databases. The internal PostgreSQL database should be used for non-production clusters only, such as proof-of-concept.
- For external databases (production environments): The database should be up and running before you add the Navigator Metadata Server role to the cluster. You must have the database schema name (user name), password, and other details to provide when adding the role. When you have these ready, you can proceed.
- For internal databases (non-production environments): No additional preliminary information is needed. You can proceed.
- Log in to the Cloudera Manager Admin Console.
- Select .
- Click the Instances tab.
- Click the Add Role Instances button. The Customize Role Assignments page displays and lists the nodes available to support additional roles, assuming the cluster has available resources. Reassign and customize role instances as needed.
- Select the Navigator Metadata Server role and assign it to appropriate host for your cluster.
- When finished, click Continue. The Database Setup page displays.
- Click Use Custom Database.
- In the Navigator Metadata Server section, enter the details of your database instance:
- Database host name
- Database type
- Database name
- Username
- Password
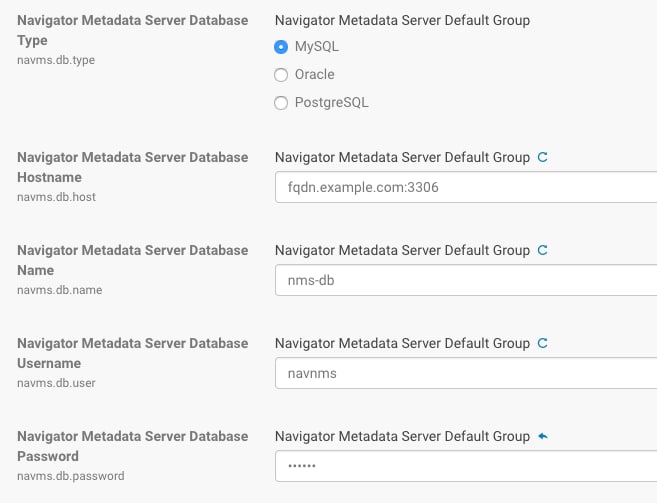
- Click Test Connection to verify the communication between the cluster and the external database. If the test fails, check the database settings and try again. If you selected embedded database, a message displays regarding database creation.
- Click Continue.
- The Cluster Setup Review Changes page displays.
- Click Finish.
Starting, Stopping, and Restarting the Navigator Metadata Server Role
Required Role: Cloudera Navigator Full Administrator
- Log in to the Cloudera Manager Admin Console.
- Select .
- Click the Instances tab.
- Click the link for the Navigator Metadata Server from the Role Type list. The Actions for Selected button activates and displays (1) for the selected role.
- From the Actions for Selected (1) menu, select the Action you want to perform on
this role instance:
- Start
- Stop
- Restart
- Enter Maintenance Mode
- Exit Maintenance Mode
- Delete
- Click Cancel to abandon the process, or click Action to execute the action.
Moving the Navigator Metadata Server to a New Host
Minimum Required Role: Navigator Administrator (also provided by Full Administrator)
- Stop the Navigator Metadata Server, delete it from the existing host, and add it to a new host. See Starting, Stopping, and Restarting the Navigator Metadata Server Role and Adding the Navigator Metadata Server Role.
- If the storage directory is not on NFS/SAN, move the data to the same path on the new host. See steps to copy in Configuring the Navigator Metadata Server Storage Directory.
- Start the Navigator Metadata Server.
Setting the Navigator Metadata Server Java Heap Size
Minimum Required Role: Navigator Administrator (also provided by Full Administrator)
Use the formula discussed in Estimating Optimal Java Heap Size Using Solr Document Counts to calculate optimal Java heap size:(num_nav_elements * 200 bytes) + 2 GBBriefly, num_nav_elements is the number of Solr documents (per the Navigator Metadata Server log file) that comprise the index. See sizing guidelines for complete details. Once you have derived a viable Java heap setting using this or another technique, you can change the setting as follows:
- Log in to the Cloudera Manager Admin Console.
- Select .
- Click the Configuration tab.
- Select .
- For Filter Category, click Resource Management to display the Java heap size property. The default value is 1.5 GiB
(specified in binary units).

- Use the drop-down selector to change the unit scale to B (Bytes), KiB, MiB, or GiB and set your preferred heap size.
- Click Save Changes. The setting takes effect only after restarting the role. Restart the Navigator Metadata Server role now or make other configuration changes and restart after you are finished with all changes. To restart the role:
- Click the Instances tab to display list the list of instances of each role type.
- Click the link for the Navigator Metadata Server to select it.
- From the Actions for Selected (1) menu, select Restart to restart the Navigator Metadata Server role instance using the new Java heap size.
Configuring the Navigator Metadata Server Storage Directory
Minimum Required Role: Navigator Administrator (also provided by Full Administrator)
The Navigator Metadata Server stores extracted and indexed data in a directory on the host on which the Server runs. The default is /var/lib/cloudera-scm-navigator. To configure the storage directory:
- Log in to the Cloudera Manager Admin Console.
- Select .
- Click the Instances tab.
- Click the link for the Navigator Metadata Server to select it.
- From the Actions for Selected (1) menu, select Stop.
- Open a terminal session and log in to the host configured to run Navigator Metadata Server.
- Copy the contents of the current storage directory to the new location. When the copying is completed to the new location, return to the Cloudera Manager Admin Console.
- Click the Configuration tab.
- Select .
- Specify the directory in the Navigator Metadata Server Storage Dir property. The property applies to the default role group, but you can apply to other role groups as needed. See Modifying Configuration Properties Using Cloudera Manager for details.
- Click Save Changes. This change does not take effect until the Navigator Metadata Server role is restarted.
- Click the Instances tab.
- Click the link for the Navigator Metadata Server from the list of instances.
- From the Actions for Selected menu, select Restart to restart the Navigator Metadata Server role instance.
Configuring the Navigator Metadata Server Port
Minimum Required Role: Navigator Administrator (also provided by Full Administrator)
The Cloudera Navigator console is accessed at port 7187 by default, on the host supporting the Navigator Metadata Server role. Follow the steps below to configure a different port other than the default.
- Log in to the Cloudera Manager Admin Console.
- Select .
- Click the Configuration tab.
- In the Search box, type the word "ports" to display properties.
- Specify the port in the Navigator Metadata Server Port property. The property applies to the default role group, but you can apply to other role groups as needed. See Modifying Configuration Properties Using Cloudera Manager for details.
- Click Save Changes.
- Click the Instances tab.
- Restart the Navigator Metadata Server role.
Configuring the Navigator Metadata Server Log Directory
Minimum Required Role: Navigator Administrator (also provided by Full Administrator)
- Log in to the Cloudera Manager Admin Console.
- Select .
- Click the Configuration tab.
- Under the Filter for Scope, click Navigator Metadata Server.
- Under Filter Category, click Logs.
- Set the Navigator Metadata Server Log Directory property. The property applies to the default role group, but you can apply to other role groups as needed. See Modifying Configuration Properties Using Cloudera Manager for details.
- Click Save Changes.
- Restart the Navigator Metadata Server role instance.
Configuring the Navigator Metadata Server Session Timeout
Minimum Required Role: Navigator Administrator (also provided by Full Administrator)
The default session timeout is 30 minutes (1800 seconds). To change the timeout period:- Log in to the Cloudera Manager Admin Console.
- Select .
- Click the Configuration tab.
- Under the Filter for Scope, click Navigator Metadata Server.
- For Filter Category, click Advanced. Scroll to find the Advanced Configuration Snippet (Safety Valve) entry field for cloudera-navigator.properties.
- Set the value for the nav.max_inactive_interval property to the number of seconds that can elapse before system times out:
nav.max_inactive_interval=num-seconds-until-timeout
This example reduces the timeout period from the default of 30 minutes to 15 minutes:

- Click Save Changes.
- Restart the Navigator Metadata Server role instance.
Managing Anonymous Usage Data Collection
Minimum Required Role: Navigator Administrator (also provided by Full Administrator)
Cloudera Navigator uses Google Analytics to send anonymous usage information to Cloudera. The information helps Cloudera improve Navigator. By default, anonymous usage data collection is enabled. To enable and disable data collection:
- Log in to the Cloudera Manager Admin Console.
- Select .
- Click the Configuration tab.
- Under the Filter for Scope, click Navigator Metadata Server.
- Select or clear the Allow Usage Data Collection checkbox.
The property applies to the default role group, but you can apply to other role groups as needed. See Modifying Configuration Properties Using Cloudera Manager for details.
- Click Save Changes.
- Restart the Navigator Metadata Server role instance.
Navigator Metadata Server Configuration Settings Reference Table
| Property | Default | Usage |
|---|---|---|
| Java Heap Size of Cloudera Navigator Metadata Server in Bytes | 1536 MiB (1.5 GiB) | Increase Java heap size temporarily during an upgrade. Increase Java heap size for large Solr indexes. See Memory Sizing Considerations for Navigator Metadata Server for details. |
| Navigator Metadata Storage Dir | /var/lib/cloudera-scm-navigator | Change to another path if you like. Be sure to move existing content from the default directory to the new directory to maintain state. Offload content from this directory prior to upgrading for faster upgrades. |
| Cloudera Navigator Server Port | 7187 | Change to another port if necessary. This is the port used to access Cloudera Navigator console. |
| Navigator Metadata Server Log Directory | /var/log/cloudera-scm-navigator | Examine the log to find out how many documents the Solr index contains and use to estimate needed Java heap size. Use the log to troubleshoot issues. |
| Server Session Timeout | 30 minutes (1800 seconds) | Timeout is specified in number of seconds that must elapse before the system generates a timeout event. |
| Allow Usage Data Collection | enabled | Cloudera Navigator uses Google Analytics to anonymous usage data to Cloudera for product enhancement. Disable this setting if you do not want to send usage data. |