Metadata Policies
- Add managed metadata, tags, and custom metadata to entities as they are ingested by the cluster
- Move entities of specific class to a specific target path, or to the trash
- Send messages to a JMS message queue for notifications. This requires configuring the JMS server on the Cloudera Management Service. See Configuring a JMS Server for Policy Messages for details.
 {
  "entity":entity_property,
  "userMessage":"some message text"
 }
A policy is run as the user who created the policy, in the home directory of the user who created the policy. To change a policy's ownership, log in to Cloudera Navigator console as the user account to which you want to transfer ownership of the policy, clone the policy, and then delete or disable the old policy.
Policies execute in the home directory of the user account that creates, and can only take actions for which the user account has privileges. The privileges needed are for file (or directory) access and any command executed. A policy will fail at runtime if the associated user account does not have privileges to perform all the actions defined in the policy.
Certain actions can be specified using Java expressions. See Metadata Policy Expressions for details.
Creating Policies
Required Role: Policy Administrator (or Full Administrator)
These steps begin from the Cloudera Navigator console.
- Select .
- Click the Policies tab.
- In the Status field, check the Enable checkbox.
- Enter a name for the policy.
- Specify the search query that defines the class of entities to which the policy applies. If you arrive at the Policies page by clicking a search result, the query property is populated with the query that generated the result. To display a list of entities that satisfy a search query, click the Test Query link.
- Specify an optional description for the policy.
- If you use policy expressions in properties that support expressions, specify required imports in the Import Statements field. See Metadata Policy Expression Examples.
- Choose the schedule for applying the policy:
- On Change - When the entities matching the search string change.
- Immediate - When the policy is created.
- Once - At the time specified in the Start Time field.
- Recurring - At recurring times specified by the Start and End Time fields at the interval specified in the Interval field.
- Date - Click the down arrow to display a calendar and select a date, or click a field and click the spinner arrows or press the up and down arrow keys.
- Time - Click the hour, minute, and AM/PM fields and click the spinner arrows or press the up and down arrow keys to specify the value.
- Move between fields by clicking fields or by using the right and left arrow keys.
- Follow the appropriate procedure for the actions performed by the policy:
- Metadata Assignments: Specify the custom metadata or managed metadata to be assigned. Optionally, you can specify a Java policy expression for fields that support expressions by checking the Expression checkbox. The following fields support expressions:
- Name
- Description
- Managed Metadata
- Key-Value Pairs
- Command Actions: Select or . For a move, specify the location to move the
entity to in the Target Path field. If you specify multiple actions, they are run in the order in which they are specified.
Command actions are supported only for HDFS entities. If you configure a command action for unsupported entities, a runtime error is logged when the policy runs.
- JMS Notifications: If not already configured, configure a JMS server and queue. Specify the queue name and message. Optionally, check the Expression checkbox and specify a policy expression for the message.
- Metadata Assignments: Specify the custom metadata or managed metadata to be assigned. Optionally, you can specify a Java policy expression for fields that support expressions by checking the Expression checkbox. The following fields support expressions:
- Click Save.
Viewing Policies
Required Role: Policy Viewer (or Policy Administrator, or Full Administrator)
- Accessing the Cloudera Navigator console.
- Click the Policies tab.
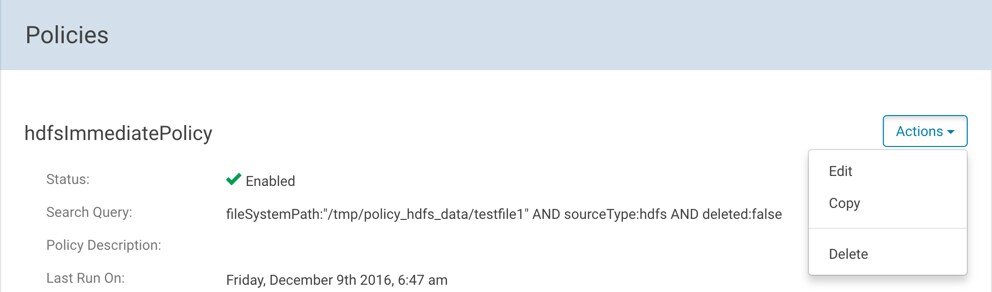
- In a policy row, click a policy name link or select . The
policy detail page is displayed.
You can also edit, copy, or delete a policy from the policy details page by clicking the Actions button.
Enabling and Disabling Policies
As a policy administrator, you can manage access to policies by enabling and disabling them.
Required Role: Policy Administrator (or Full Administrator)
- Accessing the Cloudera Navigator console.
- Click the Policies tab.
- In a policy row, click a policy name link or select or .
Copying and Editing a Policy
If you have an existing policy that you want to use as a template for another similar property, you can copy it and then make any required adjustments. You can also edit existing policies if you need to make changes to it.
Required Role: Policy Administrator (or Full Administrator)
- Accessing the Cloudera Navigator console.
- Click the Policies tab.
- In a policy row, select or . You can also click the policy row and then on the policy details page, select or .
- Edit the policy name, search query, or policy actions.
- Click Save.
Deleting Policies
Required Role: Policy Administrator (or Full Administrator)
- Accessing the Cloudera Navigator console.
- Click the Policies tab.
- In a policy row, select and OK to confirm.