Introduction
See for yourself how easy it is to use Cloudera AI on Cloudera on cloud.
In this tutorial, we will use a publicly available jet engine dataset which simulates how jet engines degrade over time. We will create a predictive model to determine the jet's engine remaining useful life (RUL) and do cost benefit analysis.
Prerequisites
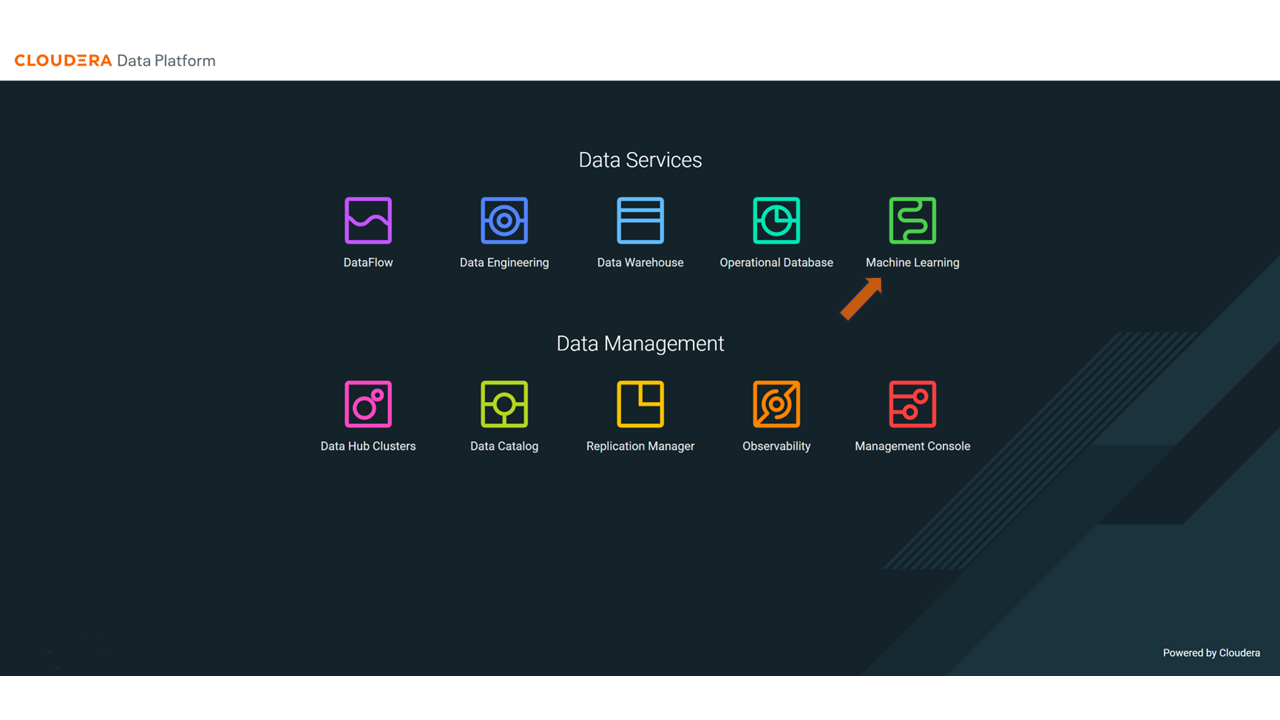
- Have access to Cloudera on cloud
- Have created a Cloudera workload User
- Ensure proper Cloudera AI role access
- MLUser - ability to run workloads
- MLAdmin - ability to create and delete workspaces
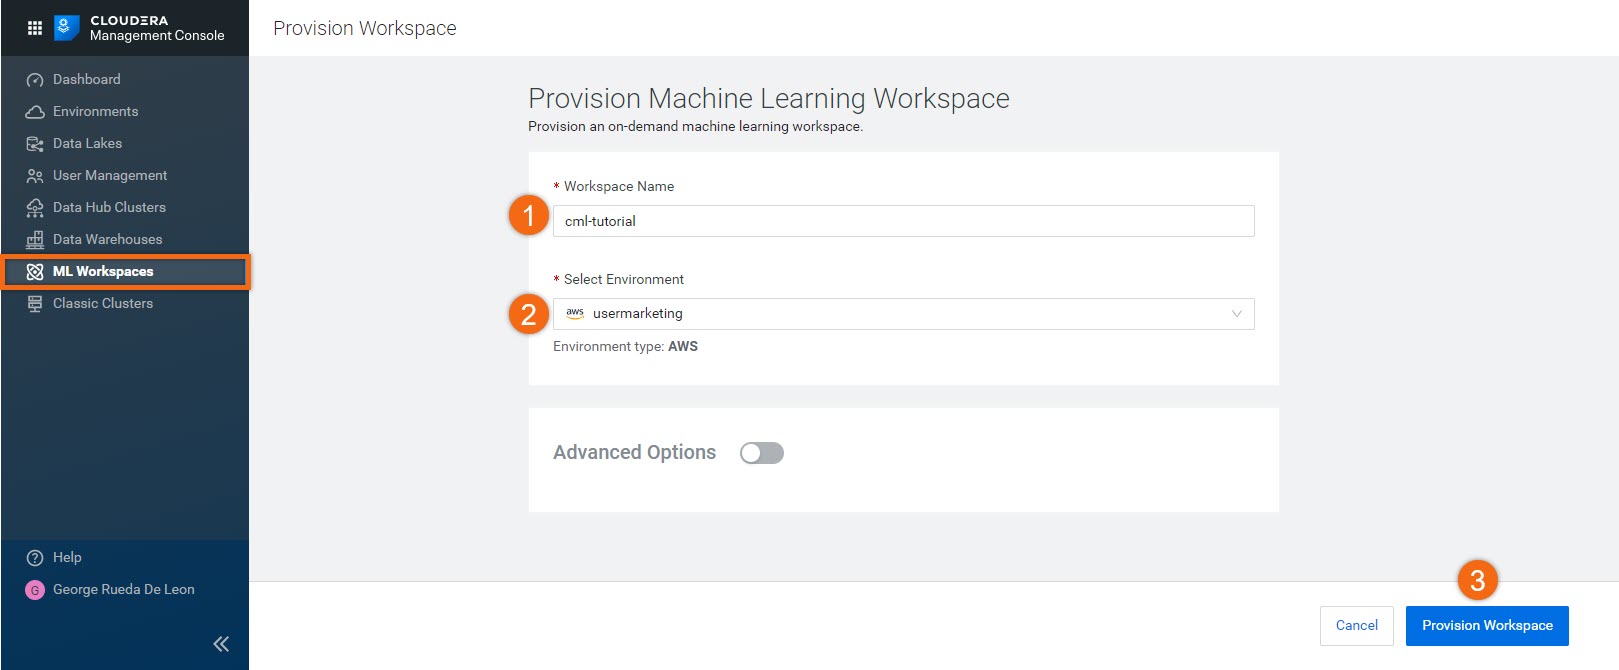
In the ML Workspaces section, select Provision Workspace:

Two simple pieces of information are needed to a provision workspace - Workspace Name and Environment. For example:
- Workspace Name:
cml-tutorial - Environment: use your environment name
- Select Provision Workspace
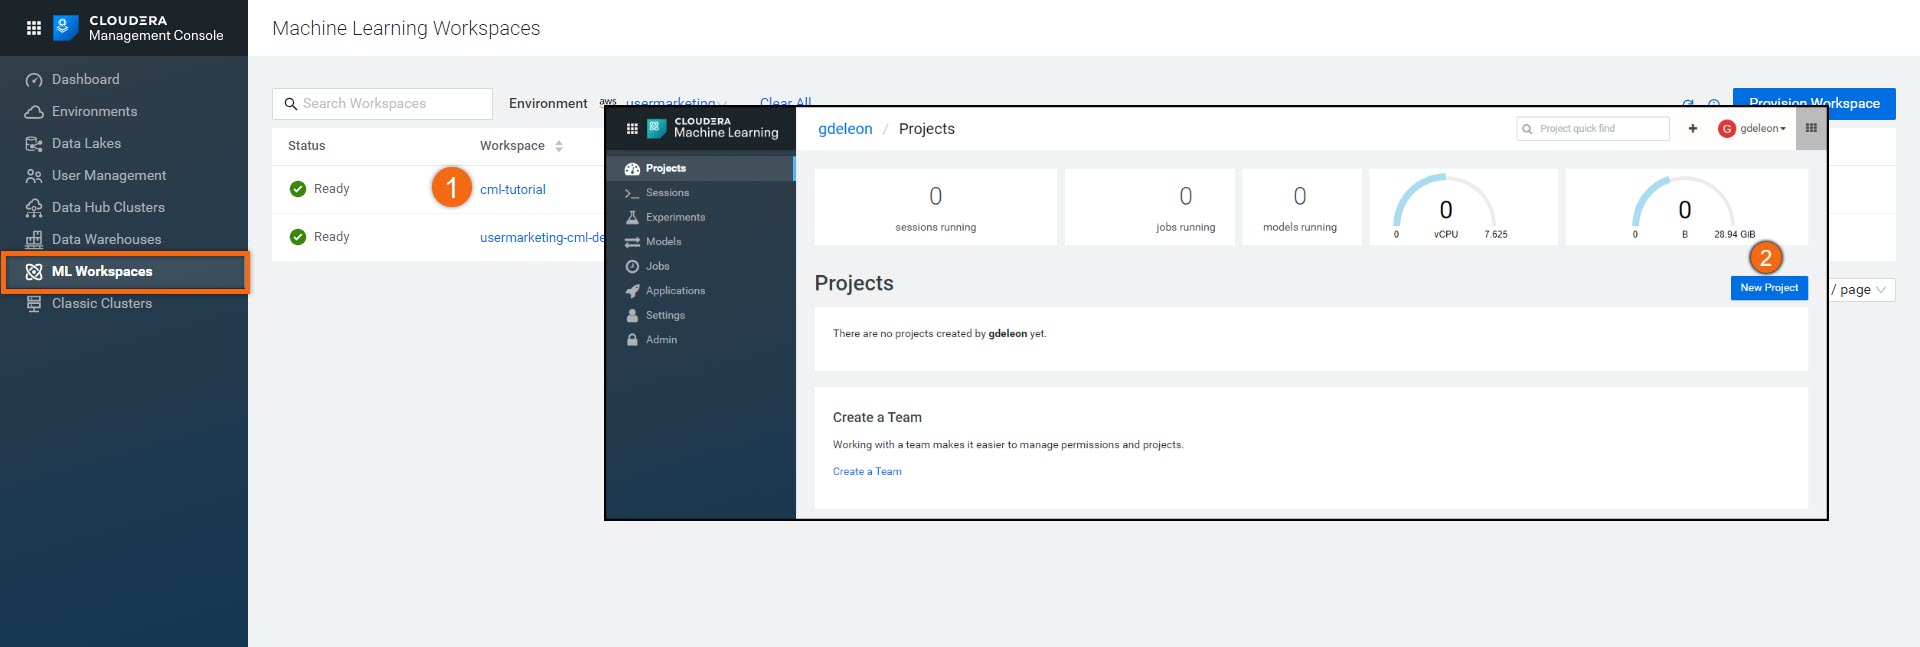
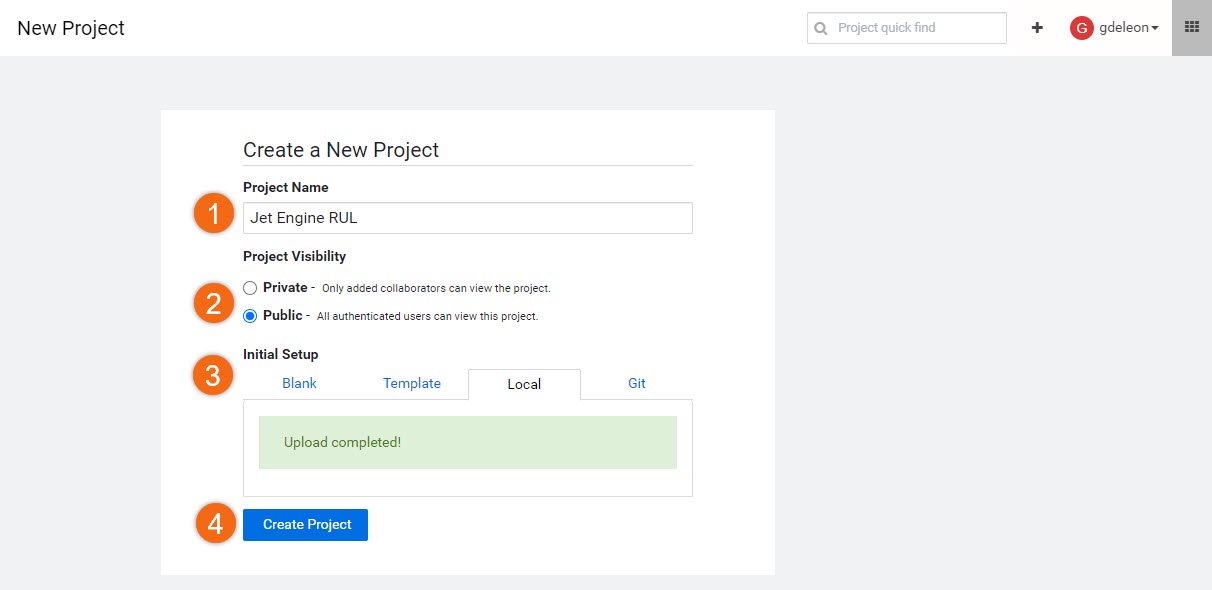
Complete the New Project form using:
Project Name:
Jet Engine RULProject Visibility: Public
Initial Setup: Local
Upload or Drag-Drop tutorial-files.zip you downloaded earlierCreate Project
Create model
Now that we have a working environment, we'll create a session to begin building our regression model.
First, let's briefly go over jet engine data files we'll be working with:
There are four (4) scenarios - each consisting of three (3) files containing engine sensor data for about 100-300 engines:
training_FD00x.csv
We will use this data to train and create our regression model to estimate the jet engine's remaining useful life (RUL). Sensor data and RUL are included in the same file.
test_FD00x.csv
RUL_FD00x.txt
The sensor test data and RUL are in separate files. We will use this data to test our model and run a few calculations to validate accuracy and associated cost savings.
The cost savings is based on correctly predicting Cycle_Alert_Threshhold, which represents the number of flights before requiring maintenance.
Where x, in filename, is the scenario number (1, 2, 3 or 4).
Let's continue with the fun stuff - code!
Beginning from the Projects section, select the project name, Jet Engine RUL.
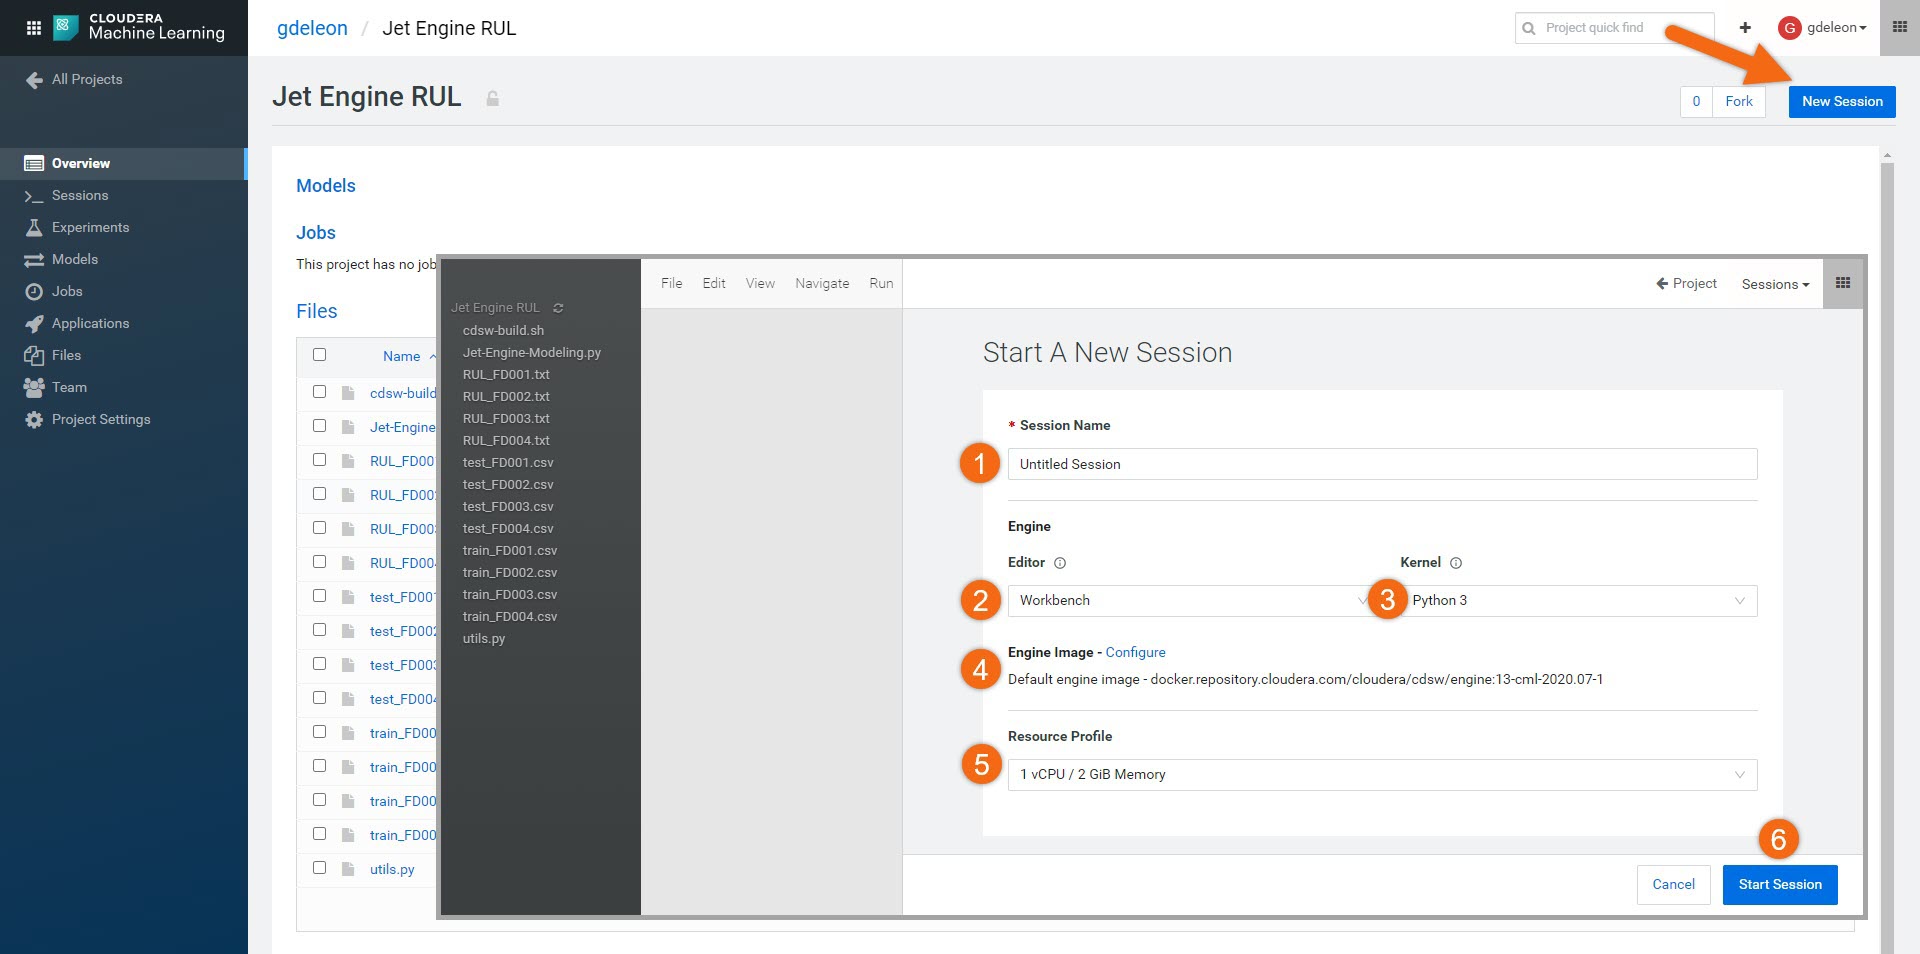
Select New Session and complete the session form:
Session Name:
Untitled SessionEditor: Workbench
Kernel: Python 3
Engine Image: Default
Resource Profile: Default (1 vCPU / 2 GiB Memory)
Start Session
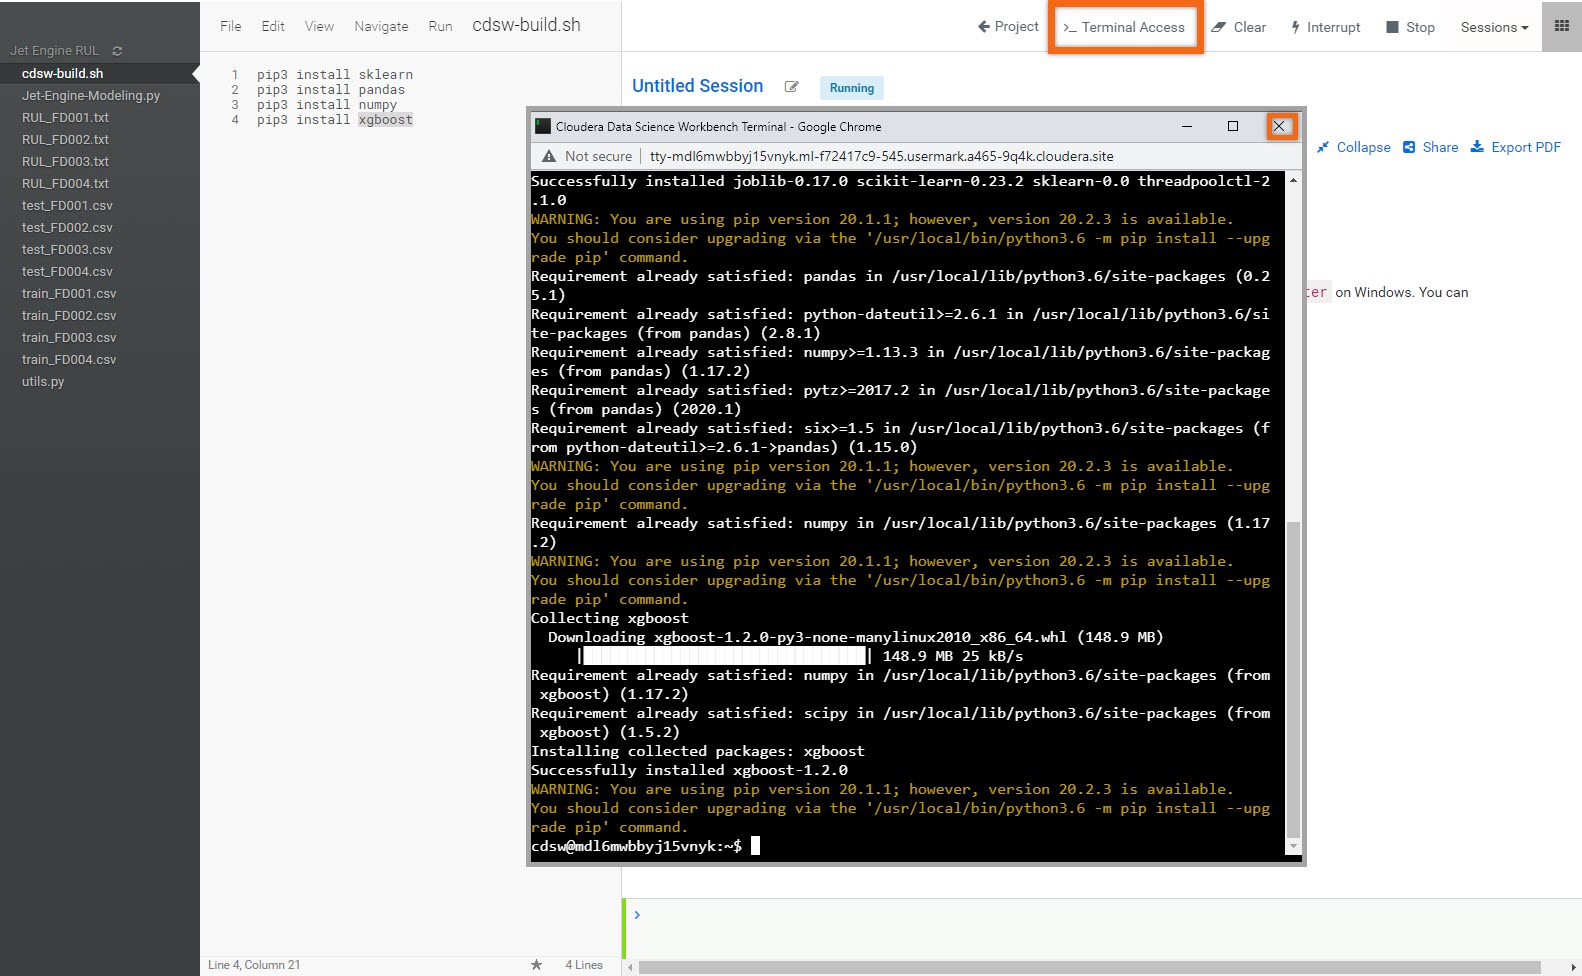
Let’s open a terminal window by selecting, >_ Terminal Access and type:
sh cdsw-build.sh
This will install the dependent libraries needed for the project (sklearn, pandas, numpy and xgboost). Once it completes, close the terminal window.
NOTE: You only need to install dependent libraries once - this step can be skipped in future sessions.
Data cleansing
Before we create our model, we should take some time and understand the data provided. Sensor data that do not influence our model should be removed.
This is an iterative and time-consuming process - patience is a virtue!
File utils.py has two functions to assist in this process:
trainDataPlot() - visualize/plot sensor data column compared to RUL
trainDataCorrelation() - see correlation matrix/heatmap of sensor data, including RUL
Data cleansing has already been done for you - columns that do not influence our model have been commented out. You are encouraged to go through the exercise and verify.
Now that our data is cleansed, let's create our model:
From the list of files, select Jet_Engine-Modeling.py and click on ![]() to run the entire program.
to run the entire program.
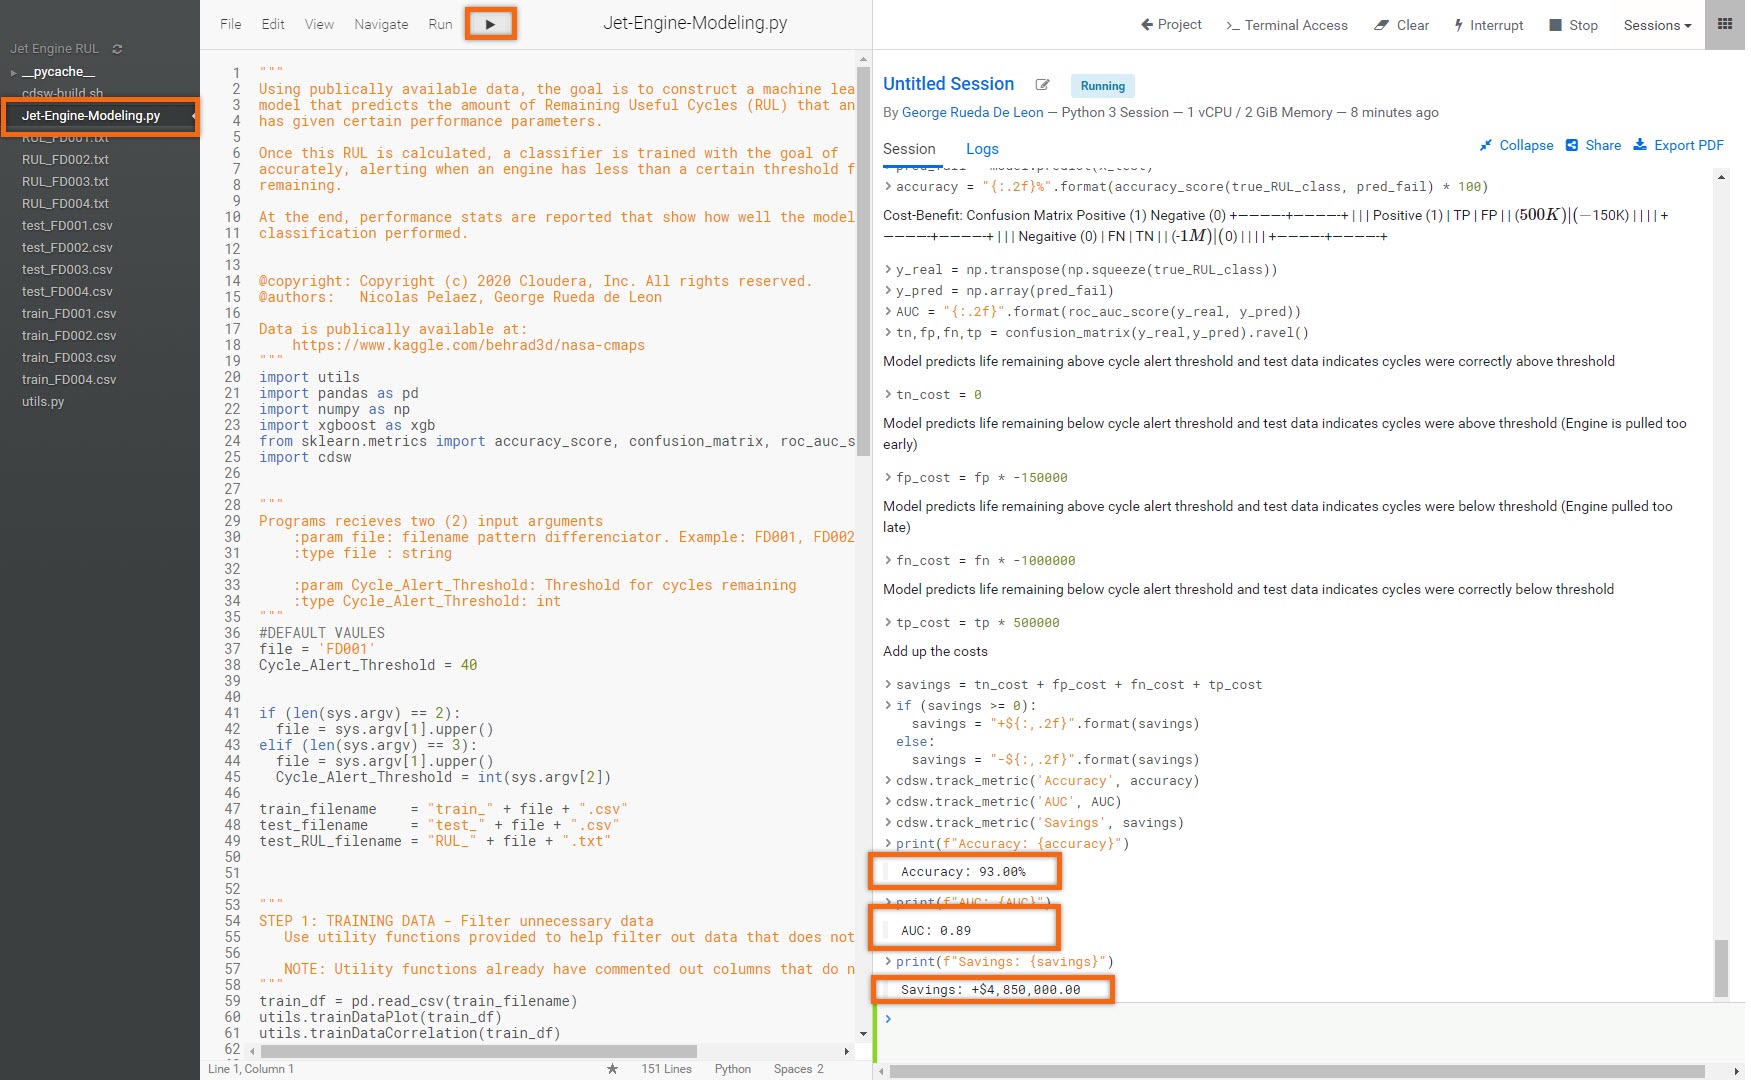
The output (above) shows an accuracy of 93.00%, AUC of 0.89 and savings of $4.85M.
Now that we've verified one scenario, let's see how this model performs on the rest of the provided data. Let's run some experiments.
Run experiments
Now that we have our model, let's run several experiments using other provided scenarios. Let's see how well we classify the engines that require maintenance, using Cycle_Alert_Threshhold of 40 and 50.
Beginning from the Projects section, select the project name, Jet Engine RUL.
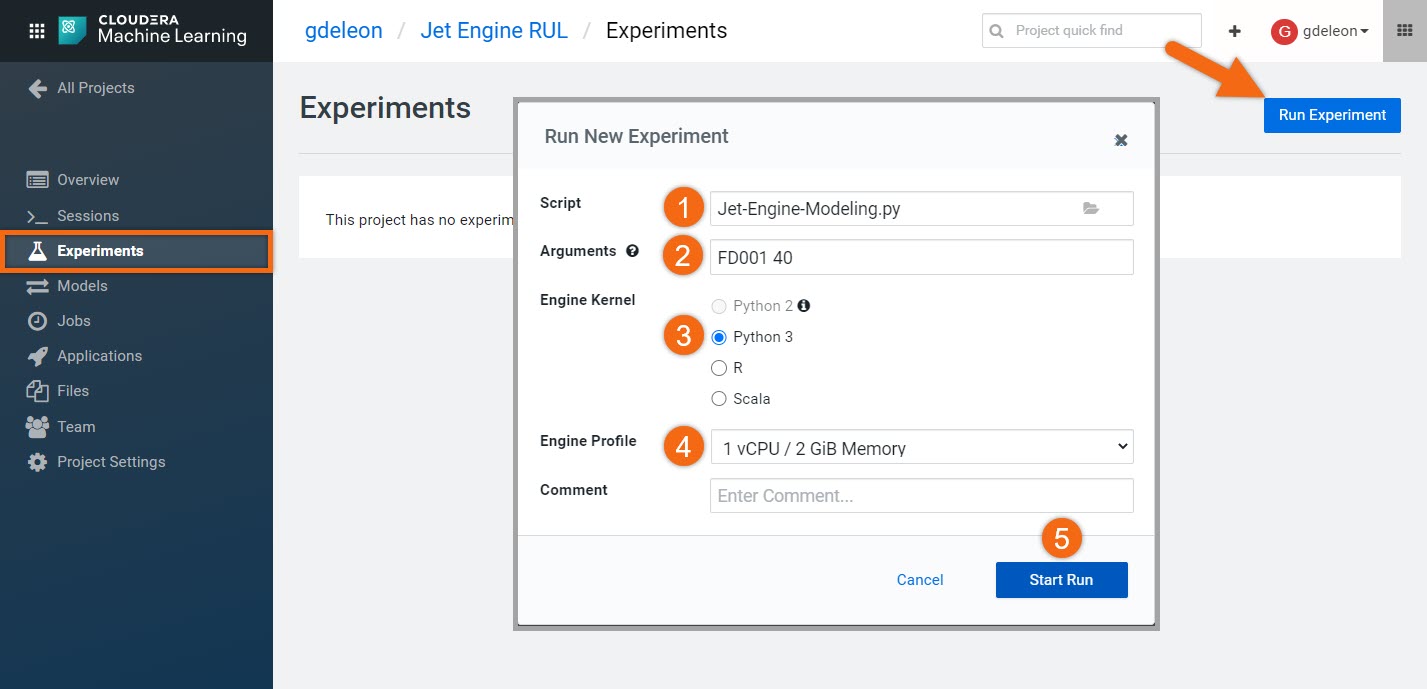
Next, in the Experiments section, select Run Experiment and complete the Run New Experiment form:
Script:
Jet-Engine-Modeling.pyArguments:
FD001 40Engine Kernel: Python 3
Engine Profile: Default or smallest resource available
Start Run
Run a few more experiments. Repeat the same steps, using the following arguments:
Arguments: FD001 50
Arguments: FD002 40
Arguments: FD002 50
Arguments: FD003 40
Arguments: FD003 50
Arguments: FD004 40
Arguments: FD004 50
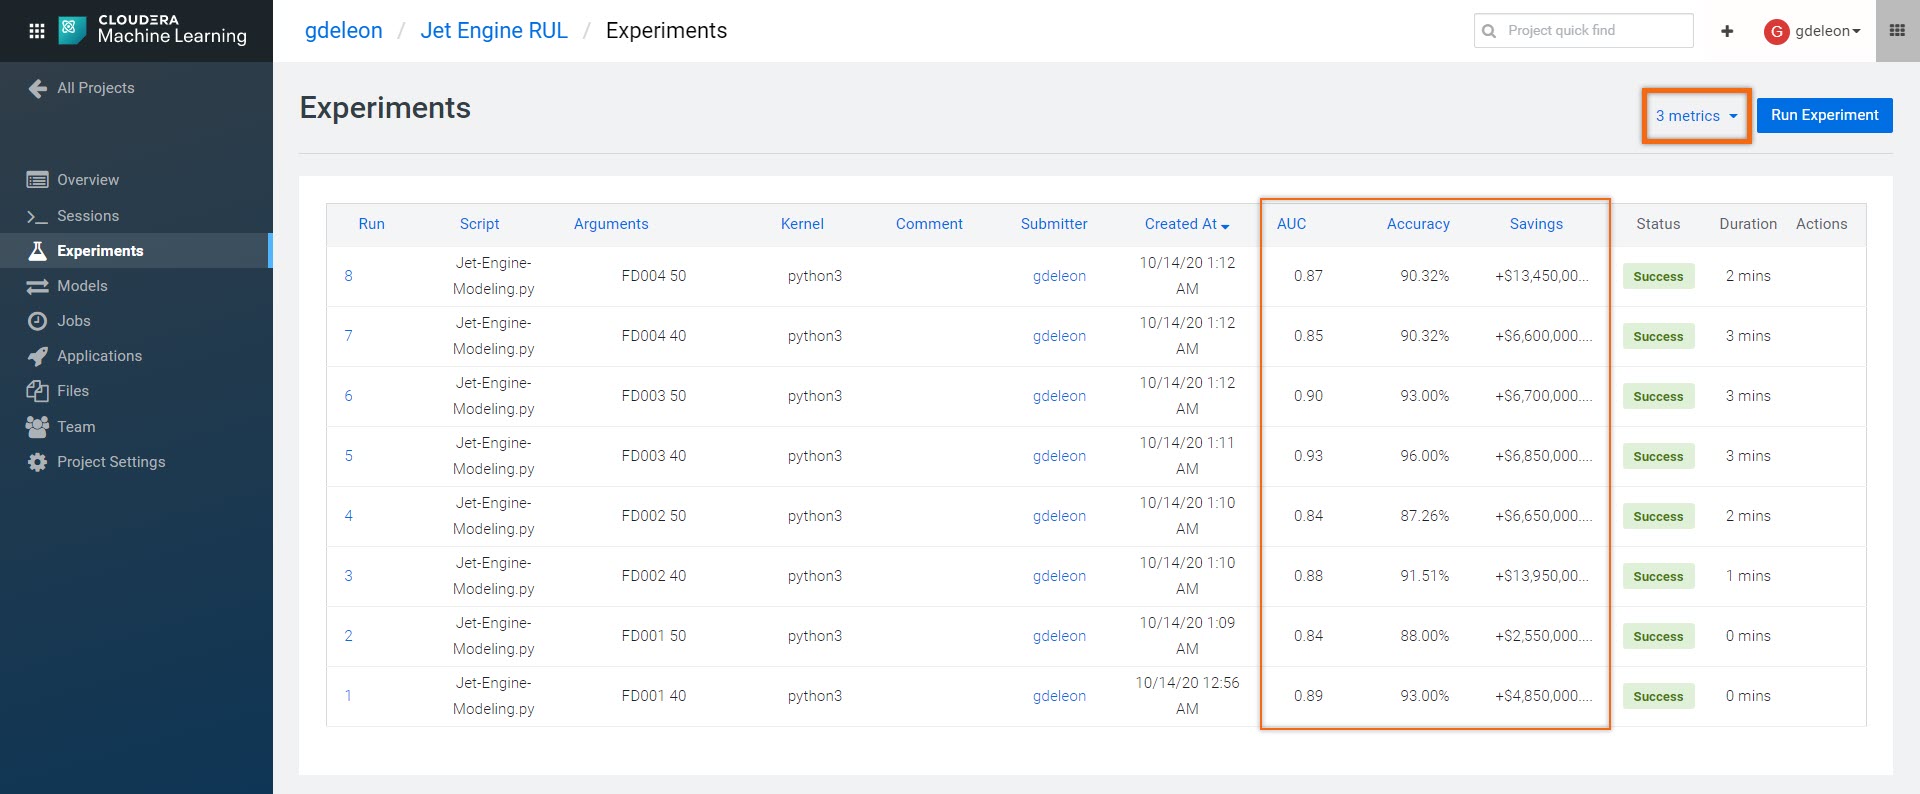
Let's review our experiments - make sure to select all three (3) metrics: AUC, Accuracy and Savings.
Wow! Accuracy is between 87-96% and what about that money saved.
Summary
Congratulations on completing the tutorial.
Overall, our predictive model performed well in all scenarios - some performed better than others. Although data cleansing was done for you, what would happen to our model if we included more sensor data?
As you have seen, it is easy to use Cloudera AI on Cloudera platform. This is only the beginning - there is so much more to learn.

