
Introduction
Many Cloudera customers are making the transition from being completely on-prem to cloud by either backing up their data in the cloud, or running multi-functional analytics on CDP Public cloud in AWS or Azure.
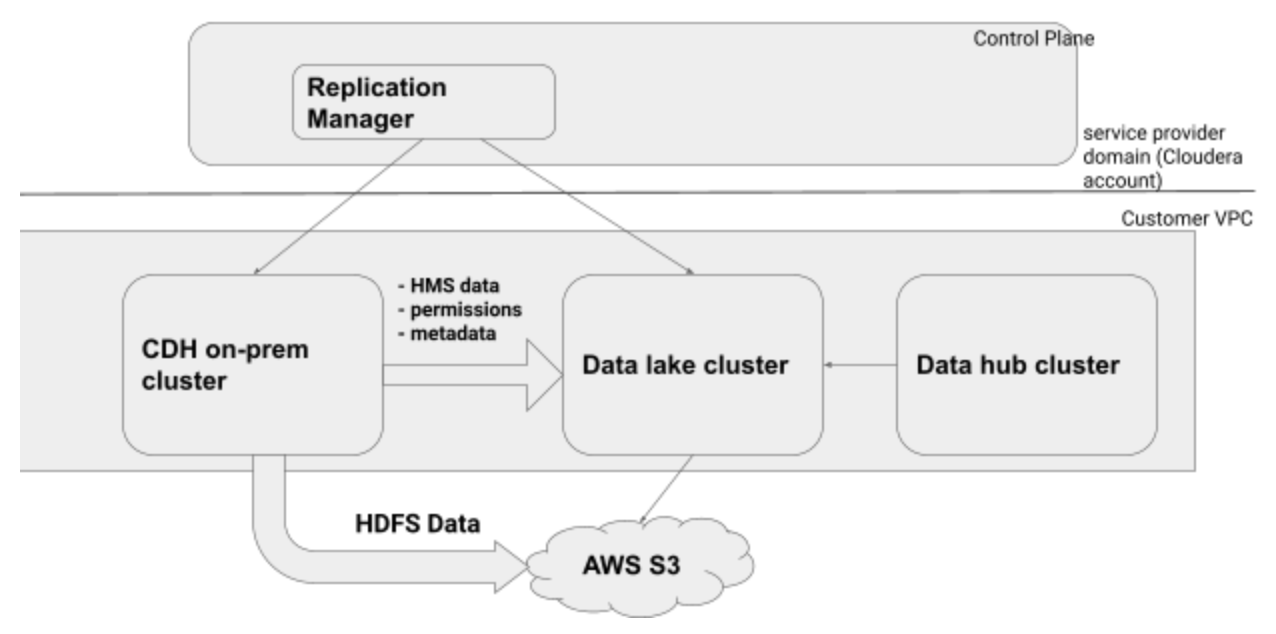
The Replication Manager service facilitates both disaster recovery and data migration across different environments. Using easy-to-define policies, Replication Manager solves one of the biggest barriers for the customers in their cloud adoption journey by allowing them to move both tables/structured data and files/unstructured data to the CDP cloud of their choice easily.
The policies can be crafted to support periodic replication which allows the migration of workloads to the cloud to be under the control of the end user.
Replication Manager can be used to migrate Apache Hive, Apache Impala, and HDFS objects from CDH clusters to CDP Public Cloud clusters.
The Replication Manager support matrix is documented in our public docs.
Objective
This blog post outlines detailed step by step instructions to perform Hive Replication from an on-prem CDH cluster to a CDP Public Cloud Data Lake.
For context, the setup used is as follows.
- Source CDH cluster versions – CM 6.3.4, CDH 6.3.4
- CDP Data Lake cluster versions – CM 7.4.0, Runtime 7.2.8
Architecture
Prerequisites
Along with ensuring that both CDH and CDP Data Lake clusters meet the support matrix requirements, both these clusters also need to meet following requirements.
- While using CDH on-premises cluster or CDP Private Cloud Base cluster, make sure that the following ports are open and accessible on the source hosts to allow communication between the source on-premise cluster and CDP Data Lake cluster.
- Configure the required ports to enable connectivity from CDH to CDP Public Cloud (see docs for details)
Pre-Check: CDH Cluster
This step involves checking the following configs on source:
- External Account setup
- Understanding Sentry permissions on CDH cluster
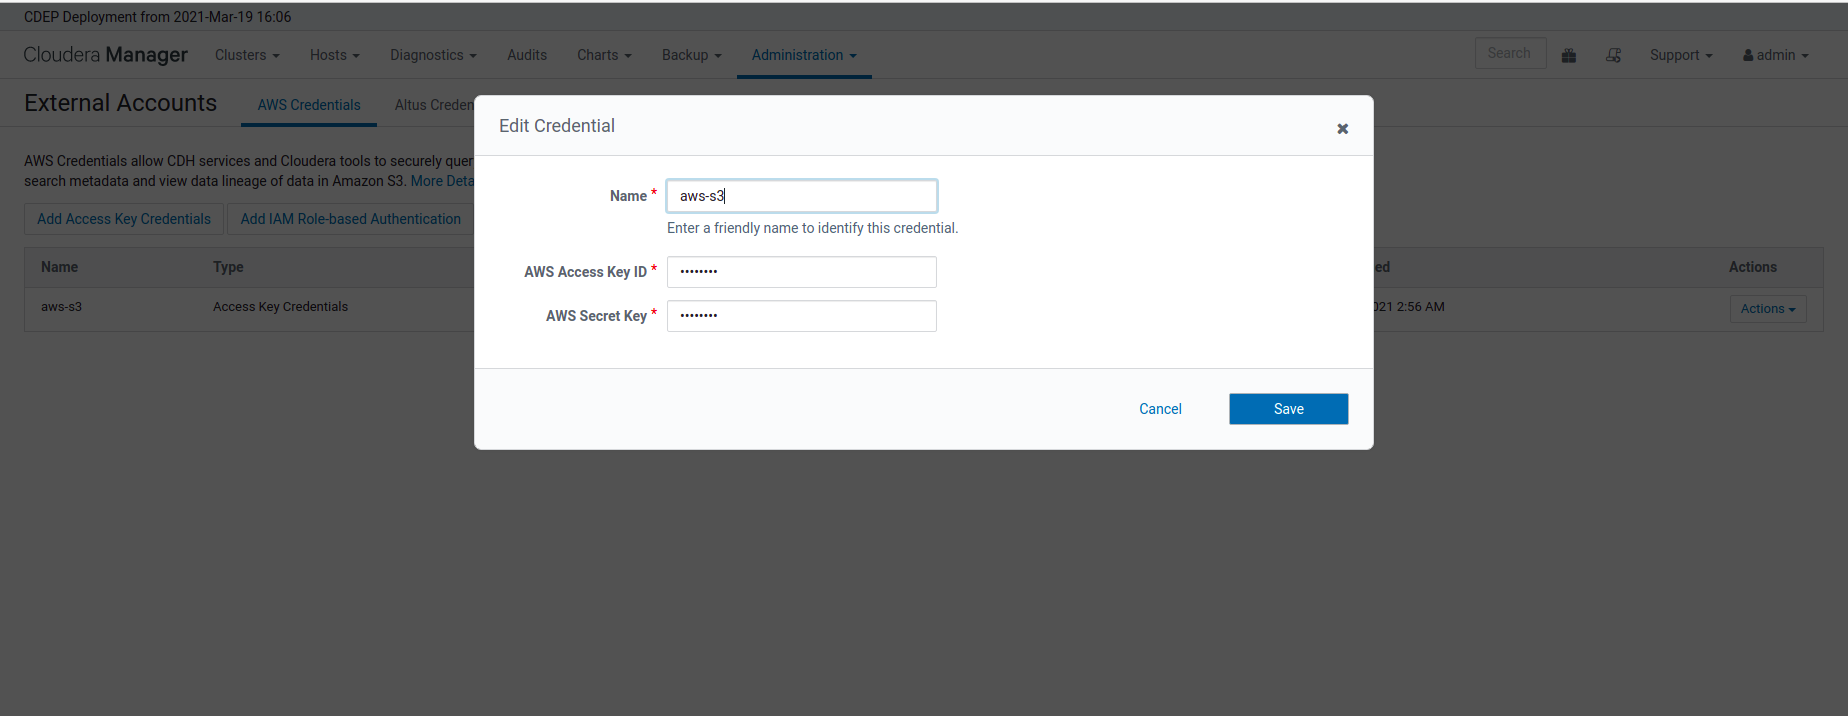
External Account Setup
In order to copy or migrate data from CDH cluster to CDP Data Lake cluster, the on-prem CDH cluster should be able to access the CDP cloud storage.
To enable this, an External Account is configured on the CDH Cluster. In our example we use the following External Account.
- aws-s3: This provides access to s3a://<data lake bucket path>
We have used an access key / secret key pair to ensure that the External Account configured on CDH can successfully access the S3 buckets used by Data Lake.

Understanding Sentry Permissions on CDH Cluster.
The Sentry service serves authorization metadata from the database backed storage; it does not handle actual privilege validation. The Hive, Impala, and Solr services are clients of this service and will enforce Sentry privileges when they are configured to use Sentry.
More details about using and managing Sentry.
Replication Manager allows administrators to migrate the existing Sentry permissions from the source CDH cluster to the Ranger policies in CDP Public Cloud.
Pre-Check: Data Lake Cluster
Understanding Ranger Policies in Data Lake Cluster
The Apache Ranger access policy model consists of two major components:
- Specification of the resources a policy is applied to, such as HDFS files and directories, Hive databases. tables. and columns, HBase tables, column-families, and columns, and so on;
- Specification of access conditions for specific users and groups.
The hdfs user should have access to all Hive datasets, including all operations. Else, Hive import fails during the replication process. To provide access, follow these steps:
- Log in to Ranger Admin UI
- Provide hdfs user permission to “all-database, table, column” in hdfs under the Hadoop_SQL section.
Hadoop SQL Policies overview

How to register a CDH Cluster as a Classic Cluster
Before the Replication Manager can use the CDH cluster as a source cluster, it is a mandatory step to register the CDH Cluster as a Classic Cluster under CDP Public Cloud control plane.
The following article covers how to register a CDH Cluster as a Classic Cluster in the CDP control plane.
Replication Manager will be able to list the classic clusters that have HDFS, Hive, YARN and other necessary services that are currently accessible/running.
Thus, if a source Cloudera Manager is managing Cluster 1 and Cluster 2, which are running the necessary services and are currently registered/accessible, either of the clusters can be used as a source.
RM App: Create and Manage Replication Policies
Understanding the data sets to be replicated from the CDH Cluster.
During Hive replication, the following data sets can be replicated from the CDH cluster for the specified databases (and tables).
- Hive database, table metadata along partitions, Hive UDFs and column statistics.
- HDFS files which are used by tables.
- Sentry permissions exported from CDH to Ranger policies on Data Lake.
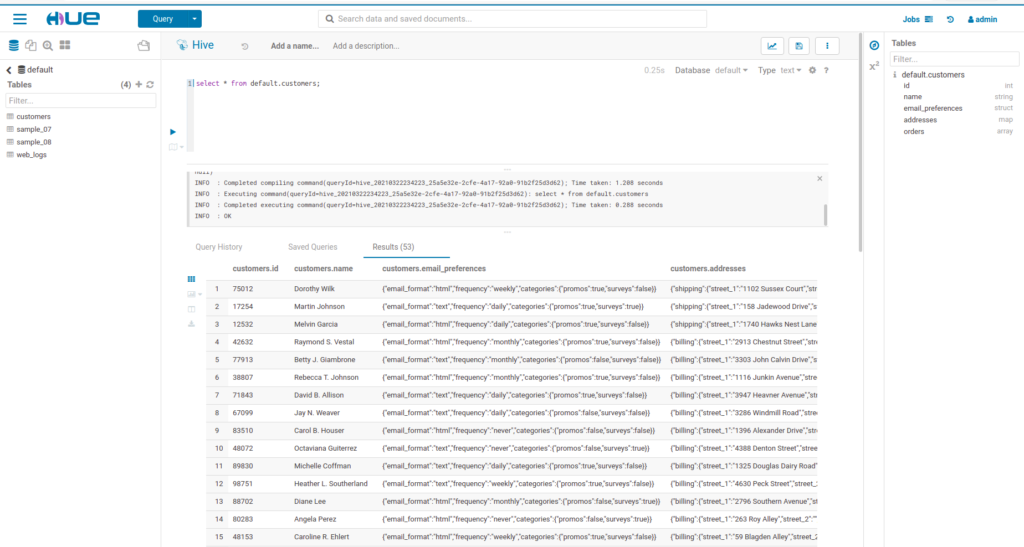
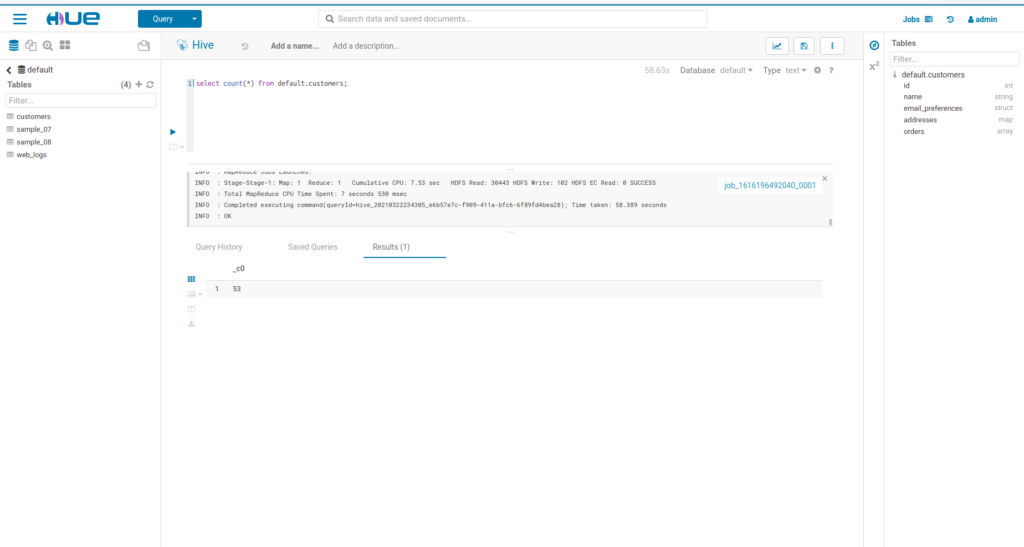
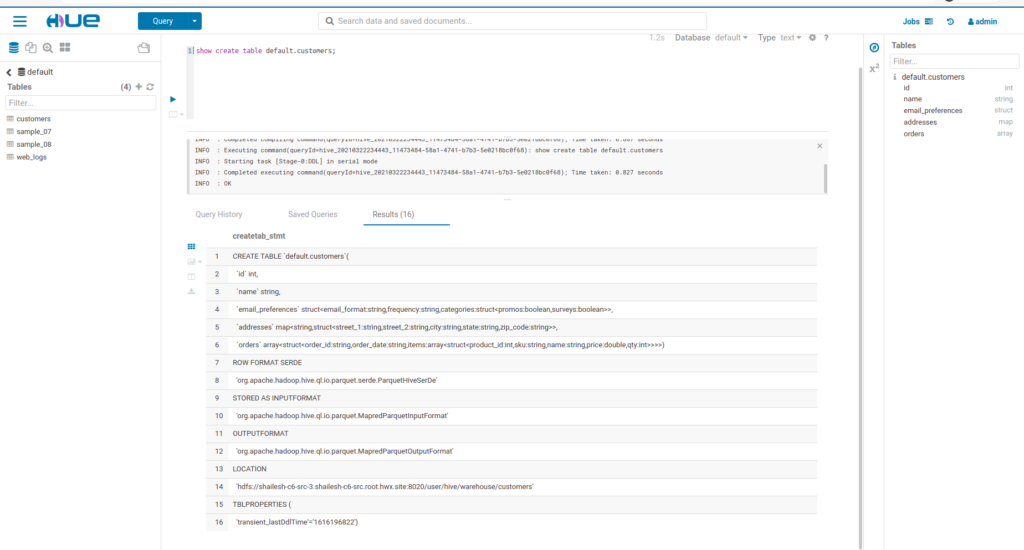
In this blog post, the Hive table, “default:customers” is being replicated from the CDH cluster to the CDP Data Lake cluster.
The various details of this table are as follows:
- The contents of default.customers tables
- The number of rows in default.customers
- The HDFS path of default.customers
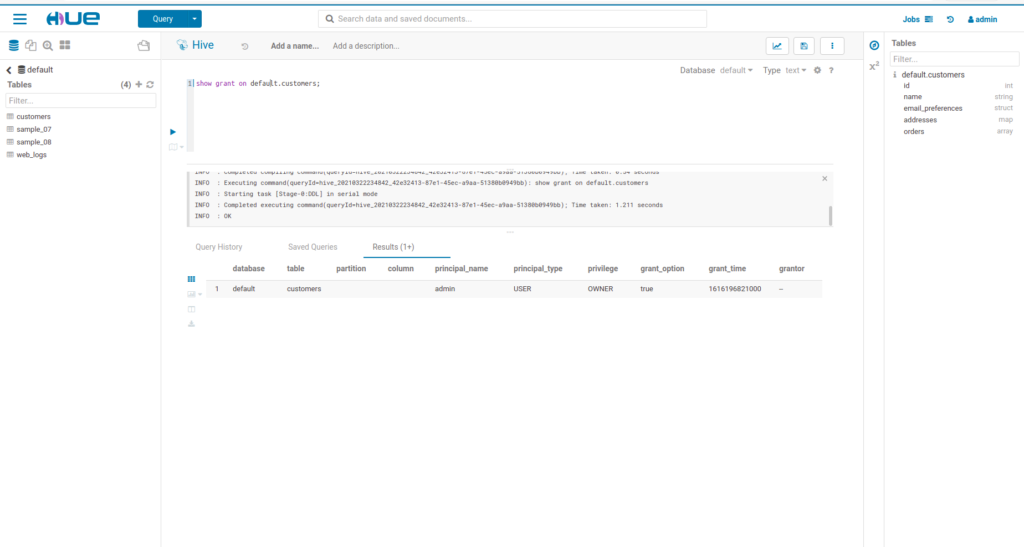
- The Sentry permissions on default.customers
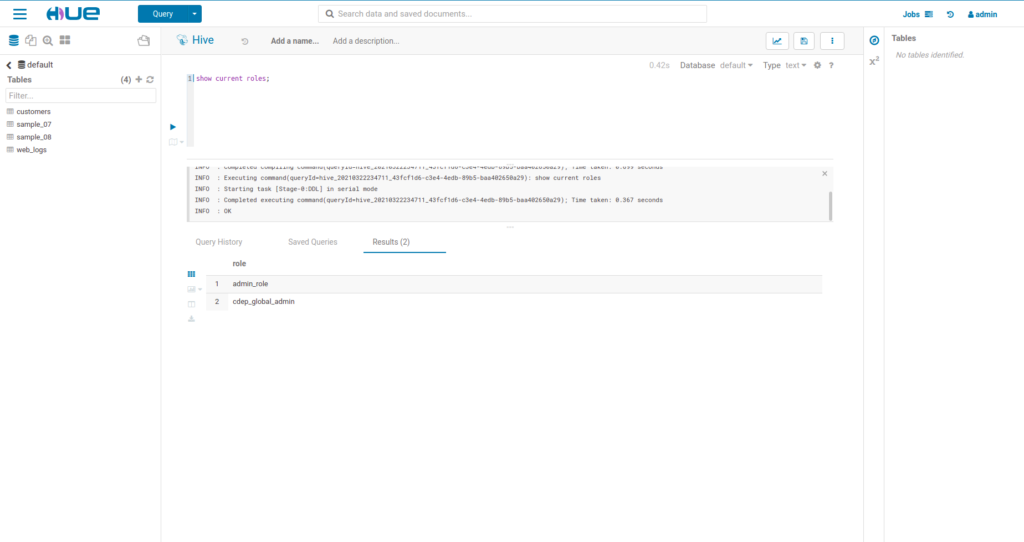
- Sentry Permissions continued
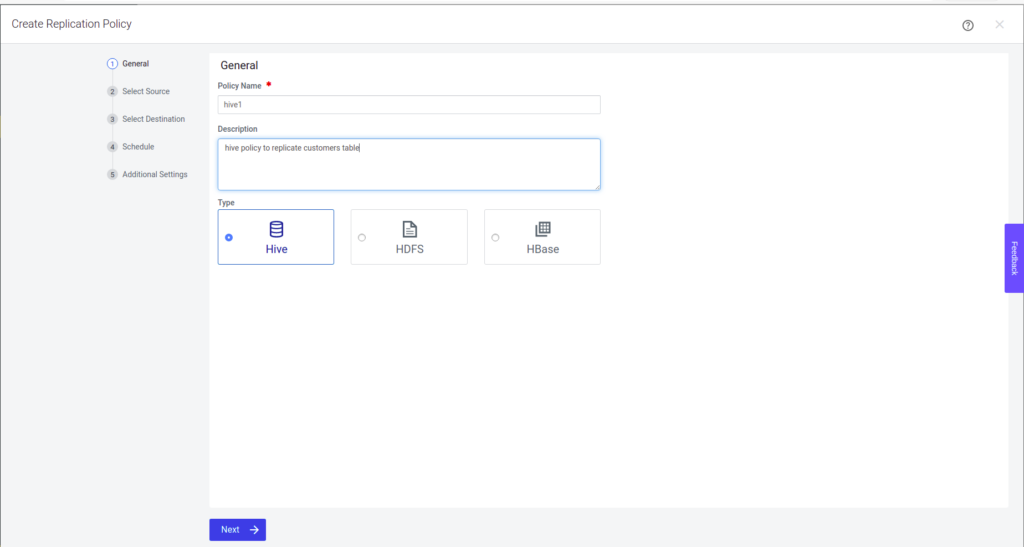
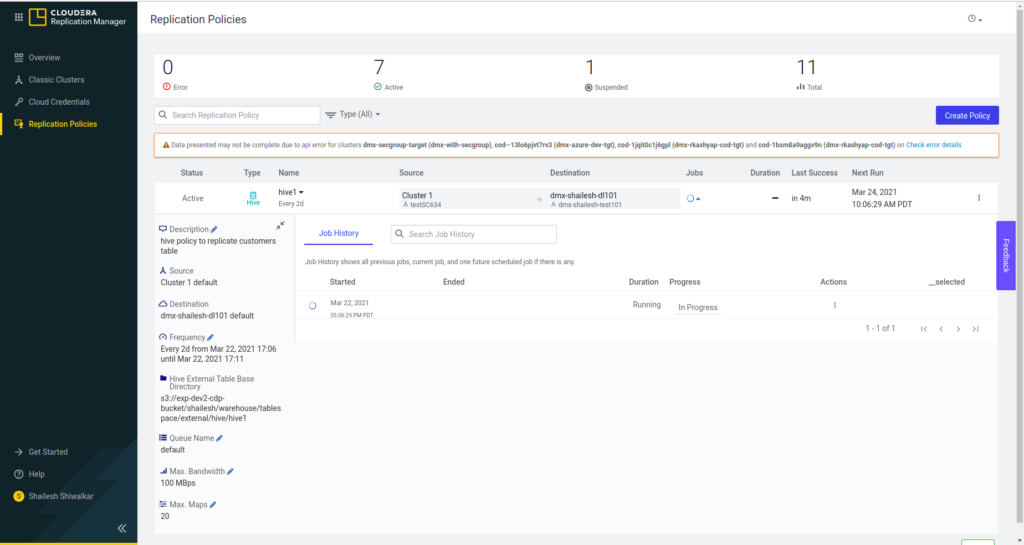
Creating a Hive replication policy
The Replication Manager wizard prompts various steps to create a Hive replication policy.
These steps are outlined as follows.
Step 1: Provide the policy name and description here. Select Hive and click Next.
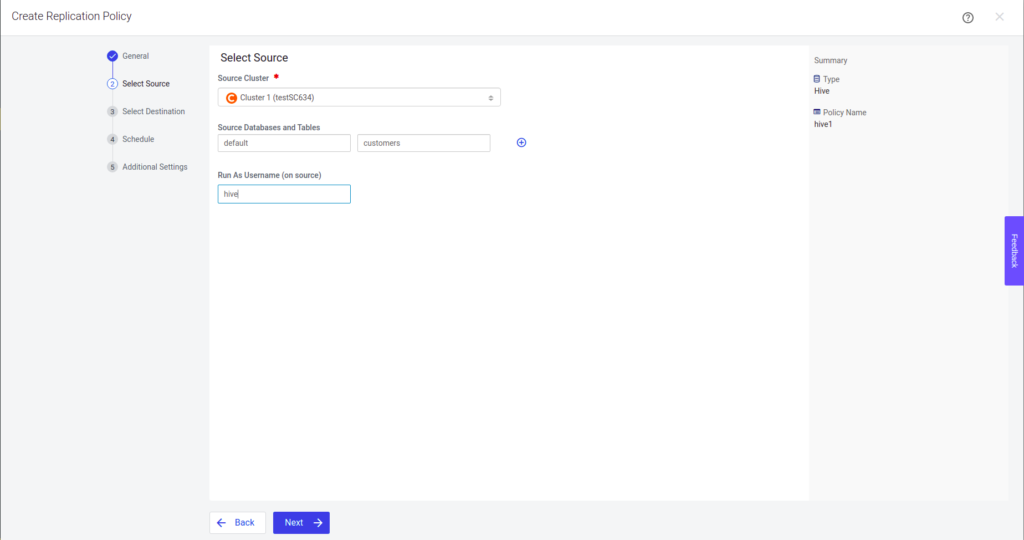
Step 2: Select the registered CDH classic cluster from the drop down list if you have multiple classic clusters and click Next.
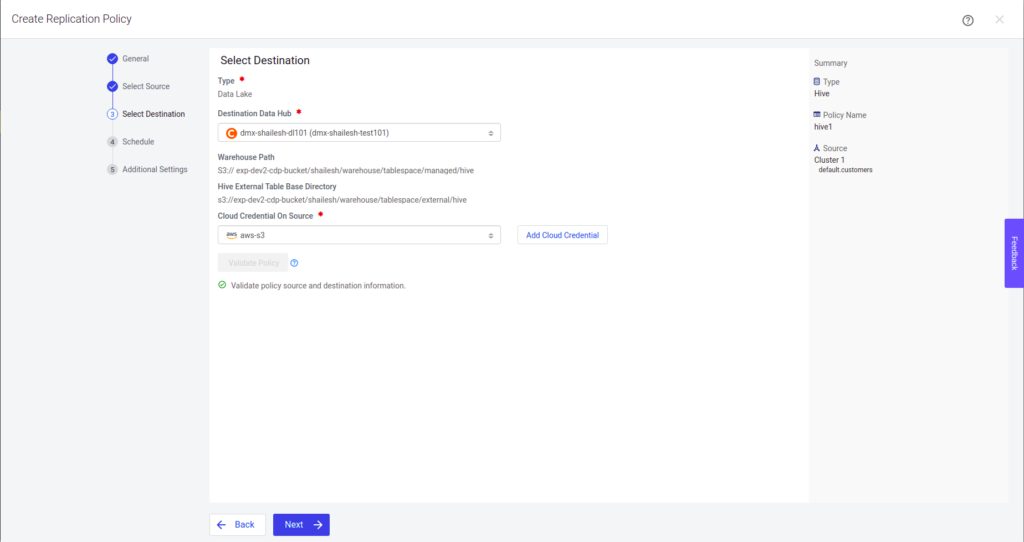
Step 3: Select the Destination Data Lake Cluster and provide the name of the Cloud Credential (present as External Account on the CDH cluster or create a new Cloud Credential on the selected source cluster). Click Next.
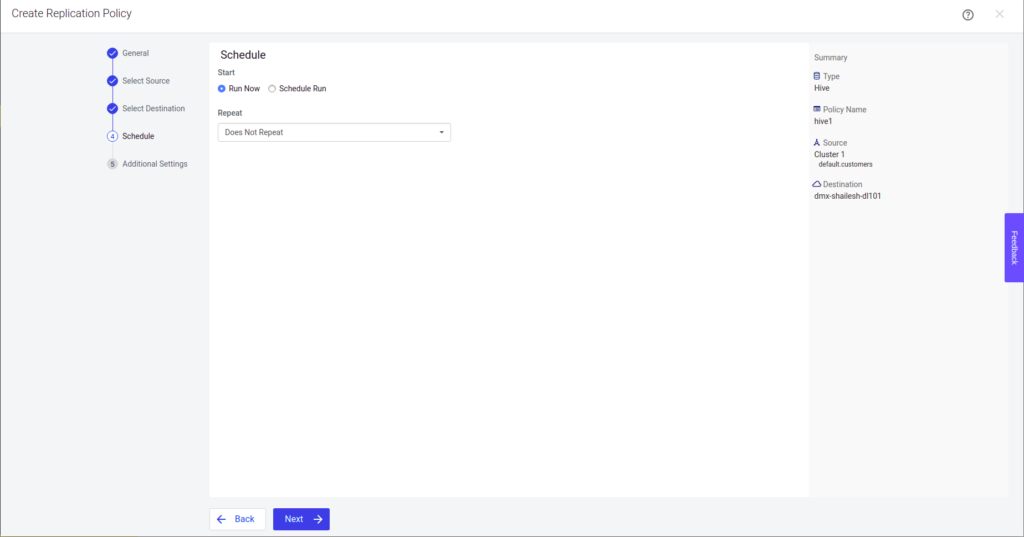
Step 4: Determine the schedule frequency for the policy to execute, and then click Next.
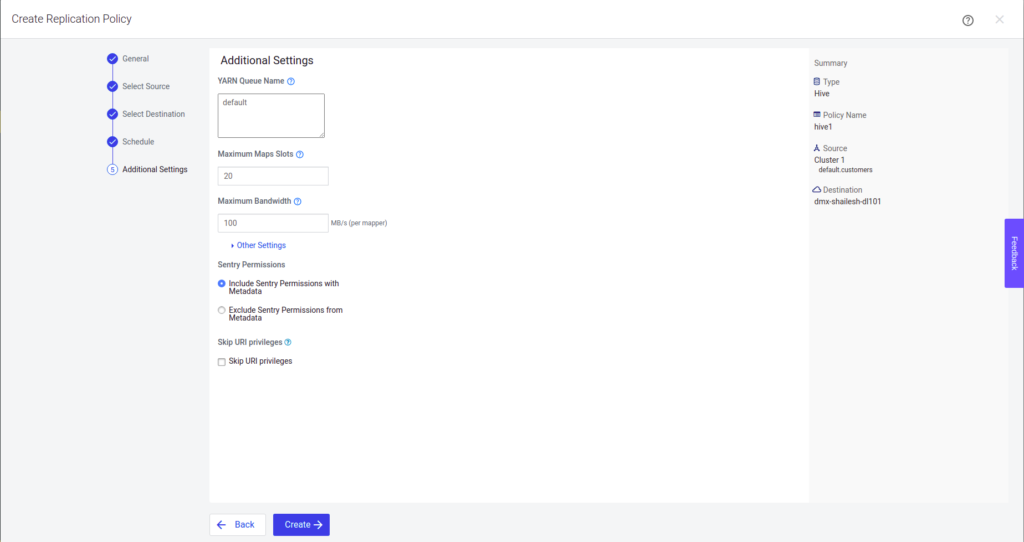
Step 5: Provide details about the Export task which is executed on the source cluster and click Create.
The replication policy is now created and the admin can now check its status.
How to Monitor a Replication Policy Run: Behind the scenes, on the Data Lake Cluster
Visit this community article for step-by-step details.
How to Monitor a Replication Policy Run: Behind the scenes, on a CDH Cluster
Visit this community article for step-by-step details.
Verifying the Replication on CDP
Once the Hive replication policy has successfully executed, the admin can perform the following validations to ensure that replication was indeed successful:
- HDFS data replication – The admin can enumerate the cloud storage path (S3 bucket path) to verify whether the data was successfully copied in the specified bucket.
- Hive metadata replication – The admin can verify whether the specified source database, along with tables, partitions, UDFs and column stats are indeed present in the Data Lake HMS instance. For this, the admin can use a Data Hub cluster and run the corresponding queries either via Hue or beeline.
- Ranger policies – Finally, the admin can query the Ranger policies to ensure that the Sentry policies are properly mapped as Ranger policies for the right users and groups.
Troubleshooting
The replication manager has a comprehensive troubleshooting guide. This blog post is not a substitute for that. However it lists the most common errors faced by the administrators while using Replication Manager.
- Connectivity between CDP Data Lake Cluster and on-prem CDH cluster.
As part of pre-requisites it is mentioned that Replication Manager requires connectivity from CDP Data Lake CM to on-prem CDH CM. Under “Configure the required ports to enable connectivity” the linked document mentions the various ports which should be accessible between on-prem and CDP network.Once connectivity is established between on-prem and CDP network, Hive replication works successfully. - Ranger permissions / groups on the Data Lake.
Another common error faced by administrators while running Hive replication is when the policy fails during Sentry to Ranger import.As another prerequisite, administrators need to pre create all the Sentry Groups in the Ranger before running a Hive replication policy.In absence of a Ranger group, the sentry to ranger import fails with the error complaining about the missing Group in Ranger.Once admin has pre-created all the required Groups in Ranger, the Sentry to Ranger imports completes successfully.
- Cloud Credentials with limited / no permissions to data lake storage.
During data replication to the cloud storage, if the Cloud Credentials specified in the replication policy doesn’t have sufficient permissions to write (and to perform mkdir / create dirs), the data replication fails with the error where it will mention that HDFS replication from source CDH to s3 bucket wasn’t successful.Once an administrator provides a policy with proper Cloud Credentials, the HDFS data replication step completes successfully.
Conclusion
The key purpose of this blog post is to explain a detailed step by step workflow which is involved in performing Hive replication between a CDH cluster and CDP data lake cluster.
Each cluster configuration has subtle differences and hence the steps should help administrators manage those differences in order to successfully create a Hive replication policy using Replication Manager.
If you seek further clarification while running a Hive replication policy, please provide your feedback in the comments or on Cloudera Community and we will make sure to address it in the next revision.